microcom -d 1200 -s 115200 /dev/ttyUSB3
: 設定 character timeout 是 1200ms,baudrate 是 115200,對 /dev/ttyUSB3 動作。package 有問題,ref: http://r40eubuntu.blogspot.tw/2013/10/uart-terminal-with-log-microcom.html
microcom -d 1200 -s 115200 /dev/ttyUSB3
: 設定 character timeout 是 1200ms,baudrate 是 115200,對 /dev/ttyUSB3 動作。system/core/include/private/android_filesystem_config.h
實際reference ,使用的是:
system/core/cpio/mkbootfs.cidVendor=12d1, idProduct=140c
但是和網路上 140C 的 Huawei dongle 不一樣的是,這個(fake) E180 是同時有 3G modem, CD ROM + card reader 三種 device profile 同時啟動。10.64.64.64
route :
Destination     Gateway         Genmask         Flags Metric Ref    Use Iface
10.64.64.64     0.0.0.0         255.255.255.255 UH    0      0        0 ppp0
169.254.0.0     0.0.0.0         255.255.0.0     U     1000   0        0 ppp0
0.0.0.0         10.64.64.64     0.0.0.0         UG    0      0        0 ppp0
^BOOT:32614906,0,0,0,20
^SRVST:1
^MODE:5,4
^STIN:0,0,0
^RSSI:13
^RSSI:13
..
依照 這一篇(http://forum.huawei.com/jive4/thread.jspa?threadID=328818) 的說法,下
AT^CURC=0
就可以停止這些 unsolicied response.[ 3322.275837] usb 2-1.1.4.3: new high speed USB device using ehci_hcd and address 7
[ 3322.385272] usb 2-1.1.4.3: New USB device found, idVendor=0fce, idProduct=014f
[ 3322.385277] usb 2-1.1.4.3: New USB device strings: Mfr=1, Product=2, SerialNumber=3
[ 3322.385280] usb 2-1.1.4.3: Product: SEMC HSUSB Device
[ 3322.385282] usb 2-1.1.4.3: Manufacturer: SEMC
[ 3322.385285] usb 2-1.1.4.3: SerialNumber: XXXXXXXXXXXX
[ 3322.385429] usb 2-1.1.4.3: configuration #1 chosen from 1 choice
[ 3360.185459] usb 2-1.1.4.3: USB disconnect, address 7
[ 3360.404499] usb 2-1.1.4.3: new high speed USB device using ehci_hcd and address 8
[ 3360.513935] usb 2-1.1.4.3: New USB device found, idVendor=0fce, idProduct=714f
[ 3360.513939] usb 2-1.1.4.3: New USB device strings: Mfr=1, Product=2, SerialNumber=3
[ 3360.513942] usb 2-1.1.4.3: Product: SEMC HSUSB Device
[ 3360.513945] usb 2-1.1.4.3: Manufacturer: SEMC
[ 3360.513947] usb 2-1.1.4.3: SerialNumber: XXXXXXXXXXXX
[ 3360.514069] usb 2-1.1.4.3: configuration #1 chosen from 1 choice
[ 3360.582488] usbcore: registered new interface driver cdc_ether
[ 3360.587738] usb0: register 'rndis_host' at usb-0000:00:1d.0-1.1.4.3, RNDIS device, XX:XX:XX:XX:XX:XX
[ 3360.587786] usbcore: registered new interface driver rndis_host
[ 3371.666534] usb0: no IPv6 routers present
所以host 要 support,要 enable cdc_ether ,還有 rndis_host。obj-$(CONFIG_USB_NET_CDCETHER) += cdc_ether.o
obj-$(CONFIG_USB_NET_RNDIS_HOST) += rndis_host.o
config USB_NET_CDCETHER
        tristate "CDC Ethernet support (smart devices such as cable modems)"
        depends on USB_USBNET
        default y
config USB_USBNET
        tristate "Multi-purpose USB Networking Framework"
        select MII
還有,這些是屬於...
menu "USB Network Adapters"
        depends on USB && NET
$sudo route -n

Destination     Gateway         Genmask         Flags Metric Ref    Use Iface
192.168.43.0    0.0.0.0         255.255.255.0   U     2      0        0 wlan0
169.254.0.0     0.0.0.0         255.255.0.0     U     1000   0        0 wlan0
0.0.0.0         192.168.43.1    0.0.0.0         UG    0      0        0 wlan0
公司內部又分很多 sub network,我的ethernet 好像是在 192.168.144.0 網段,$sudo route add -net 192.168.144.netmask 255.255.255. dev eth0
然後加上要 access 的 server:
$sudo route add -host 191.168.147.233 gw 192.168.144.254 dev eth0
因為公司有分很多 sub net, 144 網段的 gateway 是 254。sudo route add -host 192.168.147.15 gw 192.168.144.254 dev eth0sudo route add -net 192.168.147.0 netmask 255.255.255.0 gw 192.168.144.254 dev eth004:00.0 Network controller: Broadcom Corporation BCM4313 802.11b/g/n Wireless LAN Controller (rev 01)
或是用 lshw --class network 看
  *-network
       description: Wireless interface
       product: BCM4313 802.11b/g/n Wireless LAN Controller
       vendor: Broadcom Corporation
       physical id: 0
       bus info: pci@0000:04:00.0
       logical name: wlan0
       version: 01
       serial: 5c:ac:4c:98:d7:59
       width: 64 bits
       clock: 33MHz
       capabilities: pm msi pciexpress bus_master cap_list ethernet physical wireless
       configuration: broadcast=yes driver=brcm80211 ip=192.168.43.230 latency=0 multicast=yes wireless=IEEE 802.11bgn
       resources: irq:17 memory:f0300000-f0303fff
知道是 BCM4313import android.app.ActivityManagerNative;
import android.util.Log;
try {
ActivityManagerNative.getDefault().setAlwaysFinish(true);
} catch (RemoteException ex) {
Log.d(TAG,"setAlwaysFinish failed!!");
}
結果可以用 adk 的 hierarchyviewer 來看。#sqilt3 /data/data/com.android.providers.settings/database/settings.db
顯示 所有內容:
sqilte>select * from system;

1|volume_music|12
2|volume_ring|5
3|volume_system|7
4|volume_voice|4
5|volume_alarm|6
6|volume_notification|5
7|volume_bluetooth_sco|7
8|mode_ringer|2
9|vibrate_on|4
10|mode_ringer_streams_affected|166
11|mute_streams_affected|46
12|dim_screen|1
13|stay_on_while_plugged_in|0
14|screen_off_timeout|-1
15|emergency_tone|0
16|xec_dls_control|0
17|call_auto_retry|0
18|dtmf_tone_type|0
19|hearing_aid|0
20|tty_mode|0
21|airplane_mode_on|0
22|airplane_mode_radios|cell,bluetooth,wifi
23|airplane_mode_toggleable_radios|bluetooth,wifi
24|auto_time|1
25|screen_brightness|255
26|screen_brightness_mode|0
27|window_animation_scale|1.0
28|transition_animation_scale|1.0
29|accelerometer_rotation|1
30|haptic_feedback_enabled|1
31|notification_light_pulse|1
32|set_install_location|0
33|default_install_location|0
34|power_sounds_enabled|1
35|low_battery_sound|/system/media/audio/ui/LowBattery.ogg
36|dock_sounds_enabled|0
37|desk_dock_sound|/system/media/audio/ui/Dock.ogg
38|desk_undock_sound|/system/media/audio/ui/Undock.ogg
39|car_dock_sound|/system/media/audio/ui/Dock.ogg
40|car_undock_sound|/system/media/audio/ui/Undock.ogg
41|lockscreen_sounds_enabled|0
42|lock_sound|/system/media/audio/ui/Lock.ogg
43|unlock_sound|/system/media/audio/ui/Unlock.ogg
44|vibrate_in_silent|1
45|notifications_use_ring_volume|1
46|next_alarm_formatted|
47|alarm_alert|content://media/internal/audio/media/1
48|notification_sound|content://media/internal/audio/media/2
49|ringtone|content://media/internal/audio/media/3
50|pointer_location|0
52|ServiceIntentActionToResumeSD|
69|MediaPlaybackPath|content://media/external/audio/media/131076
70|always_finish_activities|1
sqlite>
default 沒有 show 欄位名稱,可以用:
sqlite>.header on
打開,然後再顯示一次..
sqlite> select * from system;
_id         name          value
----------  ------------  ----------
1           volume_music  12
2           volume_ring   5
3           volume_syste  7
4           volume_voice  4
5           volume_alarm  6
6           volume_notif  5
7           volume_bluet  7
8           mode_ringer   2
...
hierarchyviewer
是 GUI 介面,會自動 update。import android.app.Activity;
import android.os.Bundle;
import android.util.Log;
import android.widget.Button;
import android.widget.LinearLayout;
import android.view.View;
public class testAndroidActivity extends Activity implements View.OnClickListener
{
final String TAG = "testAndroid";
LinearLayout layout;
Button btn;
int clickcnt = 0;
/** Called when the activity is first created. */
@Override
public void onCreate(Bundle savedInstanceState)
{
super.onCreate(savedInstanceState);
layout = new LinearLayout(this);
layout.setOrientation(LinearLayout.VERTICAL);
btn = new Button(this);
btn.setText(Integer.toString(clickcnt));
btn.setOnClickListener(this);
layout.addView(btn,150,100);
setContentView(layout);
Log.v(TAG,"onCreate");
}
public void onClick(View v) {
Log.v(TAG, "onClick");
clickcnt++;
btn.setText(Integer.toString(clickcnt));
}
結果..import android.app.Activity;
import android.os.Bundle;
import android.util.Log;
import android.widget.Button;
import android.widget.LinearLayout;
import android.view.View;
public class testAndroidActivity extends Activity implements View.OnClickListener
{
final String TAG = "testAndroid";
LinearLayout layout;
Button btn;
public void onCreate(Bundle savedInstanceState)
{
super.onCreate(savedInstanceState);
layout = new LinearLayout(this);
layout.setOrientation(LinearLayout.VERTICAL);
btn = new Button(this);
btn.setText("Button");
btn.setOnClickListener(this);
layout.addView(btn,150,50);
setContentView(layout);
}
public void onClick(View v) {
Log.v(TAG, "onClick");
}
..
android create project \
--target 1 \
--name MyAndroidApp \
--path ./MyAndroidAppProject \
--activity MyAndroidAppActivity \
--package com.example.myandroid
target 的內容可以用 command:
android list targets
----------
id: 1 or "android-3"
     Name: Android 1.5
     Type: Platform
     API level: 3
     Revision: 4
     Skins: HVGA-L, QVGA-L, HVGA-P, QVGA-P, HVGA (default)
     ABIs : armeabi
----------
id: 2 or "Google Inc.:Google APIs:3"
     Name: Google APIs
     Type: Add-On
     Vendor: Google Inc.
     Revision: 3
     Description: Android + Google APIs
     Based on Android 1.5 (API level 3)
     Libraries:
      * com.google.android.maps (maps.jar)
          API for Google Maps
     Skins: QVGA-P, HVGA (default), HVGA-L, QVGA-L, HVGA-P
     ABIs : armeabi
----------
id: 3 or "android-4"
     Name: Android 1.6
     Type: Platform
     API level: 4
     Revision: 3
     Skins: WVGA800 (default), QVGA, HVGA, WVGA854
     ABIs : armeabi
path 選項,如果 path 不存在,就會幫你create。Android make apk error:This attribute must be localized.
參考這一篇:http://jjnnykimo.pixnet.net/blog/post/31996155-android-make-apk-error%3Athis-attribute-must-be-localized.有加 _init,會不會後來又再 run 一次?code:
        struct tag *tags = (struct tag *)&init_tags;
        struct machine_desc *mdesc;
        char *from = default_command_line;

        mdesc = setup_machine(machine_arch_type);
        machine_name = mdesc->name;

        if (mdesc->soft_reboot)
                reboot_setup("s");

        if (__atags_pointer)
                tags = phys_to_virt(__atags_pointer);
        else if (mdesc->boot_params)
                tags = phys_to_virt(mdesc->boot_params);
        else
                init_tags.mem.start = PHYS_OFFSET;
__atags_pointer 是 uboot 傳遞參數的位址,boot_params 也是。/arch/arm/plat-mxc/include/mach/memory.h:17:#define MX1_PHYS_OFFSET UL(0x08000000)
./arch/arm/plat-mxc/include/mach/memory.h:18:#define MX21_PHYS_OFFSET UL(0xc0000000)
./arch/arm/plat-mxc/include/mach/memory.h:19:#define MX25_PHYS_OFFSET UL(0x80000000)
./arch/arm/plat-mxc/include/mach/memory.h:20:#define MX27_PHYS_OFFSET UL(0xa0000000)
./arch/arm/plat-mxc/include/mach/memory.h:21:#define MX3x_PHYS_OFFSET UL(0x80000000)
./arch/arm/plat-mxc/include/mach/memory.h:22:#define MX37_PHYS_OFFSET UL(0x40000000)
./arch/arm/plat-mxc/include/mach/memory.h:23:#define MX50_PHYS_OFFSET UL(0x70000000)
./arch/arm/plat-mxc/include/mach/memory.h:24:#define MX51_PHYS_OFFSET UL(0x90000000)
./arch/arm/plat-mxc/include/mach/memory.h:25:#define MX53_PHYS_OFFSET UL(0x70000000)
./arch/arm/plat-mxc/include/mach/memory.h:26:#define MXC91231_PHYS_OFFSET UL(0x90000000)
所以是 MX51 是 0x90000000 void start_property_service(void)
{
int fd;
load_properties_from_file(PROP_PATH_SYSTEM_BUILD);
load_properties_from_file(PROP_PATH_SYSTEM_DEFAULT);
load_properties_from_file(PROP_PATH_LOCAL_OVERRIDE);
/* Read persistent properties after all default values have been loaded. */
load_persistent_properties();
fd = create_socket(PROP_SERVICE_NAME, SOCK_STREAM, 0666, 0, 0);
if(fd < 0) return;
fcntl(fd, F_SETFD, FD_CLOEXEC);
fcntl(fd, F_SETFL, O_NONBLOCK);
listen(fd, 8);
property_set_fd = fd;
}
core/init 這個 process 最後,好像就是在做 property_service.. main() 的最後:
  for(;;) {
    ...
    ...

        nr = poll(ufds, fd_count, timeout);
        if (nr <= 0)
            continue;

        for (i = 0; i < fd_count; i++) {
            if (ufds[i].revents == POLLIN) {
                if (ufds[i].fd == get_property_set_fd())
                    handle_property_set_fd();
                else if (ufds[i].fd == get_keychord_fd())
                    handle_keychord();
                else if (ufds[i].fd == get_signal_fd())
                    handle_signal();
            }
        }
  }
ufds 就是剛剛 create_socket(PROP_SERVICE_NAME...) 的 fd#define PERSISTENT_PROPERTY_DIR "/data/property"
./system/core/adb/adb_client.c:251: printf("adb server is out of date. killing...\n");
是 compare version:
int adb_connect(const char *service)
{
    // first query the adb server's version
    int fd = _adb_connect("host:version");
    ....

        char buf[100];
        int n;
        int version = ADB_SERVER_VERSION - 1;

        // if we have a file descriptor, then parse version result
            if(readx(fd, buf, 4)) goto error;

            buf[4] = 0;
            n = strtoul(buf, 0, 16);
            if(readx(fd, buf, n)) goto error;
            adb_close(fd);

            if (sscanf(buf, "%04x", &version) != 1) goto error;
        } else {
        ........
        }
        ....
        if(version != ADB_SERVER_VERSION) {
            printf("adb server is out of date.  killing...\n");
就是去詢問 host adb server 的版本,然後和自己比較。/* config.h. Generated from config.h.in by configure. */
/* config.h.in. Generated from configure.ac by autoheader. */
/* Default visibility */
#define API_EXPORTED __attribute__((visibility("default")))
/* Debug message logging */
/* #undef ENABLE_DEBUG_LOGGING */
/* Message logging */
#define ENABLE_LOGGING 1
/* Define to 1 if you have the header file. */
#define HAVE_DLFCN_H 1
/* Define to 1 if you have the header file. */
#define HAVE_INTTYPES_H 1
/* Define to 1 if you have the `rt' library (-lrt). */
#define HAVE_LIBRT 1
/* Define to 1 if you have the header file. */
#define HAVE_MEMORY_H 1
/* Define to 1 if you have the header file. */
#define HAVE_STDINT_H 1
/* Define to 1 if you have the header file. */
#define HAVE_STDLIB_H 1
/* Define to 1 if you have the header file. */
#define HAVE_STRINGS_H 1
/* Define to 1 if you have the header file. */
#define HAVE_STRING_H 1
/* Define to 1 if you have the header file. */
#define HAVE_SYS_STAT_H 1
/* Define to 1 if you have the header file. */
#define HAVE_SYS_TYPES_H 1
/* Define to 1 if you have the header file. */
#define HAVE_UNISTD_H 1
/* Define to the sub-directory in which libtool stores uninstalled libraries.
*/
#define LT_OBJDIR ".libs/"
/* Define to 1 if your C compiler doesn't accept -c and -o together. */
/* #undef NO_MINUS_C_MINUS_O */
/* Darwin backend */
/* #undef OS_DARWIN */
/* Linux backend */
#define OS_LINUX /**/
/* Name of package */
#define PACKAGE "libusb"
/* Define to the address where bug reports for this package should be sent. */
#define PACKAGE_BUGREPORT ""
/* Define to the full name of this package. */
#define PACKAGE_NAME "libusb"
/* Define to the full name and version of this package. */
#define PACKAGE_STRING "libusb 1.0.8"
/* Define to the one symbol short name of this package. */
#define PACKAGE_TARNAME "libusb"
/* Define to the home page for this package. */
#define PACKAGE_URL ""
/* Define to the version of this package. */
#define PACKAGE_VERSION "1.0.8"
/* Define to 1 if you have the ANSI C header files. */
#define STDC_HEADERS 1
/* Backend handles timeout */
/* #undef USBI_OS_HANDLES_TIMEOUT */
/* timerfd headers available */
/* #undef USBI_TIMERFD_AVAILABLE */
/* Version number of package */
#define VERSION "1.0.8"
/* Use GNU extensions */
#define _GNU_SOURCE /**/
/* Define to `__inline__' or `__inline' if that's what the C compiler
calls it, or to nothing if 'inline' is not supported under any name. */
#ifndef __cplusplus
/* #undef inline */
#endif
LOCAL_PATH := $(call my-dir)
subdirs := $(addprefix $(LOCAL_PATH)/,$(addsuffix /Android.mk, \
                libusb \
                examples \
                ))
include $(subdirs)
LOCAL_PATH:= $(call my-dir)
include $(CLEAR_VARS)

LOCAL_MODULE_TAGS:= tests
LOCAL_PRELINK_MODULE:= false

LOCAL_SRC_FILES:= \
 core.c \
 descriptor.c \
 io.c \
 sync.c \
 os/linux_usbfs.c

LOCAL_C_INCLUDES += \
 external/libusb-1.0.8/ \
 external/libusb-1.0.8/libusb/ \
 external/libusb-1.0.8/libusb/os

LOCAL_MODULE:= libusb
include $(BUILD_SHARED_LIBRARY)
LOCAL_PATH:= $(call my-dir)

include $(CLEAR_VARS)
LOCAL_MODULE_TAGS := tests
LOCAL_SRC_FILES := lsusb.c
LOCAL_MODULE := lsusb
LOCAL_C_INCLUDES += external/libusb-1.0.8/
LOCAL_SHARED_LIBRARIES := libc libusb
include $(BUILD_EXECUTABLE)
#define TIMESPEC_TO_TIMEVAL(tv, ts)                                     \
        do {                                                            \
                (tv)->tv_sec = (ts)->tv_sec;                            \
                (tv)->tv_usec = (ts)->tv_nsec / 1000;                   \
} while (0)bash-3.2# lsusb
1d6b:0002 (bus 1, device 1)
1d6b:0002 (bus 2, device 1)
0424:2517 (bus 2, device 2)
0a12:0001 (bus 2, device 3)
13fe:1d00 (bus 2, device 4)
static const char *find_usbfs_path(void)
{
        const char *path = "/dev/bus/usb";
        const char *ret = NULL;

        if (check_usb_vfs(path)) {
                ret = path;
        } else {
                path = "/proc/bus/usb";
                if (check_usb_vfs(path))
                        ret = path;
        }

        usbi_dbg("found usbfs at %s", ret);
        return ret;
}
用的是 /dev/bus/usb // Shortcuts are invoked through Search+key, so intercept those here
if (mSearchKeyPressed) {
if (down && repeatCount == 0 && !keyguardOn) {
Intent shortcutIntent = mShortcutManager.getIntent(keyCode, metaState);
if (shortcutIntent != null) {
shortcutIntent.addFlags(Intent.FLAG_ACTIVITY_NEW_TASK);
mContext.startActivity(shortcutIntent);
/*
* We launched an app, so the up-event of the search key
* should be consumed
*/
mConsumeSearchKeyUp = true;
return true;
}
}
}
一樣用 startActivity( ) 叫起 app (intent),那個 對應哪個 key,都在ShorcutManager 的 database (bookmark) 中紀錄。src/com/android/settings/ApplicationSettings.java if (getResources().getConfiguration().keyboard == Configuration.KEYBOARD_NOKEYS) {
// No hard keyboard, remove the setting for quick launch
Preference quickLaunchSetting = findPreference(KEY_QUICK_LAUNCH);
getPreferenceScreen().removePreference(quickLaunchSetting);
}
launchHomeFromHotKey();
            try {
                ActivityManagerNative.getDefault().stopAppSwitches();
            } catch (RemoteException e) {
            }
            sendCloseSystemWindows(SYSTEM_DIALOG_REASON_HOME_KEY);
            startDockOrHome();
ActivityManagerNative.getDefault().closeSystemDialogs(reason);
就是把 windws map 叫出來,一個一個 send message:
        Message msg = Message.obtain();
        msg.what = CLOSE_SYSTEM_DIALOGS;
        msg.obj = reason;
        sendMessage(msg);
        mHomeIntent =  new Intent(Intent.ACTION_MAIN, null);
        mHomeIntent.addCategory(Intent.CATEGORY_HOME);
        mHomeIntent.addFlags(Intent.FLAG_ACTIVITY_NEW_TASK
                | Intent.FLAG_ACTIVITY_RESET_TASK_IF_NEEDED);
        ........
        startActivity(mHomeIntent)
  LOCAL_PATH := $(call my-dir)
  include $(CLEAR_VARS)

  # Build all java files in the java subdirectory
  LOCAL_SRC_FILES := $(call all-subdir-java-files)

  # Name of the APK to build
  LOCAL_PACKAGE_NAME := LocalPackage

  # Tell it to build an APK
  include $(BUILD_PACKAGE)
把這個 Android.mk 放在 app 的 folder 中就可以。
            File path = Environment.getExternalStoragePublicDirectory(
                    Environment.DIRECTORY_PICTURES);
            File file = new File(path, "DemoPicture.jpg");
            .....
            .....
            // Tell the media scanner about the new file so that it is
            // immediately available to the user.
            MediaScannerConnection.scanFile(this,
                    new String[] { file.toString() }, null,
                    new MediaScannerConnection.OnScanCompletedListener() {
                public void onScanCompleted(String path, Uri uri) {
                    Log.i("ExternalStorage", "Scanned " + path + ":");
                    Log.i("ExternalStorage", "-> uri=" + uri);
                }
            });
    public void forceStopPackage(String packageName) {
        try {
            ActivityManagerNative.getDefault().forceStopPackage(packageName);
        } catch (RemoteException e) {
        }
    }
    public void forceStopPackage(String packageName) throws RemoteException {
        Parcel data = Parcel.obtain();
        Parcel reply = Parcel.obtain();
        data.writeInterfaceToken(IActivityManager.descriptor);
        data.writeString(packageName);
        mRemote.transact(FORCE_STOP_PACKAGE_TRANSACTION, data, reply, 0);
        reply.readException();
        data.recycle();
        reply.recycle();
    }
        case FORCE_STOP_PACKAGE_TRANSACTION: {
            data.enforceInterface(IActivityManager.descriptor);
            String packageName = data.readString();
            forceStopPackage(packageName);
            reply.writeNoException();
            return true;
        }
            IPackageManager pm = AppGlobals.getPackageManager();
            int pkgUid = pm.getPackageUid(packageName);
            forceStopPackageLocked(packageName, pkgUid);
    private void forceStopPackageLocked(final String packageName, int uid) {
        forceStopPackageLocked(packageName, uid, false, false, true);
        Intent intent = new Intent(Intent.ACTION_PACKAGE_RESTARTED,
                Uri.fromParts("package", packageName, null));
        if (!mProcessesReady) {
            intent.addFlags(Intent.FLAG_RECEIVER_REGISTERED_ONLY);
        }
        intent.putExtra(Intent.EXTRA_UID, uid);
        broadcastIntentLocked(null, null, intent,
                null, null, 0, null, null, null,
                false, false, MY_PID, Process.SYSTEM_UID);
    }
就是call forceStopPackageLocked( ) 結束他,然後再 broadcast ACTION_PACKAGE_RESTARTED.. (叫他再起來?) Iterator<SparseArray<Long>> badApps = mProcessCrashTimes.getMap().values().iterator();
while (badApps.hasNext()) {
SparseArray ba = badApps.next();
if (ba.get(uid) != null) {
badApps.remove();
}
}
把 mProcessCrashTime (上次system crash 時的 proces map) 中,同 uid 的 process data 從 record map 中移除。 boolean didSomething = killPackageProcessesLocked(name, uid, -100,
callerWillRestart, doit);
然後 killPackageProcessLocked( ). for (i=mMainStack.mHistory.size()-1; i>=0; i--) {
ActivityRecord r = (ActivityRecord)mMainStack.mHistory.get(i);
if (r.packageName.equals(name)) {
if (!doit) {
return true;
}
didSomething = true;
Slog.i(TAG, " Force finishing activity " + r);
if (r.app != null) {
r.app.removed = true;
}
r.app = null;
r.stack.finishActivityLocked(r, i, Activity.RESULT_CANCELED, null, "uninstall");
}
}
然後再從 目前系統 activiry stack (所有執行過的 activity) 中,找出符合name 的package,作 RESULT_CANCELED 的 finishActivityLocked( )。 public boolean interceptKeyBeforeDispatching(WindowState win, int action, int flags,
int keyCode, int scanCode, int metaState, int repeatCount, int policyFlags) {
可以看到這個 function 根據狀況決定HOME key 要不要處理。 sendCloseSystemWindows();
// Broadcast an intent that the Camera button was longpressed
Intent intent = new Intent(Intent.ACTION_CAMERA_BUTTON, null);
intent.putExtra(Intent.EXTRA_KEY_EVENT, event);
getContext().sendOrderedBroadcast(intent, null);
.. close current window & launch CAMERA app /system/extras/tests/bionic/libc cd system/extras/tests/bionic/libc
mm BIONIC_TESTS=1
CONFIG_DYNAMIC_DEBUG=y#mkdir /mnt/debugfs
#mount -t debugfs none /mnt/debugfs...
drivers/i2c/busses/mxc_i2c_hs.c:154 [mxc_i2c_hs]mxci2c_hs_bus_busy - "%s: Bus Busy!\012"
drivers/media/video/mxc/capture/mxc_v4l2_capture.c:264 [mxc_v4l2_capture]mxc_free_frames - "In MVC:mxc_free_frames\012"
drivers/media/video/mxc/capture/mxc_v4l2_capture.c:413 [mxc_v4l2_capture]mxc_streamoff - "In MVC:mxc_streamoff\012"
drivers/media/video/mxc/capture/mxc_v4l2_capture.c:2825 [mxc_v4l2_capture]camera_init - "In MVC:camera_init\012"
drivers/media/video/mxc/capture/mxc_v4l2_capture.c:574 [mxc_v4l2_capture]start_preview - "MVC: start_preview\012"
drivers/media/video/mxc/capture/mxc_v4l2_capture.c:592 [mxc_v4l2_capture]start_preview - "End of %s: v2f pix widthxheight %d x %d\012"
drivers/media/video/mxc/capture/mxc_v4l2_capture.c:595 [mxc_v4l2_capture]start_preview - "End of %s: crop_bounds widthxheight %d x %d\012"
drivers/media/video/mxc/capture/mxc_v4l2_capture.c:598 [mxc_v4l2_capture]start_preview - "End of %s: crop_defrect widthxheight %d x %d\012"
drivers/media/video/mxc/capture/mxc_v4l2_capture.c:601 [mxc_v4l2_capture]start_preview - "End of %s: crop_current widthxheight %d x %d\012"
drivers/media/video/mxc/capture/mxc_v4l2_capture.c:617 [mxc_v4l2_capture]stop_preview - "MVC: stop preview\012"
drivers/media/video/mxc/capture/mxc_v4l2_capture.c:335 [mxc_v4l2_capture]mxc_streamon - "In MVC:mxc_streamon\012"
drivers/media/video/mxc/capture/mxc_v4l2_capture.c:2714 [mxc_v4l2_capture]mxc_v4l2_resume p "In MVC:mxc_v4l2_resume\012"
drivers/media/video/mxc/capture/mxc_v4l2_capture.c:2681 [mxc_v4l2_capture]mxc_v4l2_suspend - "In MVC:mxc_v4l2_suspend\012"
drivers/media/video/mxc/capture/mxc_v4l2_capture.c:2812 [mxc_v4l2_capture]mxc_v4l2_master_detach - "In MVC:mxc_v4l2_master_detach\012"
drivers/media/video/mxc/capture/mxc_v4l2_capture.c:2756 [mxc_v4l2_capture]mxc_v4l2_master_attach - "In MVC: mxc_v4l2_master_attach\012"
drivers/media/video/mxc/capture/mxc_v4l2_capture.c:2757 [mxc_v4l2_capture]mxc_v4l2_master_attach - " slave.name = %s\012"
drivers/media/video/mxc/capture/mxc_v4l2_capture.c:2758 [mxc_v4l2_capture]mxc_v4l2_master_attach - " master.name = %s\012"
..
中間那個 "-" 就代表不印出來, echo 'file mxc_v4l2_capture.c +p' > control
如果不要了,就用:
echo 'file mxc_v4l2_capture.c -p' > control
如果只是要第 617 行的 stop preview 印出來,就用:
echo 'file mxc_v4l2_capture.c line 617 +p' > control
Lost lock (since last read of this register)
bool NetlinkEvent::decode(char *buffer, int size) {
    char *s = buffer;
    char *end;
    int param_idx = 0;
    int i;
    int first = 1;

    end = s + size;
    while (s < end) {
        if (first) {
            char *p;
            for (p = s; *p != '@'; p++);
            p++;
            mPath = strdup(p);
            first = 0;
        } else {
            if (!strncmp(s, "ACTION=", strlen("ACTION="))) {
                char *a = s + strlen("ACTION=");
                if (!strcmp(a, "add"))
                    mAction = NlActionAdd;
                else if (!strcmp(a, "remove"))
                    mAction = NlActionRemove;
                else if (!strcmp(a, "change"))
                    mAction = NlActionChange;
            } else if (!strncmp(s, "SEQNUM=", strlen("SEQNUM=")))
                mSeq = atoi(s + strlen("SEQNUM="));
            else if (!strncmp(s, "SUBSYSTEM=", strlen("SUBSYSTEM=")))
                mSubsystem = strdup(s + strlen("SUBSYSTEM="));
            else
                mParams[param_idx++] = strdup(s);
        }
        s+= strlen(s) + 1;
    }
    return true;
}
可以順便知道kobject, uevent 的 message 內容。UEVENT[1192521009.711215] change@/block/dm-3 ACTION=change DEVPATH=/block/dm-3 SUBSYSTEM=block DM_TARGET=multipath DM_ACTION=PATH_FAILED DM_SEQNUM=1 DM_PATH=8:32 DM_NR_VALID_PATHS=0 DM_NAME=mpath2 DM_UUID=mpath-35333333000002328 MINOR=3 MAJOR=253 SEQNUM=1130
Process process = Runtime.getRuntime().exec(command);
mVm->getBroadcaster()->sendBroadcast();
那幹麼還做出 getBroadcast( ) 這個 function?
mVm->sendBroadcast( );
不就好? /framework/base/include/utils/
-- 奇怪,bionic 也有 implement 一份 stl 呀...為什麼要再作一份?
SocketListener
   |
FrameworkListener
  |
CommandListener
Vold, Netd 各自implement 自己的 CommandListener.
FrameworkCommand
  |
VoldCommand
 |
DumpCmd, VolumeCmd, ShareCmd, AsecCmd, ObbCmd, StorageCmd, XwarpCmd
FrameworkCommand
  |
NetdCommand
 |
UsbCmd, SoftapCmd, InterfaceCmd, IpFwdCmd, TetherCmd, NatCmd, ListTtysCmd, PppdCmd, PanCmd
很有趣的是...這裡,各自 implement VoldCommand, NetCommand,結果內容是完全一樣的....
SocketListener
  |
NetlinkListener
  |
NetlinkHandler
也是一樣,vold, netd 各自 implement 自己的 NetlinkHandler
runListener
  while(1) {
  FD_SET
  select( )
  if( FD_IISSET( ) {
   c = accept( )
  }
  do {
    for( i = clients->begin ~ end) {
      if(FD_ISSET(client(fd)))
              onDataAvailable(i)
就是標準的 FD_SET, select 動作,當有monitor 到 fd 變更,在一一check client 的 fd,把對應的 client 的 onDataAvailable( ) 執行一次
why GNU grep is fast

Mike Haertel mike at ducky.net
Sat Aug 21 03:00:30 UTC 2010
Previous message: Latest intr problems
Next message: why GNU grep is fast
Messages sorted by: [ date ] [ thread ] [ subject ] [ author ]
Hi Gabor,

I am the original author of GNU grep.  I am also a FreeBSD user,
although I live on -stable (and older) and rarely pay attention
to -current.

However, while searching the -current mailing list for an unrelated
reason, I stumbled across some flamage regarding BSD grep vs GNU grep
performance.  You may have noticed that discussion too...

Anyway, just FYI, here's a quick summary of where GNU grep gets
its speed.  Hopefully you can carry these ideas over to BSD grep.

#1 trick: GNU grep is fast because it AVOIDS LOOKING AT
EVERY INPUT BYTE.

#2 trick: GNU grep is fast because it EXECUTES VERY FEW
INSTRUCTIONS FOR EACH BYTE that it *does* look at.

GNU grep uses the well-known Boyer-Moore algorithm, which looks
first for the final letter of the target string, and uses a lookup
table to tell it how far ahead it can skip in the input whenever
it finds a non-matching character.

GNU grep also unrolls the inner loop of Boyer-Moore, and sets up
the Boyer-Moore delta table entries in such a way that it doesn't
need to do the loop exit test at every unrolled step.  The result
of this is that, in the limit, GNU grep averages fewer than 3 x86
instructions executed for each input byte it actually looks at
(and it skips many bytes entirely).

See "Fast String Searching", by Andrew Hume and Daniel Sunday,
in the November 1991 issue of Software Practice & Experience, for
a good discussion of Boyer-Moore implementation tricks.  It's
available as a free PDF online.

Once you have fast search, you'll find you also need fast input.

GNU grep uses raw Unix input system calls and avoids copying data
after reading it.

Moreover, GNU grep AVOIDS BREAKING THE INPUT INTO LINES.  Looking
for newlines would slow grep down by a factor of several times,
because to find the newlines it would have to look at every byte!

So instead of using line-oriented input, GNU grep reads raw data into
a large buffer, searches the buffer using Boyer-Moore, and only when
it finds a match does it go and look for the bounding newlines.
(Certain command line options like -n disable this optimization.)

Finally, when I was last the maintainer of GNU grep (15+ years ago...),
GNU grep also tried very hard to set things up so that the *kernel*
could ALSO avoid handling every byte of the input, by using mmap()
instead of read() for file input.  At the time, using read() caused
most Unix versions to do extra copying.  Since GNU grep passed out
of my hands, it appears that use of mmap became non-default, but you
can still get it via --mmap.  And at least in cases where the data
is already file system buffer caches, mmap is still faster:

  $ time sh -c 'find . -type f -print | xargs grep -l 123456789abcdef'
  real 0m1.530s
  user 0m0.230s
  sys 0m1.357s
  $ time sh -c 'find . -type f -print | xargs grep --mmap -l 123456789abcdef'
  real 0m1.201s
  user 0m0.330s
  sys 0m0.929s

[workload was a 648 megabyte MH mail folder containing 41000 messages]
So even nowadays, using --mmap can be worth a >20% speedup.

Summary:

- Use Boyer-Moore (and unroll its inner loop a few times).

- Roll your own unbuffered input using raw system calls.  Avoid copying
  the input bytes before searching them.  (Do, however, use buffered
  *output*.  The normal grep scenario is that the amount of output is
  small compared to the amount of input, so the overhead of output
  buffer copying is small, while savings due to avoiding many small
  unbuffered writes can be large.)

- Don't look for newlines in the input until after you've found a match.

- Try to set things up (page-aligned buffers, page-sized read chunks,
  optionally use mmap) so the kernel can ALSO avoid copying the bytes.

The key to making programs fast is to make them do practically nothing. ;-)

Regards,

 Mike
curl https://dl-ssl.google.com/dl/googlesource/git-repo/repo > ~/bin/repo
server address:
$ repo init -u https://android.googlesource.com/platform/manifest -b android-2.3.7_r1
所以應該不用下面的方法了...curl "http://php.webtutor.pl/en/wp-content/uploads/2011/09/repo" > ~/bin/repo
chmod a+x ~/bin/repo
PATH=~/bin:$PATH
mkdir WORKING_DIRECTORY
cd WORKING_DIRECTORY
repo init -u git://codeaurora.org/platform/manifest.git -b gingerbread
repo sync
    public static final Context main(int factoryTest) {
        ........
        ActivityManagerService m = thr.mService;
        mSelf = m;
        ........
        m.startRunning(null, null, null, null);

        return context;
    }
startRunning( ) 的最後是 call systemReady():
    public final void startRunning(String pkg, String cls, String action,
        ........
        systemReady(null);
    }


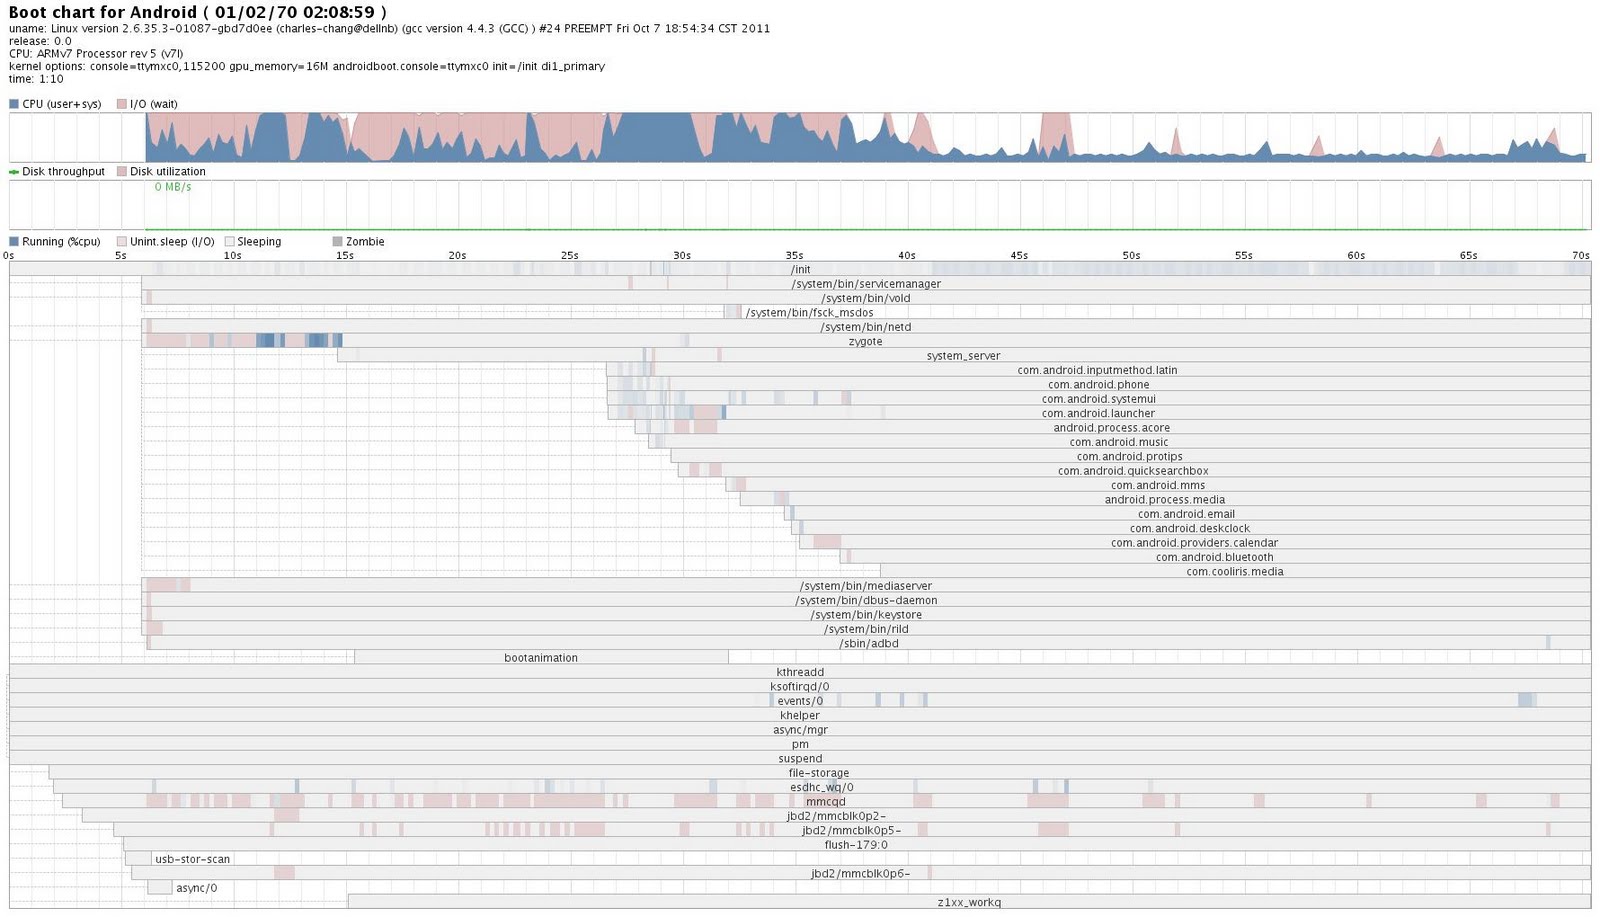
$aptitude install ant
解開 bootchart source,然後到目錄去 run ant...$update-alternatives --all
所有 java 的部份,都由 openjdk 改為 sun-java。
到 system/core/init
$ mm INIT_BOOTCHART=true
dd 到 板子上後,啟動。 $ echo 60 > bootchart-start
$adb push bootchart-start /data/
$adb shell sync
然後就可以reboot..java -jar bootchart.jar bootchart.tgz
    private class SettingsObserver implements Observer {
        ........
        public void update(Observable o, Object arg) {
            synchronized (mLocks) {

                   ......
                // SCREEN_OFF_TIMEOUT, default to 15 seconds
                mScreenOffTimeoutSetting = -1;//getInt(SCREEN_OFF_TIMEOUT, DEFAULT_SCREEN_OFF_TIMEOUT);
mScreenOffTimeoutSetting = -1;struct console mxc_consol
register_console(&mxc_console);
struct uart_console mxc_reg = {
  .con = (&mxc_sonsole);
};

struct console mxc_console = {
  .data = &mxc_reg;
}
uart_register(&mxc_reg);
platform_driver_register(&mxcuart_driver);
mxcuart_driver 是 platform_driver 結構,name 是 mxcintuart (internal uart ?) uart_mxc_port *umxc = platform_get_drvdata(pdev);
if (umxc && umxc->port.flags & ASYNC_SUSPENDED) {
umxc->port.state->port.tty->hw_stopped = 0;
uart_resume_port(&mxc_reg, &umxc->port);
}
這裡的 uart_resume_port 在 serial_core.c 裡。platform_device --> (uart_mxc_port) --> port.flags
uart_resume_port 是:
uart_driver --> uart_state -->tty_port --> flags
好像不相關.
static struct platform_device mxc_uart_device1 = {
        .name = "mxcintuart",
        .id = 0,
        .num_resources = ARRAY_SIZE(mxc_uart_resources1),
        .resource = mxc_uart_resources1,
        .dev = {
                .platform_data = &mxc_ports[0],
                },
};
static uart_mxc_port mxc_ports[] = {
        [0] = {
               .port = {
                        .iotype = SERIAL_IO_MEM,
                        .fifosize = 32,
                        .flags = ASYNC_BOOT_AUTOCONF ,
                        .line = 0,
                        },
               .ints_muxed = 1,
               .mode = MODE_DCE,
               .ir_mode = NO_IRDA,
               .enabled = 1,
               .cts_threshold = UART1_UCR4_CTSTL,
               .dma_enabled = UART1_DMA_ENABLE,
               .dma_rxbuf_size = UART1_DMA_RXBUFSIZE,
               .rx_threshold = UART1_UFCR_RXTL,
               .tx_threshold = UART1_UFCR_TXTL,
               .dma_tx_id = MXC_DMA_UART1_TX,
               .dma_rx_id = MXC_DMA_UART1_RX,
               .rxd_mux = MXC_UART_RXDMUX,
               },
看到那個 flags 欄位。 uart_resume_port(&mxc_reg, &umxc->port);
所以就是
uart_mxc_port
其中包含有 .port 這個 property。
uart_change_pm(state,0);
uart_startup(state,0);
uart_update_termios(state)
static struct console mxc_early_uart_console __initdata = {
        .name = "ttymxc",
        .write = early_mxcuart_console_write,
        .setup = mxc_early_uart_setup,
        .flags = CON_PRINTBUFFER | CON_BOOT,
        .index = -1,
};
這被用來 register_console(&mxc_early_uart_console);struct console {
char name[16];
void (*write)(struct console *, const char *, unsigned);
int (*read)(struct console *, char *, unsigned);
struct tty_driver *(*device)(struct console *, int *);
void (*unblank)(void);
int (*setup)(struct console *, char *);
int (*early_setup)(void);
short flags;
short index;
int cflag;
void *data;
struct console *next;
};
其中 next 是用來做出 linking list/sys/devices/systemsuspend/hibernate 時:
Suspending System Devices
Suspending type 'vfp':
 vfp0
Suspending type 'clocksource':
 clocksource0
Suspending type 'timekeeping':
 timekeeping0
Suspending type 'timer':
 timer0
Suspending type 'mxc_gpio':
 mxc_gpio0
Suspending type 'cpu':
 cpu0
跟 /sys/device/system 下的目錄一致。CPU Power Management --> Enable CPUfreq debugging
 echo 7 > /sys/module/cpufreq/debug
echo 0 > /sys/module/cpufreq/debug_ratelimit
改一下 cpufreq 的debug 參數,讓他output message。"Rafael J. Wysocki" <> Subject [PATCH 0/3] Hibernate cleanups Date Sat, 21 May 2011 14:08:28 +0200 Hi, Following are three hibernate patches I didn't have the time to work on before. [1/3] - Update comments in kernel/power/hibernate.c [2/3] - Remove arch_prepare_suspend() [3/3] - Update kerneldoc comments in kernel/power/hibernate.c Since they don't make any functional changes, I don't think it makes sense to wait with them for the next merge window, so I'd like to push them for 2.6.40 if no one objects. Thanks, Rafael慘的是..後來 Linus 宣佈沒有 2.6.40,而是 3.0 ...
#ifdef __STDC__
#define __catify_fn(name,x)     name##x
#else
#define __catify_fn(name,x)     name/**/x
#endif
#define __cpu_fn(name,x)        __catify_fn(name,x)

/*
 * If we are supporting multiple CPUs, then we must use a table of
 * function pointers for this lot.  Otherwise, we can optimise the
 * table away.
 */
#define cpu_proc_init                   __cpu_fn(CPU_NAME,_proc_init)
#define cpu_proc_fin                    __cpu_fn(CPU_NAME,_proc_fin)
#define cpu_reset                       __cpu_fn(CPU_NAME,_reset)
#define cpu_do_idle                     __cpu_fn(CPU_NAME,_do_idle)
#define cpu_dcache_clean_area           __cpu_fn(CPU_NAME,_dcache_clean_area)
#define cpu_do_switch_mm                __cpu_fn(CPU_NAME,_switch_mm)
#define cpu_set_pte_ext                 __cpu_fn(CPU_NAME,_set_pte_ext)

#include

struct mm_struct;

/* declare all the functions as extern */
extern void cpu_proc_init(void);
extern void cpu_proc_fin(void);
extern int cpu_do_idle(void);
extern void cpu_dcache_clean_area(void *, int);
extern void cpu_do_switch_mm(unsigned long pgd_phys, struct mm_struct *mm);
extern void cpu_set_pte_ext(pte_t *ptep, pte_t pte, unsigned int ext);
extern void cpu_reset(unsigned long addr) __attribute__((noreturn));
所以 cpu_reset( ) 會變成 CPU_NAME_reset# ifdef CONFIG_CPU_V6
# ifdef CPU_NAME
# undef MULTI_CPU
# define MULTI_CPU
# else
# define CPU_NAME cpu_v6
# endif
# endif
# ifdef CONFIG_CPU_V7
# ifdef CPU_NAME
# undef MULTI_CPU
# define MULTI_CPU
# else
# define CPU_NAME cpu_v7
# endif
# endif
所以 cortext A8 的 kernel config 是:
CONFIG_CPU_V7=y
也就是會變成 cpu_v7_reset( )make -j4 BUILD_TINY_ANDROID=true TARGET_NO_RECOVERY=true showcommands
來 build TINY_ANDROID。TINY_ANDROID 不會rebuild recovery,但是 Makefile 卻還是去 make recoveryimage,所以要手動加上 TARGET_NO_RECOVERY=true
  /toolchain/arm-eabi-4.4.3/bin/arm-eabi-gcc
-Wp,-MD,arch/arm/kernel/.debug.o.d
-nostdinc
-isystem /toolchain/arm-eabi-4.4.3/bin/../lib/gcc/arm-eabi/4.4.3/include
-I/kernel_imx/arch/arm/include
-Iinclude
-include include/generated/autoconf.h
-D__KERNEL__
-mlittle-endian
-Iarch/arm/mach-mx5/include
-Iarch/arm/plat-mxc/include
-D__ASSEMBLY__
-mabi=aapcs-linux -mno-thumb-interwork
-funwind-tables
-D__LINUX_ARM_ARCH__=7
-march=armv7-a
-include asm/unified.h
-msoft-float
-c -o arch/arm/kernel/debug.o arch/arm/kernel/debug.S

  /toolchain/arm-eabi-4.4.3/bin/arm-eabi-gcc
-Wp,-MD,arch/arm/mm/.iomap.o.d
-nostdinc
-isystem /toolchain/arm-eabi-4.4.3/bin/../lib/gcc/arm-eabi/4.4.3/include
-I/kernel_imx/arch/arm/include
-Iinclude
-include include/generated/autoconf.h
-D__KERNEL__
-mlittle-endian
-Iarch/arm/mach-mx5/include
-Iarch/arm/plat-mxc/include
-Wall
-Wundef
-Wstrict-prototypes
-Wno-trigraphs
-fno-strict-aliasing
-fno-common
-Werror-implicit-function-declaration
-Wno-format-security
-fno-delete-null-pointer-checks
-Os
-marm
-mabi=aapcs-linux
-mno-thumb-interwork
-funwind-tables
-D__LINUX_ARM_ARCH__=7
-march=armv7-a
-msoft-float
-Uarm
-Wframe-larger-than=1024 -fno-stack-protector
-fomit-frame-pointer
-Wdeclaration-after-statement
-Wno-pointer-sign
-fno-strict-overflow
-fconserve-stack
-D"KBUILD_STR(s)=#s"
-D"KBUILD_BASENAME=KBUILD_STR(iomap)"
-D"KBUILD_MODNAME=KBUILD_STR(iomap)"
-c -o arch/arm/mm/.tmp_iomap.o arch/arm/mm/iomap.c

arch/arm/kernel/debug.S: Assembler messages:
arch/arm/kernel/debug.S:167: Error: garbage following instruction -- `ldrne r3,=MX51_AIPS1_IO_ADDRESS(MX51_UART1_BASE_ADDR)'
arch/arm/kernel/debug.S:183: Error: garbage following instruction -- `ldrne r3,=MX51_AIPS1_IO_ADDRESS(MX51_UART1_BASE_ADDR)'
make[1]: *** [arch/arm/kernel/debug.o] Error 1
make: *** [arch/arm/kernel] Error 2
make: *** Waiting for unfinished jobs....
trace debug.S :167
addruart r3, r1
addruart 定義在 debug-macro.S:
		.macro	addruart, rx, tmp
		mrc	p15, 0, \rx, c1, c0
		tst	\rx, #1			@ MMU enabled?
		ldreq	\rx, =UART_PADDR	@ physical
		ldrne	\rx, =UART_VADDR	@ virtual
所以是 UART_VADDR 的定義: (debug-macro.S):
#include
#define UART_PADDR	MX51_UART1_BASE_ADDR
#define UART_VADDR	MX51_AIPS1_IO_ADDRESS(MX51_UART1_BASE_ADDR)
的 MX51_AIPS1_IO_ADDRESS( ) 沒有展開 (定義)。Uncompressing Linxu... done, booting the kernel.
後,就沒有 message 了...
/*
 * The console driver calls this routine during kernel initialization
 * to register the console printing procedure with printk() and to
 * print any messages that were printed by the kernel before the
 * console driver was initialized.
 *
 * This can happen pretty early during the boot process (because of
 * early_printk) - sometimes before setup_arch() completes - be careful
 * of what kernel features are used - they may not be initialised yet.
 *
 * There are two types of consoles - bootconsoles (early_printk) and
 * "real" consoles (everything which is not a bootconsole) which are
 * handled differently.
 *  - Any number of bootconsoles can be registered at any time.
 *  - As soon as a "real" console is registered, all bootconsoles
 *    will be unregistered automatically.
 *  - Once a "real" console is registered, any attempt to register a
 *    bootconsoles will be rejected
 */
大概翻譯一下:
為了要讓 printk, early_printk能正常送出 message,要儘早 call register_console( ) 把 console 掛起來。
console 分為兩種:
1. bootconsole : 為了應付kernel boot 前段,真正的 (real) console 還沒決定的時候,所使用的 console
2. real consol : 就真正的 console。
在real console 被 register 後,bootconsole 就會自動被 unregister,然後就再也不允許有人註冊 boot_console 了。
在 arch/arm/kernal/ 下有 early_prink.c,但是要
obj-$(CONFIG_EARLY_PRINTK) += early_printk.o
才會 build 進去。
config EARLY_PRINTK
 bool "Early printk"
 depends on DEBUG_LL
 help
   Say Y here if you want to have an early console using the
   kernel low-level debugging functions. Add earlyprintk to your
   kernel parameters to enable this console.
所以要 enable DEBUG_LL (Kernel low-level debugging functions),才會顯示出來。
echo disk > /sys/power/state
收到的是static ssize_t state_store(struct kobject *kobj, struct kobj_attribute *attr,
const char *buf, size_t n)
suspend to disk 部份超快,就..
	if (len == 4 && !strncmp(buf, "disk", len)) {
		error = hibernate();
  goto Exit;
	}
直接 call kernel/power/hibernate.c 的 hibernate( ) atomic_add_unless(&snapshot_device_available, -1 ,0)
用來確認 snaphot_device_available 是不是 1 (available),/* Hibernation and suspend events */
#define PM_HIBERNATION_PREPARE 0x0001 /* Going to hibernate */
#define PM_POST_HIBERNATION 0x0002 /* Hibernation finished */
#define PM_SUSPEND_PREPARE 0x0003 /* Going to suspend the system */
#define PM_POST_SUSPEND 0x0004 /* Suspend finished */
#define PM_RESTORE_PREPARE 0x0005 /* Going to restore a saved image */
#define PM_POST_RESTORE 0x0006 /* Restore failed */
static int orig_fgconsole, orig_kmsg;

int pm_prepare_console(void)
{
	orig_fgconsole = vt_move_to_console(SUSPEND_CONSOLE, 1);
	if (orig_fgconsole < 0)
		return 1;

	orig_kmsg = vt_kmsg_redirect(SUSPEND_CONSOLE);
	return 0;
}

void pm_restore_console(void)
{
	if (orig_fgconsole >= 0) {
		vt_move_to_console(orig_fgconsole, 0);
		vt_kmsg_redirect(orig_kmsg);
	}
}
static inline int atomic_add_unless(atomic_t *v, int a, int u)
{
	int c, old;

	c = atomic_read(v);
	while (c != u && (old = atomic_cmpxchg((v), c, c + a)) != c)
		c = old;
	return c != u;
}
然後 cmpxchg 是
static inline int atomic_cmpxchg(atomic_t *ptr, int old, int new)
{
	unsigned long oldval, res;

	smp_mb();

	do {
		__asm__ __volatile__("@ atomic_cmpxchg\n"
		"ldrex	%1, [%3]\n"
		"mov	%0, #0\n"
		"teq	%1, %4\n"
		"strexeq %0, %5, [%3]\n"
		    : "=&r" (res), "=&r" (oldval), "+Qo" (ptr->counter)
		    : "r" (&ptr->counter), "Ir" (old), "r" (new)
		    : "cc");
	} while (res);

	smp_mb();

	return oldval;
}
就是 swp. armv6 版.atomic_cmpxchg((v),c , c+a))
		Semantics and Behavior of Atomic and
		         Bitmask Operations
這個 documsnt 的說明好像跟實做一饃一樣。
typedef struct {
	int counter;
} atomic_t;
宣告後,要初始化: (atomic.h)
#define ATOMIC_INIT(i) { (i) }
#define early_initcall(fn)		__define_initcall("early",fn,early)

/*
 * A "pure" initcall has no dependencies on anything else, and purely
 * initializes variables that couldn't be statically initialized.
 *
 * This only exists for built-in code, not for modules.
 */
#define pure_initcall(fn)		__define_initcall("0",fn,0)

#define core_initcall(fn)		__define_initcall("1",fn,1)
#define core_initcall_sync(fn)		__define_initcall("1s",fn,1s)
#define postcore_initcall(fn)		__define_initcall("2",fn,2)
#define postcore_initcall_sync(fn)	__define_initcall("2s",fn,2s)
#define arch_initcall(fn)		__define_initcall("3",fn,3)
#define arch_initcall_sync(fn)		__define_initcall("3s",fn,3s)
#define subsys_initcall(fn)		__define_initcall("4",fn,4)
#define subsys_initcall_sync(fn)	__define_initcall("4s",fn,4s)
#define fs_initcall(fn)			__define_initcall("5",fn,5)
#define fs_initcall_sync(fn)		__define_initcall("5s",fn,5s)
#define rootfs_initcall(fn)		__define_initcall("rootfs",fn,rootfs)
#define device_initcall(fn)		__define_initcall("6",fn,6)
#define device_initcall_sync(fn)	__define_initcall("6s",fn,6s)
#define late_initcall(fn)		__define_initcall("7",fn,7)
#define late_initcall_sync(fn)		__define_initcall("7s",fn,7s)
其中 __define_initcall 是:
#define __define_initcall(level,fn,id) \
	static initcall_t __initcall_##fn##id __used \
	__attribute__((__section__(".initcall" level ".init"))) = fn
會把 function 放在 .initcall + level 這個section..do_basic_setup( )
--> do_initcalls()
static void __init do_initcalls(void)
{
initcall_t *fn;
for (fn = __early_initcall_end; fn < __initcall_end; fn++)
do_one_initcall(*fn);
/* Make sure there is no pending stuff from the initcall sequence */
flush_scheduled_work();
}
在 vmlinux.lds :
. = ALIGN(16); __setup_start = .; *(.init.setup) __setup_end = .;
  __initcall_start = .;
 *(.initcallearly.init) __early_initcall_end = .;
 *(.initcall0.init) *(.initcall0s.init)
 *(.initcall1.init) *(.initcall1s.init)
 *(.initcall2.init) *(.initcall2s.init)
 *(.initcall3.init) *(.initcall3s.init)
 *(.initcall4.init) *(.initcall4s.init)
 *(.initcall5.init) *(.initcall5s.init)
 *(.initcallrootfs.init)
 *(.initcall6.init) *(.initcall6s.init)
 *(.initcall7.init) *(.initcall7s.init)
 __initcall_end = .;
? 為什摩中間有一個 initcallrootfs ?late_initcall(software_resume);
因為在 開完後,手動 resume , sh console 是 OK 的,所以改一下 software_resume( ) 的位置.../* Open the /dev/console on the rootfs, this should never fail */
if (sys_open((const char __user *) "/dev/console", O_RDWR, 0) < 0)
printk(KERN_WARNING "Warning: unable to open an initial console.\n");
以後再 call,就 OK 了
start_kernel( )
----> console_init()
----> reset_init( )
-------->kernel_thread(kernel_init, NULL, CLONE_FS | CLONE_SIGHAND);
------------>sys_open("/dev/console",..)
console_init( ) 跟 上面的 initcall 一樣:
void __init console_init(void)
{
	initcall_t *call;

	/* Setup the default TTY line discipline. */
	tty_ldisc_begin();

	/*
	 * set up the console device so that later boot sequences can
	 * inform about problems etc..
	 */
	call = __con_initcall_start;
	while (call < __con_initcall_end) {
		(*call)();
		call++;
		printk("*");
	}
}
可以打開 System.map 看 symbol:
800301c4 T __con_initcall_start
800301c4 t __initcall_con_init
800301c4 T __initcall_end
800301c8 t __initcall_mxcuart_console_init
800301cc T __con_initcall_end
其中 __initcall_con_init 和 __initcall_end 是同一個位置,所以實際上只有兩個 function
Package                Minimum ver   Installed info
-------                -----------   ---------------
rpm                    0             not installed
rpm-build              0             not installed
這兩個command都在 rpm 這個 package,所以 aptitude install rpm 就可以了。compr_lzo.c:29:23: error: lzo/lzo1x.h: No such file or directory
因為沒有 liblzo2-dev。mkfs.ubifs.h:48:23: error: uuid/uuid.h: No such file or directory
裝 uuid-dev ,手動刪掉 /opt/freescale/ltib/usr/src/rpm/BUILD/mtd-utils 後繼續..make[2]: Entering directory `/home/charles-chang/L2.6.35/ltib/rpm/BUILD/gtk+-2.14.3/demos'
no --raw --build-list \
apple_red ./apple-red.png \
gnome_foot ./gnome-foot.png \
> test-inline-pixbufs.h \
|| (rm -f test-inline-pixbufs.h && false)
/bin/bash: no: command not found
make[2]: *** [test-inline-pixbufs.h] Error 1
make[2]: Leaving directory `/home/charles-chang/L2.6.35/ltib/rpm/BUILD/gtk+-2.14.3/demos'
make[1]: *** [all-recursive] Error 1
make[1]: Leaving directory `/home/charles-chang/L2.6.35/ltib/rpm/BUILD/gtk+-2.14.3'
make: *** [all] Error 2
error: Bad exit status from /home/charles-chang/L2.6.35/ltib/tmp/rpm-tmp.29984 (%build)
在這一篇 (http://ubuntuforums.org/showthread.php?t=962233 ) 說是缺 mono-mcs。
/**
 *	hibernation_restore - quiesce devices and restore the hibernation
 *	snapshot image.  If successful, control returns in hibernation_snaphot()
 *	@platform_mode - if set, use the platform driver, if available, to
 *			 prepare the platform firmware for the transition.
 *
 *	Must be called with pm_mutex held
 */

int hibernation_restore(int platform_mode)
{
	int error;
	gfp_t saved_mask;

	pm_prepare_console();
	suspend_console();
	saved_mask = clear_gfp_allowed_mask(GFP_IOFS);
	error = dpm_suspend_start(PMSG_QUIESCE);
	if (!error) {
		error = resume_target_kernel(platform_mode);
		dpm_resume_end(PMSG_RECOVER);
	}
	set_gfp_allowed_mask(saved_mask);
	resume_console();
	pm_restore_console();
	return error;
}
根據 comment, run 完會回到 hibernate_snapshot( ) , 猜是 stack 變更,所以這個 function return 回去會到 hibnation_snapshot( ). while (!list_empty(&dpm_list)) {
dev = to_device(dpm_list.next);
get_device(dev);
if (dev->power.status >= DPM_OFF && !is_async(dev)) {
int error;
mutex_unlock(&dpm_list_mtx);
error = device_resume(dev, state, false);
mutex_lock(&dpm_list_mtx);
if (error)
pm_dev_err(dev, state, "", error);
} else if (dev->power.status == DPM_SUSPENDING) {
/* Allow new children of the device to be registered */
dev->power.status = DPM_RESUMING;
}
if (!list_empty(&dev->power.entry))
list_move_tail(&dev->power.entry, &list);
put_device(dev);
}
中間有 mmc0: error -110 during reumse (card was remved?) 的 error.LOCAL_FORCE_STATIC_EXECUTABLE := true
LOCAL_STATIC_LIBRARIES := liblinenoise libc
這樣build 出來的 sh 會變大 (很多)LOCAL_FORCE_STATIC_EXECUTABLE := true
LOCAL_STATIC_LIBRARIES := libcutils libc
on early-init
    start ueventd

on init

    sysclktz 0

    loglevel 7

# setup the global environment
    export PATH /sbin:/bin


on boot
    class_start default
    start console
    start mcustub

## Daemon processes to be run by init.
##

service ueventd /sbin/ueventd

service mcustub /sbin/xostub

service console /sbin/sh
    console
lrwxrwxrwx 1 charles-chang charles-chang     4 Sep 16 15:45 bin -> sbin
drwxr-xr-x 2 charles-chang charles-chang  4096 Sep 16 15:45 data
-rw-r--r-- 1 charles-chang charles-chang   118 Sep 16 15:45 default.prop
drwxr-xr-x 2 charles-chang charles-chang  4096 Sep 16 15:45 dev
-rwxr-xr-x 1 charles-chang charles-chang 90132 Sep 16 15:45 init
-rwxr-xr-x 1 charles-chang charles-chang     5 Sep 16 15:45 init.freescale.rc
-rwxr-xr-x 1 charles-chang charles-chang   363 Sep 16 15:45 init.rc
drwxr-xr-x 2 charles-chang charles-chang  4096 Sep 16 15:45 proc
drwxr-xr-x 2 charles-chang charles-chang  4096 Sep 16 15:47 sbin
drwxr-xr-x 2 charles-chang charles-chang  4096 Sep 16 15:45 sys
drwxr-xr-x 2 charles-chang charles-chang  4096 Sep 16 15:45 system
-rw-r--r-- 1 charles-chang charles-chang  2089 Sep 16 15:45 ueventd.freescale.rc
-rw-r--r-- 1 charles-chang charles-chang     0 Sep 16 15:45 ueventd.goldfish.rc
-rw-r--r-- 1 charles-chang charles-chang  3764 Sep 16 15:45 ueventd.rc
root tree:
myroot2/
|-- bin -> sbin
|-- data
|-- default.prop
|-- dev
|-- init
|-- init.freescale.rc
|-- init.rc
|-- proc
|-- sbin
|   |-- adbd
|   |-- busybox
|   |-- mcustub
|   |-- sh
|   `-- ueventd -> ../init
|-- sys
|-- system
|-- ueventd.freescale.rc
|-- ueventd.goldfish.rc
`-- ueventd.rc
mkbootfs myroot2 | minigzip > myramdisk.img
然後 imx51 的 uboot 需要在做:
mkimage -A arm -O linux -T ramdisk -C none -a 0x90308000 -n "Android Root Filesystem" -d myramdisk2.img myuramdisk2.img
填入 64 bytes 的 uboot info e2fsck/Android.mk | 6 ++++--
lib/blkid/Android.mk | 2 +-
lib/e2p/Android.mk | 2 +-
lib/et/Android.mk | 2 +-
lib/ext2fs/Android.mk | 2 +-
lib/uuid/Android.mk | 2 +-
misc/Android.mk | 13 ++++++++++---
其中 lib 的部份都是 build library:
