ubuntu 在 R40e 上 還有 Debian 在 Sempron 2600 上

2010年12月30日 星期四

mkfs.ext4 for ARM (Android)

因為 eSD, eMMC mount 在版上,所以不能用讀卡機接到 PC 作 format。
所以要再 target board 上作 mkfs.ext4。
而且因為 bionic 的關係,要 static link lib.

partition 還好,busybox 就有支援, ext4 就沒有 (到1.18 還沒有),
所以只好 build 一版 for arm 的 mkfs (mke2fs).

這一篇:mtab 有多重要 有完整的說明。
另外 這一篇:制作嵌入式文件系统工具 mkfs.ext2 mkfs.ext3 mkfs.ext4 也有說明

Download http://sourceforge.net/projects/e2fsprogs/

解開後,run config:
LDFLAGS=-static ./configure --host=arm-none-linux-gnueabi 然後 make 就可以了,會在 misc 下找到 mke2fs.

copy 到 target 上,用
#mke2fs -t ext4 /dev/block/mmcblk2p4 就 .... 會像 elleryq 說的一樣,因為沒有 /etc/mtab ,所以沒有辦法做出 journal.

跟elleryq說的一樣,建一個空的 /etc/mtab 就可以了。


或是用 busybox 的 mkfs.ext3 format 完在用
# tune2fs -O extents,uninit_bg,dir_index /dev/sdxn #e2fsck /dev/sdxn
ref
  1. https://ext4.wiki.kernel.org/index.php/Ext4_Howto#Converting_an_ext3_filesystem_to_ext4
  2. http://wiki.debian.org.hk/w/Format_disk_as_Ext2,_Ext3_or_Ext4

2010年12月29日 星期三

ref: http://www.debian.org/doc/manuals/apt-howto/ch-sourcehandling.en.html $apt-get source ibus-chewing charles-chang@ubuntu:~/Downloads$ apt-get source ibus-chewing Reading package lists... Done Building dependency tree Reading state information... Done NOTICE: 'ibus-chewing' packaging is maintained in the 'Bzr' version control system at: lp:~pkg-ime/ibus/debian-ibus-chewing Please use: bzr get lp:~pkg-ime/ibus/debian-ibus-chewing to retrieve the latest (possibly unreleased) updates to the package. Need to get 85.5kB of source archives. Get:1 http://us.archive.ubuntu.com/ubuntu/ maverick/main ibus-chewing 1.3.6.20100730-1 (dsc) [1,480B] Get:2 http://us.archive.ubuntu.com/ubuntu/ maverick/main ibus-chewing 1.3.6.20100730-1 (tar) [80.7kB] Get:3 http://us.archive.ubuntu.com/ubuntu/ maverick/main ibus-chewing 1.3.6.20100730-1 (diff) [3,316B] Fetched 85.5kB in 3s (25.1kB/s) sh: dpkg-source: not found Unpack command 'dpkg-source -x ibus-chewing_1.3.6.20100730-1.dsc' failed. Check if the 'dpkg-dev' package is installed. E: Child process failed then install dpkg-dev then install build-dep for ibus-chewing

2010年12月28日 星期二

ibus_main( )

2010年12月27日 星期一

紀錄一下 uboot 讀到的 ocr csd register:
  • mmc ocr: 80FF8080
  • csd : D00F0032 F5A03A6 FFFFFCFF 92404000
CSD 的 byte order是相反的:
  • D00F0032 : 96-127
  • 0F5A03A6 : 64-95
  • FFFFFCFF: 32-63
  • 92404000 : 0-31
跟micro sd 讀到的一樣。 很麻煩,還是用 linux 的 code: #define UNSTUFF_BITS(resp,start,size) \ ({ \ const int __size = size; \ const u32 __mask = (__size < 32 ? 1 << __size : 0) - 1; \ const int __off = 3 - ((start) / 32); \ const int __shft = (start) & 31; \ u32 __res; \ \ __res = resp[__off] >> __shft; \ if (__size + __shft > 32) \ __res |= resp[__off-1] << ((32 - __shft) % 32); \ __res & __mask; \ }) 這樣就可以用比較漂亮的方式: csd_struct = UNSTUFF_BITS(resp, 126, 2); m = UNSTUFF_BITS(resp, 115, 4); e = UNSTUFF_BITS(resp, 112, 3); csd->tacc_ns = (tacc_exp[e] * tacc_mant[m] + 9) / 10; csd->tacc_clks = UNSTUFF_BITS(resp, 104, 8) * 100; m = UNSTUFF_BITS(resp, 99, 4); e = UNSTUFF_BITS(resp, 96, 3); csd->max_dtr = tran_exp[e] * tran_mant[m]; csd->cmdclass = UNSTUFF_BITS(resp, 84, 12); e = UNSTUFF_BITS(resp, 47, 3); m = UNSTUFF_BITS(resp, 62, 12); csd->capacity = (1 + m) << (e + 2); csd->read_blkbits = UNSTUFF_BITS(resp, 80, 4); csd->read_partial = UNSTUFF_BITS(resp, 79, 1); csd->write_misalign = UNSTUFF_BITS(resp, 78, 1); csd->read_misalign = UNSTUFF_BITS(resp, 77, 1); csd->r2w_factor = UNSTUFF_BITS(resp, 26, 3); csd->write_blkbits = UNSTUFF_BITS(resp, 22, 4); csd->write_partial = UNSTUFF_BITS(resp, 21, 1); host->read_bl_len = (1<<9); host->write_bl_len = (1<<9); host->capacity = csd->capacity<<(csd->read_blkbits - 9); CSD 的內榮要看 JEDEC 84-A43 : (http://www.solutioninside.com/~jackiekan/lib/exe/fetch.php?id=dsd2008%3Aindex&cache=cache&media=dsd2008:jedsd84-a43.pdf) command class 在 linux header 有定義: /* * Card Command Classes (CCC) */ #define CCC_BASIC (1<<0) /* (0) Basic protocol functions */ /* (CMD0,1,2,3,4,7,9,10,12,13,15) */ /* (and for SPI, CMD58,59) */ #define CCC_STREAM_READ (1<<1) /* (1) Stream read commands */ /* (CMD11) */ #define CCC_BLOCK_READ (1<<2) /* (2) Block read commands */ /* (CMD16,17,18) */ #define CCC_STREAM_WRITE (1<<3) /* (3) Stream write commands */ /* (CMD20) */ #define CCC_BLOCK_WRITE (1<<4) /* (4) Block write commands */ /* (CMD16,24,25,26,27) */ #define CCC_ERASE (1<<5) /* (5) Ability to erase blocks */ /* (CMD32,33,34,35,36,37,38,39) */ #define CCC_WRITE_PROT (1<<6) /* (6) Able to write protect blocks */ /* (CMD28,29,30) */ #define CCC_LOCK_CARD (1<<7) /* (7) Able to lock down card */ /* (CMD16,CMD42) */ #define CCC_APP_SPEC (1<<8) /* (8) Application specific */ /* (CMD55,56,57,ACMD*) */ #define CCC_IO_MODE (1<<9) /* (9) I/O mode */ /* (CMD5,39,40,52,53) */ #define CCC_SWITCH (1<<10) /* (10) High speed switch */ /* (CMD6,34,35,36,37,50) */ /* (11) Reserved */ /* (CMD?) */ EXT_CSD 的資料更多。 在 linux kernel 的 source code : include/linux/mmc/mmc.h 有一些定義: 用到的 field 也有定義: #define EXT_CSD_BOOT_BUS_WIDTH 177 /* R/W */ #define EXT_CSD_BOOT_CONFIG 179 /* R/W */ #define EXT_CSD_BUS_WIDTH 183 /* R/W */ #define EXT_CSD_BUS_WIDTH_1 0 /* Card is in 1 bit mode */ #define EXT_CSD_BUS_WIDTH_4 1 /* Card is in 4 bit mode */ #define EXT_CSD_BUS_WIDTH_8 2 /* Card is in 8 bit mode */ #define EXT_CSD_BUS_WIDTH_4_DDR 5 /* Card is in 4 bit ddr mode */ #define EXT_CSD_BUS_WIDTH_8_DDR 6 /* Card is in 8 bit ddr mode */ #define EXT_CSD_HS_TIMING 185 /* R/W */ #define EXT_CSD_CARD_TYPE 196 /* RO */ #define EXT_CSD_CARD_TYPE_26 (1<<0) /* Card can run at 26MHz */ #define EXT_CSD_CARD_TYPE_52 (1<<1) /* Card can run at 52MHz */ #define EXT_CSD_CARD_TYPE_DDR_52 (2<<1) /* Card can run at DDR 52MHz */ #define EXT_CSD_REV 192 /* RO */ #define EXT_CSD_SEC_CNT 212 /* RO, 4 bytes */ #define EXT_CSD_BOOT_SIZE_MULT 226 /* RO, 1 bytes */ #define EXT_CSD_BOOT_INFO 228 /* RO, 1 bytes */

Change vimdiff color

hi DiffAdd term=reverse cterm=bold ctermbg=green ctermfg=white hi DiffChange term=reverse cterm=bold ctermbg=cyan ctermfg=black hi DiffText term=reverse cterm=bold ctermbg=gray ctermfg=black hi DiffDelete term=reverse cterm=bold ctermbg=red ctermfg=black 因為diff convert 的某 background C comment 的顏色一樣,所以會看不到 code, 所以改 .vimrc。 用上面的。

uboot - mmc - reading notes

common/cmd_mmc.c : do_mmcops()

drivers/mmc/mmc.c : mmc_init( )

go_idle( ) -- cmd 0
if_cmd( ) -- SD
sd_op_cond( ) --
mmc_op_cond( ) --

go_idle( )
cmd : OCR_HCS | mmc->voltages
- get  version, ocr, high_capacity from response.

mmc_startup

cmd : MMC_CMD_ALL_SEND_CID
- get CID
cmd : SD_CMD_SEND_RELATIVE_ADDR
cmdarg : mmc->rca >>16
- set relative address
cmd : MMC_SEND_CSD
- get CSD
cmd : MMC_CMD_SELECT_CARD
- set into transfer mode

mmc_change_freq( ) -- set freq  -- a lot of command
mmc_switch( ) -- set bus width (MMC_CMD_SWITCH)
mmc_set_clock( ) --


start.S start_armboot mmc_initialize --board_mmc_init ----esdhc_gpio_init ------fsl_esdhc_initialize (all the sdhc) : set host controller capability --------mmc_register

install a Master Boot Record

在 mbr 套件。 有 install-mbr 用 #install-mbr /dev/sda 可以用來在 usb driver 建立開機磁區。
[3535199.173907] usb 1-8: USB disconnect, address 10 [4412460.642042] EXT4-fs error (device loop0): htree_dirblock_to_tree: bad entry in directory #2: directory entry across blocks - block=16offset=0(0), inode=3822418, rec_len=146784, name_len=82 [4412460.644535] EXT4-fs error (device loop0): htree_dirblock_to_tree: bad entry in directory #2: directory entry across blocks - block=16offset=0(0), inode=3822418, rec_len=146784, name_len=82 [4646877.140014] usb 4-2: new full speed USB device using ohci_hcd and address 2 [4646877.352101] usb 4-2: New USB device found, idVendor=067b, idProduct=2303 [4646877.352107] usb 4-2: New USB device strings: Mfr=1, Product=2, SerialNumber=0 [4646877.352112] usb 4-2: Product: USB-Serial Controller [4646877.352116] usb 4-2: Manufacturer: Prolific Technology Inc. [4646877.352244] usb 4-2: configuration #1 chosen from 1 choice [4646877.933260] usbcore: registered new interface driver usbserial [4646877.933856] USB Serial support registered for generic [4646877.934457] usbcore: registered new interface driver usbserial_generic [4646877.934462] usbserial: USB Serial Driver core [4646877.959565] USB Serial support registered for pl2303 [4646877.960436] pl2303 4-2:1.0: pl2303 converter detected [4646877.992316] usb 4-2: pl2303 converter now attached to ttyUSB0 [4646877.992339] usbcore: registered new interface driver pl2303 [4646877.992343] pl2303: Prolific PL2303 USB to serial adaptor driver

2010年12月24日 星期五

Build native c program in Windows with Eclipse

這一篇 (http://hi.baidu.com/oopsware/blog/item/5a86550152edf7d1267fb56e.html) 有說明在 windows 下,用 cygwin 環境 build android native c executable program.

同樣的方法大概可以用在 windows eclipse 吧。

其中 compiler 用 codesourcer的, library, header 從 linux building server 上 copy 過來。

文章說,header, library 的位置和 build option 可以參考:
 myandroid/build/core/combo/ TARGET_linux_arm.mk

其中 crtbegin_XX.o 在
/myandroid/out/target/product/imx51_bbg/obj/lib
libc.a 在
myandroid/out/target/product/imx51_bbg/obj/STATIC_LIBRARIES/libc_intermediates
..

2010年12月21日 星期二

linux - mmc host

struct mmc_host { struct device *parent; struct device class_dev; int index; const struct mmc_host_ops *ops; unsigned int f_min; unsigned int f_max; u32 ocr_avail; unsigned long caps; /* Host capabilities */ /* host specific block data */ unsigned int max_seg_size; /* see blk_queue_max_segment_size */ unsigned short max_hw_segs; /* see blk_queue_max_hw_segments */ unsigned short max_phys_segs; /* see blk_queue_max_phys_segments */ unsigned short unused; unsigned int max_req_size; /* maximum number of bytes in one req */ unsigned int max_blk_size; /* maximum size of one mmc block */ unsigned int max_blk_count; /* maximum number of blocks in one req */ /* private data */ spinlock_t lock; /* lock for claim and bus ops */ struct mmc_ios ios; /* current io bus settings */ u32 ocr; /* the current OCR setting */ /* group bitfields together to minimize padding */ unsigned int use_spi_crc:1; unsigned int claimed:1; /* host exclusively claimed */ unsigned int bus_dead:1; /* bus has been released */ #ifdef CONFIG_MMC_DEBUG unsigned int removed:1; /* host is being removed */ #endif struct mmc_card *card; /* device attached to this host */ wait_queue_head_t wq; struct delayed_work detect; const struct mmc_bus_ops *bus_ops; /* current bus driver */ unsigned int bus_refs; /* reference counter */ unsigned int sdio_irqs; struct task_struct *sdio_irq_thread; atomic_t sdio_irq_thread_abort; #ifdef CONFIG_LEDS_TRIGGERS struct led_trigger *led; /* activity led */ #endif struct dentry *debugfs_root; unsigned long private[0] ____cacheline_aligned; } print debug message 可以用 mmc_hostname(struct mmc_host *host) 印出 %s
ref
  1. http://www.esawdust.com/blog/serial/files/tag-sd.html
  2. http://elm-chan.org/docs/mmc/mmc_e.html
  3. http://www.imhan.com/tag/MMC/
  4. http://www.phpfans.net/article/htmls/201006/Mjg3NzM4.html
  5. http://blog.csdn.net/evilcode/archive/2010/12/16/6079772.aspx
  6. http://zh.wikipedia.org/zh-tw/Secure_Digital
  7. http://www.sdcard.org/developers/tech/sdcard/pls/Simplified_Physical_Layer_Spec.pdf
  8. http://www.hardwarebook.info/SDIO

2010年12月20日 星期一

GPIO Wakeup Detection Register (CWDR) 竟然在 Clock Control Module 章節
新平台,系統的 problem solving time 增加考慮 了解系統 所需的時間,還有 學習 debug 技術的時間。

some notes about wubi

參考 wubi installation guide (https://wiki.ubuntu.com/WubiGuide)
  • wubi 的移除就像是一般 windows ap 移除一樣,在控制台有安裝移除程式。
  • wubi好像不能安裝多個 linux。
  • wubi 是建在 windows filesystem 下,所以 該partition 的 fragmentation會影響效能。推薦用 jkdefrag (http://www.kessels.com/JkDefrag/)
  • 要增加 wubi installed disk 的大小,建議是用 lubi (http://lubi.sourceforge.net/lvpm.html) -- 但是看起來好像是 create 一個 virtual HD,然後用 lubi transfer 過去。-- 建立 virtual driver 是用 qemu 的 tool (在 windows 下)
  • wubi 另外提供一個 ubuntu script,可以同時作到 create virtual box, move home folder to it 兩個動作。 --- 這是 wubu guide 建議用來增加 system space 的方法。

2010年12月17日 星期五

connect adb with android

用 android sdk 的 tools/android 安裝完 真正的 sdk 後。
在 android sdk 目錄會多一個 platform-tool 目錄。裡面就有 adb.

根據 google 的說法, adb 在 linux 不必 driver (用的好像是 mass storage driver)。
但是要手動增加一個 usb event rule : http://developer.android.com/guide/developing/device.html#setting-up 先接上 android 裝置,用 lsusb 看一下 pid。然後寫 (我用的是 10.10)
charles-chang@ubuntu:/etc/udev/rules.d$ cat 51-android.rules SUBSYSTEM=="usb", SYSFS{idVendor}="0bb4", MODE="0666"
接上去後,用 adb device 就會列出 id,然後用 adb shell 就可以連線。

發現這是權限的問題,adb 是使用 scsi,所以 android device 會形成 /dev/sd? 這可以用 dmesg 看出來是哪一個。
第一次使用 adb 時,會啟動一個 daemon,用 ps -aux 可以看到
adb fork-server server
這個 daemon 的 pid 就是你自己 (user)。這個 daemon 需要有對 /dev 下,android device read/write 的權限。
所以,整個作法就是:
插入 android device, dmesg 看一下是 哪一個 device (/dev/sd?),ls -l 看一下 device 的 group 是誰 (floppy),修改 /etc/group,把自己 (user) 加到 floppy group 中。
(重新 login ?)
重新啟動 adb fork-server server: 先 kill 再 invoke:
adb kill-server adb devices
OK
不必加 rules.d

會特別看這篇是因為,我不寫 51-android.rules時,adb device, shell都會 report "permission denied",
即使用 sudo run 也一樣。

* 奇怪的是....Nelson Auron 也都是用 Linux,但是他門就沒有出現這個問題。
而且一但 rules 寫好,成功開啟adb 一次後,刪掉 rules 差拔裝置也OK.\

linux 跟 windows 的 adb push 有一點不一樣。
linux 的 adb push 會保留 file attribute (rwx), windows 不會。
--- 其實這是因為 windows 沒有 rws attribute 的關係。

2010年12月16日 星期四

install android sdk in linux

Downoad 完 android-sdk-r_08-linux_86.tar.gz
解開。

看 SDK readme.txt ===>
run
tool/android
這要 jre 執行,所以要先有 jdk. (sun-java6)

tool/android 會出現 download 真正 sdk 的 UI,設好 connection (proxy) 後,選 "available" 會出現一堆選項。
勾選要的後 就會 download and install

.. 這樣都不用靠 eclipse 來 install 了。


其實這樣很麻煩。
像公司有一堆人要,每個要download 一次,應該要有可以 copy 的方法。

worklog - uboot copy uboot from mmc0 to mmc2

>fatls mmc 0:1 / 把 mmc 0 , partition 1 的 root (/) 內容 list 出來。 lost.dir/ .android_secure/ 159684 u-boot.bin Copy 到 ram 裡: >fatload mmc 0:1 0x90800000 u-boot.bin reading u-boot.bin 159684 bytes read 再 write 到 mmc 2 的 uboot section (start from 1k). > mmc write 2 0x90800000 2 140 MMC write: dev # 2, block # 2, count 320 ... 320 blocks written: OK

jni -- auron's presentation

jni 用 javah 從 java class file 產生 c header (function prototype).
所以 jni 的 function 限制只有 class 可以用。
所以不是類似 linux 一般的 .so 誰都可以用。
實際上要作到 "誰都可以用" 還是在 java class level -- import.

2010年12月15日 星期三

git -- revert some files back to previous rev

git checkout revhash file checkout就版本的file。
然後
git status就會顯示那個file 是modified, 但是 git diff 卻不會顯示出來。
然後用
git reset HEAD file 再 git diff 後,就會顯示出來。


如果是整個 project 都回到以前的某個rev,可以用
git checkout revsha
但是這個狀態,用 git branch 來看,會發現不再認一個 branch ,顯示 (no branch)。
這樣的狀態叫 detach HEAD.
因為不再任一個branch 中,所以commit 的東西將來 checkout 到其他 branch 後,就不見了 (沒辦法merge)。

就和 checkout 時的說明一樣
Note: moving to "v2.6.17" which isn't a local branch If you want to create a new branch from this checkout, you may do so (now or later) by using -b with the checkout command again. Example: git checkout -b HEAD is now at 427abfa... Linux v2.6.17 在 detach HEAD 狀態,要把保留的話,要再branch 出去一次。

Terminator -- 多視窗 terminal.

今天看到的:http://kewang.pixnet.net/blog/post/24498084 Terminator 就是可以做出切割視窗的 terminal. 基本command 用 mouse右鍵就可以切割,用Ctrl-Tab 就可以切換。 另外還可以用 Ctrl- 縮小字型。
覺得好用是: ssh 到 building machine 後,開啟上下兩個 window, 上面大一點,vi source,下面的 window 用來 make..

iMX51 : gpio selection

freescale 的 iMX51.
Linux source archive : http://linux-fsl-imx51.sourcearchive.com/
可其中 PAD Multiplex 的設定,可以看到..
/* select I2C1_SCK as daisy chain input */ mxc_request_iomux(MX37_PIN_I2C1_CLK, IOMUX_CONFIG_ALT0); mxc_iomux_set_input(MUX_IN_I2C1_SCL, INPUT_CTL_PATH1); 雖然一個 pin 可以有很多 function 可以選擇,但是選某幾種 function 時,會需要同時設定另一個 register - iomux_set_input 。
這個好像就是 iMX51 GPIO 特有的 daisy chain 架構。
所以在設 PAD Multiplex function 時,要看完 datasheet 有關 該 pin 所有 function 的說明,最後會提到選哪幾個 function 時,要額外設 IOMUXC register.

2010年12月14日 星期二

  • putty -- for serial com
  • ssh-server
  • vim
  • subversion
  • git-core

2010年12月13日 星期一

input - input_event, input_report_xx

根據 input event 的 type, 又包裝成: key, rel, abs, ff_status, switch, sync, mt_sync。 實際上,都只是 包裝 input_event: include/input.h: static inline void input_report_key(struct input_dev *dev, unsigned int code, int value) { input_event(dev, EV_KEY, code, !!value); } static inline void input_report_rel(struct input_dev *dev, unsigned int code, int value) { input_event(dev, EV_REL, code, value); } static inline void input_report_abs(struct input_dev *dev, unsigned int code, int value) { input_event(dev, EV_ABS, code, value); } static inline void input_report_ff_status(struct input_dev *dev, unsigned int code, int value) { input_event(dev, EV_FF_STATUS, code, value); }
input_device 要register 之前,先要把自己的 input capability 設定好,再用 input_register_devie( ) 來註冊。

input capability 包括: input 的 種類 (mouse move, key event ..)。
key 的種類 (keycode. button code..)

有關
keycode 與實體 key 的 mapping ,和 hardware 相關,所以有些 作法會定義在 board driver.

所有的 KEY_XX constant 都定義在 include/linux/input.h
/*
 * Event types
 */

#define EV_SYN                  0x00
#define EV_KEY                  0x01
#define EV_REL                  0x02
#define EV_ABS                  0x03
#define EV_MSC                  0x04
#define EV_SW                   0x05
#define EV_LED                  0x11
#define EV_SND                  0x12
#define EV_REP                  0x14
#define EV_FF                   0x15
#define EV_PWR                  0x16
#define EV_FF_STATUS            0x17
#define EV_MAX                  0x1f
#define EV_CNT                  (EV_MAX+1)


Android 基本的:
  • KEY_MENU : 139
  • KEY_BACK : 158
  • KEY_ENTER : 28
  • 繼續做完 communication with MCU
  • software key input

2010年12月10日 星期五

more on serial programming - termios and read/write raw data

上次 tty (UART) 的測試,結果我丟一個 0x0d, 0x0a ,對方卻收到 0x0d,0x0d,0x0a。 因為tty 會特別處理 控制字元,用 termios structure 可以知道: tty = open("/dev/ttymxc2",O_RDWR | O_NOCTTY | O_NONBLOCK); tcgetattr(tty,&tio); printf("c_oflag:"); if(tio.c_oflag & OPOST){ printf("OPOST "); if( tio.c_oflag & ONLCR) printf("-ONLCR"); if( tio.c_oflag & OCRNL) printf("-OCRNL"); if( tio.c_oflag & ONOCR) printf("-ONOCR"); if( tio.c_oflag & ONLRET) printf("-ONLRET"); printf("\n"); } printf("c_iflag:"); if(tio.c_iflag & IGNBRK) printf("-IGNBRK"); if(tio.c_iflag & BRKINT) printf("-BRKINT"); if(tio.c_iflag & IGNPAR) printf("-IGNPAR"); if(tio.c_iflag & PARMRK) printf("-PARMRK"); if(tio.c_iflag & INPCK) printf("-INPCK"); if(tio.c_iflag & ISTRIP) printf("-ISTRIP"); if(tio.c_iflag & INLCR) printf("-INLCR"); if(tio.c_iflag & IGNCR) printf("-IGNCR"); if(tio.c_iflag & ICRNL) printf("-ICRNL"); if(tio.c_iflag & IUCLC) printf("-IUCLC"); if(tio.c_iflag & IXON) printf("-IXON"); if(tio.c_iflag & IXANY) printf("-IXANY"); if(tio.c_iflag & IXOFF) printf("-IXOFF"); if(tio.c_iflag & IMAXBEL) printf("-IMAXBEL"); printf("\n"); run 的結果是: c_oflag:OPOST -ONLCR c_iflag:-ICRNL-IXON 參考這一篇,有解釋每個 bit field 的意義。 ONLCR - 會把 0x0a 變成 0x0d,0x0a. 所以我要把 OPST 這個 bit clear 掉...
要 read raw data, 參考 這一篇 (Serial Proramming Guide in POSIX System)。 termios 的 lflag 是: options.c_lflag &= ~(ICANON | ECHO | ECHOE | ISIG); 如果是要 output raw data,就只要: options.c_oflag &= ~OPOST; ... 那篇文章最後就有 raw data input/output 的 code: int fd; struct termios options; /* open the port */ fd = open("/dev/ttyS0", O_RDWR | O_NOCTTY | O_NDELAY); fcntl(fd, F_SETFL, 0); /* get the current options */ tcgetattr(fd, &options); /* set raw input, 1 second timeout */ options.c_cflag |= (CLOCAL | CREAD); options.c_lflag &= ~(ICANON | ECHO | ECHOE | ISIG); options.c_oflag &= ~OPOST; options.c_cc[VMIN] = 0; options.c_cc[VTIME] = 10; /* set the options */ tcsetattr(fd, TCSANOW, &options);
read tty 的動作 (block, no block , wait time, how many bytes.. etc) 是由 c_cc[VMIN], c_cc[VTIME] 的值決定的。 有關 c_cc[] 中 VMIN, VTIME 的功能: (ref : Nonecanonical Input)
  • VMIN : 至少收到多少 bytes 後 return
  • VTIME : 達成 收到 VMIN bytes 的條件後,多少時間 timout 後 return.
所以..
  • c_cc[VMIN], c_cc[VTIME] 的值都是 0 : 有沒有資料都會立刻 return,不過有資料的時候,會把資料都讀出來再return.
  • c_cc[VMIN]=0, c_cc[VTIME] 不是 0 : 等 c_cc[VTIME] 都沒有資料就 return.,如果有收到 data 就立刻 return
  • c_cc[VMIN] 不是 0, c_cc[VTIME] = 0 : 一定要等到收到 c_cc[VMIN] 個資料後才 return.
  • c_cc[VMIN], c_cc[VTIME] 都不是 0 : ..

後來又發現,對方送 0x0d, 0x0a,我收到 0x0a, 0x0a。 確認一下, c_iflag 要 mask 掉 + options.c_iflag &= ~(INLCR | IGNCR | ICRNL); 才行

2010年12月9日 星期四

install flash plugin failed in 10.10

10.10 amd64 在 install flash plugin 時,會出現要去 canonical download gz 檔的時候,沒有辦法 download. 這是因為她沒有看 系統的 proxy 設定。 在 launpad 也有列出這一項..Flash Plugin / Update Manager / PROXY not being honored 解決的方法就是 .... 到沒有 proxy 的地方去裝 XD
..等 install retry 20 次 fail 後,關掉 firefox,在 console 把http_proxy 環境變數設好,然後: sudo bash -c 'eval $(apt-config shell http_proxy Acquire::http::Proxy) dpkg-reconfigure flashplugin-installer' 就會正常經由 proxy download 了。
測試一下10.10 的 ibus 酷音修好了沒。 好像OK了。 但是 什麼 的麼 還是要打二聲 "什麼" 還有 shiff切換中英也沒有 看 這一篇,看來這個shift key 的功能應該不會改了>_< 但是我用caps lock 來切,沒辦法打大寫英文呀!! 喔,切到英文 then press shift to key in UPPER CASE..

git : fast-forward 的意思..

Navie.com 看到的這張圖.

從 devlope branch 出來,commit 三次後 merge 回去...
develope ---O---O----------M----
                \         /
branch            X---X---X
代表 --no-ff 的意思..

在 merge 的時候 (branch merge 進 develope),
如果 develope 沒有任何修改,這被認為是一次 "fast-forward",

所以merge進 develope 時,branch 的三次 commit 記錄 (X--X--X) 會被加進 develope 的 commit log 中,
但是這次 merge 的動作不會被記錄 (也就是上圖的 'M') 不會被記錄:
develope ---O---O---X---X---X----

如果在 merge 時加上 "--no-ff" 在 merge 的時候就會把這個 merge 的動作也記錄下來 (M):
develope ---O---O---X---X---X---M---

2010年12月8日 星期三

serial programming

這一篇
設定 /dev/ttymxc2 (UART3) 為 38400,然後每隔 1 sec 送一個固定的 packet 出去.. #include <stdio.h> #include <termios.h> #include <fcntl.h> void setparameter(void) { int tty; struct termios tio; tty = open("/dev/ttymxc2",O_RDWR | O_NOCTTY | O_NONBLOCK); tcgetattr(tty,&tio); tio.c_cflag = B38400 | CS8 | CLOCAL | CREAD; tcflush(tty,TCIFLUSH); tcsetattr(tty,TCSANOW,&tio); close(tty); } int main(int argc,char *argv[]) { FILE *fd; int i; printf("ttymxc2 bomb\n"); setparameter(); int data[]={0x24,0x06,0x03,0x00,0x0d,0x0a}; fd = fopen("/dev/ttymxc2","w"); // fd = stdin; if(!fd){ printf("open /dev/ttymxc2 failed!!\n"); return 1; } data[3]=data[0]^data[1]^data[2]; data[3] &= 0xFF; while(1){ for(i=0;i<6;i++) fputc(data[i],fd); sleep(1); fprintf(stdout,"%02X %02X %02X %02X %02X %02X\n",data[0],data[1],data[2],data[3],data[4],data[5]); } fclose(fd); return 0; }
然後只要在 init.rc 加上 +# MCU sending service ttymxc2bomb /system/bin/ttymxc2bomb console 就會自動跑起來。
加上 "console" ,就會 把 stdout 放到 console,所以可以看到 message。

--- 麻煩是用 service 啟動的 東西,,,kill 掉後又會自己起來 >_<
--- 好像加一行 oneshot 就可以

2010年12月7日 星期二

qemu, static and sdl

? 原來 QEMU 用 static build 的話,不能 enable-sdl. $./configure --disable-xen --disable-kvm --target-list="i386-softmmu" --enable-sdl 這樣就可以 disable kvm , build 一個可以在 vmware 的 linux 裡 run 的 qemu 了. 為了 build 快一點,所以 用 --target-list 指定,只 build i386-softmmu 就好 build 好會在 i386-softmmu/qemu
有關 git 的說明:
  • create branch
  • merge branch
  • git difftool
  • vimdiff
remote 預計的操作:
  • 如果是 follow git Distribution 的方法,每個人可以開放自己的 working folder ,並且要能夠以 ssh 連接,這樣 host server 就可以 pull 個別 pc 的 code 回來 merge
  • host server merge 完所有的 code
  • 個人 再 pull host server 的 code 回來 merge

built-in.o

好像是有 Makefile 的 folder,依照Makefile 和 Kconfig .config 的內容,會將有用到的 *.o link 成 built-in.o 然後最後 再把所有的 built-in.o link 成 vmlinux built-in.o 的 Make rule 在 scripts/Makefile.build ifdef builtin-target quiet_cmd_link_o_target = LD $@ # If the list of objects to link is empty, just create an empty built-in.o cmd_link_o_target = $(if $(strip $(obj-y)),\ $(LD) $(ld_flags) -r -o $@ $(filter $(obj-y), $^) \ $(cmd_secanalysis),\ rm -f $@; $(AR) rcs $@) $(builtin-target): $(obj-y) FORCE $(call if_changed,link_o_target) targets += $(builtin-target) endif # builtin-target

2010年12月6日 星期一

notes on reading git community book

翻譯一下 git community book
Internals and Plumbing

所有的 objects (是說有被記錄的file 嗎?) 都是以 gzip 壓縮的方式存放,以 他的 sha value 為檔名(?)

git 有兩種保存 object 的方法:
  • Loose Objects : 就整個 rev 的所有 file 的壓縮,會以 sha value 為檔名。為求快速,前兩個 char 會被當做 folder name
  • Packed Objects : 有點像 diff,如果某個 rev 只是另一個 rev 加一個小小的修改,整個ˊ重存一次太浪費空間,所以就會以 diff 跟 base link 的方式存
* packed object 要手動用 git gc 來作,否則都是用 Loose objects 的方式存。

所有的東西都放在 .git/objects 裡。


查看 Objects 的方法...
git 把每一個 file, commit, tree, tag 都當做是一個物件(object) 放在這個folder 裡。
所以.
$find . .git/objects 列出來的每個 object ,都可以用
$git cat-file -t shavalue 來看他是屬於哪一個type.

git 把你目前工作的 base 記錄在 .git/HEAD,可以cat 出來看:
ref: refs/heads/trysquash -- 我現在是checkout trysquash 這個 branch 在工作。

正因為 git 所有的東西(rev, commit, file, tag) 都是以 sha filename 放在 object,
所以剛剛那個 HEAD 的內容,只是指向 objects 中的一個 file。
$cat refs/heads/trysquash 2da4ad933b2079851c37e7334637d745bdfb9c94 看看是什麼type:
$git cat-file -t 2da4 commit 再看一下 commit 的內容 $git cat-file commut 2da4 tree e233040dafb15380a01e73d420143a10d66019f4 parent ce00a162dd739865c16c3fab542fb4c9fa504ac2 author Charles Chang 1291615019 +0800 committer Charles Chang 1291615019 +0800 in trysquash 看一下這次 comit 有哪些東西 $fit ls-tree 2da4 100644 blob d79ded6406430e1ab113a70476fa560d938c9292 f1 只有 f1 這個 file.
也可看這個 file 的內容
$git cat-file blob d79d add new line

Reference

branch, remote-tracking branch (是什麼?) 還有tag 實際上都是 reference 到某一個 commit。
這些 reference 別人的記錄,都是記錄在 git/refs 下,並且每個type 都有一個 folder
$ls .git heads remotes tags
  • git merge -- without commit
  • debug suspend hang on evb -- why my patch cause exception ons suspending
  • small HEX-BIN convert UART program for testing with MCU -- a backup for N.
  • debug the pwr-pin voltage -- work with hardware eng

  • try full linux version -- maybe used in mass-production, fdisk, mkfs,dd

2010年12月3日 星期五

WFI : Wait for Interrupt

ARMv7 增加一個instruction : WFI, opcode 是
.long 0xe320f003 @ Opcode for WFI 因為這個新 instruction 在現在的 GCC 裡面還沒 support,所以可以在很多地方看到這一行 code.(? 是嗎)

WFI 的動作 ref ARM Technical Manual : Wait for Interrupt.
Support WFI 的 chip 有:Which Architecture Support WFI

在 Linux kernel 裡,用這個 instruction 作 suspend. (其實也可以作idle 吧?)

2010年12月2日 星期四

Android -- Suspend (and wakeup ?)

Android 設定 power state 的 function 好像是在: hardware/libhardware_legacy/power/power.c 裡面的 int set_screen_state(int on) { QEMU_FALLBACK(set_screen_state(on)); LOGI("*** set_screen_state %d", on); initialize_fds(); //LOGI("go_to_sleep eventTime=%lld now=%lld g_error=%s\n", eventTime, // systemTime(), strerror(g_error)); if (g_error) return g_error; char buf[32]; int len; if(on) len = sprintf(buf, on_state); else len = sprintf(buf, off_state); len = write(g_fds[REQUEST_STATE], buf, len); if(len < 0) { LOGE("Failed setting last user activity: g_error=%d\n", g_error); } return 0; } 其中的 g_fds[REQUEST_STATE] 就是: enum { ACQUIRE_PARTIAL_WAKE_LOCK = 0, RELEASE_WAKE_LOCK, REQUEST_STATE, OUR_FD_COUNT }; 對應 const char * const NEW_PATHS[] = { "/sys/power/wake_lock", "/sys/power/wake_unlock", "/sys/power/state" }; 也就是 /sys/power/state 寫入 static const char *off_state = "mem"; static const char *on_state = "on";
suspend 就寫 "mem".


使用這個 function 的 source 在 ./frameworks/base/core/jni/android_os_Power.cpp: static int setScreenState(JNIEnv *env, jobject clazz, jboolean on) { return set_screen_state(on); } 這是一個 JNI function,包裝的 class 是: ./frameworks/base/core/java/android/os/Power.java
使用的 class 是 ./frameworks/base/services/java/com/android/server/PowerManagerService.java


kernel 層對應 /sys/power/state 的 device 是 kernel/power/main.c

對 /sys/power/state的 read/write 對應有點.. #define power_attr(_name) \ static struct kobj_attribute _name##_attr = { \ .attr = { \ .name = __stringify(_name), \ .mode = 0644, \ }, \ .show = _name##_show, \ .store = _name##_store, \ } 在 main.c 中: power_attr(state); 所以要找 state_store:
state_store( ) 會把 write 到 /sys/power/state 和 support 的 power state 比較,下面是suspend 的 state : (suspend.c) const char *const pm_states[PM_SUSPEND_MAX] = { #ifdef CONFIG_EARLYSUSPEND [PM_SUSPEND_ON] = "on", #endif [PM_SUSPEND_STANDBY] = "standby", [PM_SUSPEND_MEM] = "mem", }; 然後call enter_state(state) -- state 就是 pm_states[] 對應的index。

這個在 suspend.c: int enter_state(suspend_state_t state) { int error; if (!valid_state(state)) return -ENODEV; if (!mutex_trylock(&pm_mutex)) return -EBUSY; printk(KERN_INFO "PM: Syncing filesystems ... "); sys_sync(); printk("done.\n"); pr_debug("PM: Preparing system for %s sleep\n", pm_states[state]); error = suspend_prepare(); if (error) goto Unlock; if (suspend_test(TEST_FREEZER)) goto Finish; pr_debug("PM: Entering %s sleep\n", pm_states[state]); error = suspend_devices_and_enter(state); Finish: pr_debug("PM: Finishing wakeup.\n"); suspend_finish(); Unlock: mutex_unlock(&pm_mutex); return error; } 可以看到 .. suspend_device_and_enter(state);
然後是,. suspend_finish( );

上面的 debug message 是.. PM:Finishing wakeup.
所以 在 suspend_device_and_enter( ) 後,cpu 應該就進入 suspend state。
一直到有 wakeup event 後,才會wakeup 起來,繼續執行.. suspend_finish().


但是 user program 寫入 /sys/power/state 和 kernel/power/main.c 的執行沒有同步 (?)。
所以 user program 不知道在什麼時候停住。 (?)


suspend_enter( ) 實際作 cpu suspend 的動作是靠
static struct platform_suspend_ops *suspend_ops; 的 ops interface 來完成的。

這個變數是呼叫
void suspend_set_ops(struct platform_suspend_ops *ops) { mutex_lock(&pm_mutex); suspend_ops = ops; mutex_unlock(&pm_mutex); } 完成的,每個 platform 都會實作呼叫這個 function 的 code.
所以在 arch/ 下面的code 可以找到很多..
例如 arch/arm/mach-xxx/pm.c

platform 為了作 suspend,通常會 copy 最後一段的 code 到 internal ram 中,再跳過去執行,然後把 DRAM 設為 self-fresh mode,然後停止 clock.


ref: http://hi.baidu.com/linuxembedded/blog/item/4eeb143837879bd2d46225ca.html

2010年12月1日 星期三

Android - key input , touch input

framework/base/lib/ui/EventHub.cpp: static const char *device_path = "/dev/input"; 然後 .. scan_device(device_path) scan_device 找所有 /dev/input 下面的 node int EventHub::scan_dir(const char *dirname) { char devname[PATH_MAX]; char *filename; DIR *dir; struct dirent *de; dir = opendir(dirname); if(dir == NULL) return -1; strcpy(devname, dirname); filename = devname + strlen(devname); *filename++ = '/'; while((de = readdir(dir))) { if(de->d_name[0] == '.' && (de->d_name[1] == '\0' || (de->d_name[1] == '.' && de->d_name[2] == '\0'))) continue; strcpy(filename, de->d_name); open_device(devname); } closedir(dir); return 0; } 呼叫 open_device,把 node 加到 mFD[] 中。
在 kernel 的部份, /dev/input 是由 /driver/input/input.c 註冊的: static int __init input_init(void) { int err; input_init_abs_bypass(); err = class_register(&input_class); if (err) { printk(KERN_ERR "input: unable to register input_dev class\n"); return err; } err = input_proc_init(); if (err) goto fail1; err = register_chrdev(INPUT_MAJOR, "input", &input_fops); if (err) { printk(KERN_ERR "input: unable to register char major %d", INPUT_MAJOR); goto fail2; } return 0; fail2: input_proc_exit(); fail1: class_unregister(&input_class); return err; }
最上層 EventHub.cpp 中,poll input device 的 function : bool EventHub::getEvent 用 bionic -- libc 的 poll function .. release_wake_lock(WAKE_LOCK_ID); pollres = poll(mFDs, mFDCount, -1); acquire_wake_lock(PARTIAL_WAKE_LOCK, WAKE_LOCK_ID); if (pollres <= 0) { if (errno != EINTR) { LOGW("select failed (errno=%d)\n", errno); usleep(100000); } continue; } //printf("poll %d, returned %d\n", mFDCount, pollres); // mFDs[0] is used for inotify, so process regular events starting at mFDs[1] for(i = 1; i < mFDCount; i++) { ...... 一次poll所有的 input device,timeout 是 -1 ,所以是 block。 也就是說,要任一個 device 有資料才 return. 然後...判斷 有 update 的 device,read data: if(mFDs[i].revents & POLLIN) { res = read(mFDs[i].fd, &iev, sizeof(iev)); iev 內容就是 keyscan code.


touch 的 interface 也在這裡。

more on git remote repository

作 repo 的 local mirror 的時候有點奇怪。
要修改 .repo/manifest.xml

但是用 repo --mirror init/sync 的 repo 目錄,沒有辦法直接修改 (就跟用 git clone --bare 的目錄內容沒有辦法值些修改 source / 找不到 source)。

所以就要 先在其他地方 repo init ,這樣就 'checkout' 出 .repo 。
然後手動修改 .repo/manifest.xml
然後再 repo sync


git 要在 remote repository 上 create branch 要用
git push <server-name> <local-branch-name>:<remote-branch-name> 方法是把一個 local 的 branch/commit push 進 remote repository。
所以,這個命令要在某一個 workable 的 git project 下作。

2010年11月30日 星期二

local mirrir repo server

git-daemon OK,但是要 對整個 android source 作 VC,要用 repo

參考,大概都是利用修改 manifest.xml,建立一個 branch..
但是原來 bsp vendor 就 branch 一次了....
所以,預計這樣:
 master ----> apply patch ----> vender branch ----> modify manifest ----> local branch

Server 還有 48G,應該足夠。

參考 這一篇 (http://gregmeiste.com/2009/02/mirror-android-repositories-on-a-local-server/)要建 local mirror ,在 repo init 時要加 option --mirror
加上 --mirror ,接著作 repo sync 後,會做類似 git clone --bare 的動作, 只會 checkout git 的記錄資料,不會 checkout source code 出來。

這樣的 repository folder,剛好可以放在 git-daemon 的 base-path,當做一般專案。讓 git-daemon 管理。

所以建議直接到 git-daemon 的 local-path 作 repo init, repo sync,同時,follow 前面的 ref link,執行時 用 gitdaemon user 的 uid 來作。避免 access 權限問題。


使用 --mirror 作 clone 的 repo ,不能直接修改內容,要 另外 checkout 出來改,然後再 commit /push.


Follow BSP 的方式,android source 分成三個 project:
  • android repo
  • kernel
  • uboot
麻煩的地方: device 下有 vendor 自己 create 的 folder,用的是 local 的 git project. -- 要怎樣加到 server ?

android repo 比較麻煩,要先 repo init --mirror 下來。
因為 vender 改過 default.xml,所以要 checkout default.xml 出來,branch ,修改後再 commit , push 回 server。

之後各 developer 要 checkout 的時候:
  • android repo 要加上 -b local
  • kernel 和 uboot 就不用 branch 到 local 了。直接 checkout 就可以。

2010年11月29日 星期一

public git server by git-daemon

雖然 git-daemon 有 security 問題,但是在 LAN 內還算 OK .
follow 這一篇 , install git-daemon-run $sudo aptitude install git-daemon-run 這會用 sv 啟動 git-daemon,

git-daemon 的啟動 script 在 /etc/sv/git-gaemo/run
要修改一下 run 這個 script,讓他可以允許 remote push,, follow 這一篇: #!/bin/sh exec 2>&1 echo 'git-daemon starting.' exec chpst -ugitdaemon \ /usr/lib/git-core/git-daemon --export-all --verbose --enable=receive-pack --base-path=/var/cache /var/cache/git
至於要 public 的 repository,要 follow git book 的說明,先 bare clone 出來。
如果不作 bare clone的話,會不允許 remote 對 master 作 push 的動作。

option --export-all 就不用在 .git 下加一個 export_ok 的檔案。

--base-path=/var/cache 代表 git:// 的 root path.

/var/cache/git 代表放置 git repo 專案的位置。
因為 -base-path=/var/cache, 和 位置 /var/cache/git 不一樣 (少了 git),所以 remote access git:// 時,要自己加上 /git/
如果設得一樣就不用了。

假設要 public 的 repository 是 ~/testgit"
$git clone --bare ~/testgit testgit.git 然後把 clone 出來的 testgit.git 這個目錄 copy 到 剛剛啟動 git-daemon 時指定的 path : /var/cache/git 下。

另外,把testgit.git 裡,所有 file, directory 的 owner 都設為 git,這樣 git-daemon 才有write的權限。

重新啟動 git-daemon $sudo sv restart git-daemon
這樣,LAN 裡面的 機器就可以用
$ git clone git://serverip/git/testgit 取出 剛剛的 repo,用
$git push 把 code update 到 server.

實際上,安裝玩後一直有 remote push fail 的問題,到 server 打開 /var/log/git-daemon/current 來看,可以看到是 git repo folder 全縣問題。

結果是看了 run script
exec chpst -ugitdaemon 查一下 chpst 的意思, chpst -uuid 是以 uid 來 run 後面的 program。
所以要把所有 repo 的 owner 改為 gitdaemon 才行。

.... gitdaemon 只有 create user 沒有 group.


開啟 web 介面 (gitweb) #aptitude install apache2 gitweb 裝完以後,先 config gitweb: /etc/gitweb.conf
告訴 gitweb, git-daemon 的 repository 位置: $projectroot = "/home/git/git-daemon/myandroid10.2"
* 實際上,git-daemon 下有很多 folder,每個 folder 各自聚集很多 git project, 如果指定: $projectroot = "/home/git/git-daemon"
gitweb 會找所有 /home/git/git-daemon/下的git project,然後把他們攤平,列出來。
會很亂,所以只把最多人用的 project folder myandroid10.2 列出來就好,就把 root 指到 myandroid10.2 下.
其他的 folder project 就不會顯示出來了。

然後在 apache 加入 virtualhost

因為這個 server 已經 run redmine 了,加上 dns 不歸我們管,所以只有用 port number 來區分。
gitweb 使用 8080

#vi /etc/apache2/site-available/gitweb.conf: <VirtualHost *:8080> DocumentRoot /usr/share/gitweb/ SetEnv GITWEB_CONFIG /etc/gitweb.conf Options ExecCGI AddHandler cgi-script cgi DirectoryIndex gitweb.cgi RewriteEngine on RewriteRule ^/$ /usr/lib/cgi-bin/gitweb.cgi RewriteRule ^/(.*\.git/(?!/?(HEAD|info|objects|refs)).*)?$ /cgi-bin/gitweb.cgi%{REQUEST_URI} [L,PT] </VirtualHost>
然後建 link 到 site-enable 去 #ln -s /etc/apache2/site-available/gitweb.conf /etc/apache2/site-enable/001-gitweb.conf
然後把 port 8080 打開: /etc/apache2/port.conf 加上 port 8080
因為有enable RewriteEngine,所以要 load Rewrite module
建 link #ln -s /etc/apache2/mods-available/rewrite.load /etc/apache2/mods-enable/rewrite.load
之後重新啟動 apache2 #/etc/init.d/apache2 restart OK

ref
  1. http://blog.longwin.com.tw/2009/05/debian-linux-build-gitweb-2009/

備份一下 server 的 git-daemon run script: #!/bin/sh exec 2>&1 echo 'git-daemon starting.' exec chpst -ugit \ "$(git --exec-path)"/git-daemon --export-all --verbose --enable=receive-pack --base-path=/home/git/git-daemon /home/git/git-daemon server 為了方便,所以真的 create 一個 user git. 然後把 git-daemon base 放到 git 的 home 下...
  • bootloader 8.1 與 9.1 的不同--9.1 開機容易 fail 是 pmic output voltage 與 8.1 不同的關係?
  • 第一個 PanelOK 測試 image 播放 HD movie 易當機的原因 -- AudioHardwareInterface Stub 修改,沒有 clean build (whole system ?) : 看看能不能找出 dependency project 和 Make 能否auto rebuild
  • implement HOME, MENU KEY. < -- 這個有列 PIC

KEYPAD 使用 pmic 上的 ADC.用分壓找出被按下的按鍵。 BSP 的 PMIC ADC 使用:
  • 1 ~ 4 : touch
  • 5 : ADIN_5 --- 接到 PMIC 的 GPO1
  • 6 : Temperature - 接到 MCU 的 STR pin 上
  • 7 : ACCESSORY_CARD_ID - 接到 expansion boarfd slot 上

2010年11月26日 星期五

先找到 HOME, MENU KEY 等實體位置。 找到 POWER KEY -- 確認 suspend/wakeup 的動作。 ? 在 u-boot 有控制電壓的 command ?

2010年11月25日 星期四

要改 /root/init.rc 不要直接改 out/target..../root 的 init.rc

要去改 devices/... 下的 init.rc

這樣 git 可以 trace diff,而且用 make 就可以自動重新產生 ramdisk.img
不必自己用 mkbootfs ......

2010年11月23日 星期二

Detecting the Tocuh Screen

電阻式 touch screen 是由兩片導電透明塑膠重疊而成。
中間會用另一種半導電層隔開。

上面的一片,在上下兩側年上 Y+, Y- 電極。
下面的一片,在左右兩側黏上 X+, X- 電極。

由於有中間的半導電層隔開,所以上下兩層是絕緣的。

但是一旦touch 到,適當設計的半導電層,就會在touch 的位置導通。讓上下層導通。

一般的 touch controller,會配合驅動電路,供給電壓。
和 ADC 電路,量測電壓。

以下面這個 controller 來看,他是在 X+, X- 給 3.3V。
然後由 ADC 量 Y+ 的電壓,來找出 touch X 的位置。

然後再由 Y+,Y- 給 3.3V。
ADC 量 X+ 的電壓,找出 touch Y 的位置。

最後再由 X+ 給一個小電流,Y+接地,量 X+ 電壓,這樣就知道 touch 的電阻。
(用手指或是pen touch 會造成 電阻的不同)

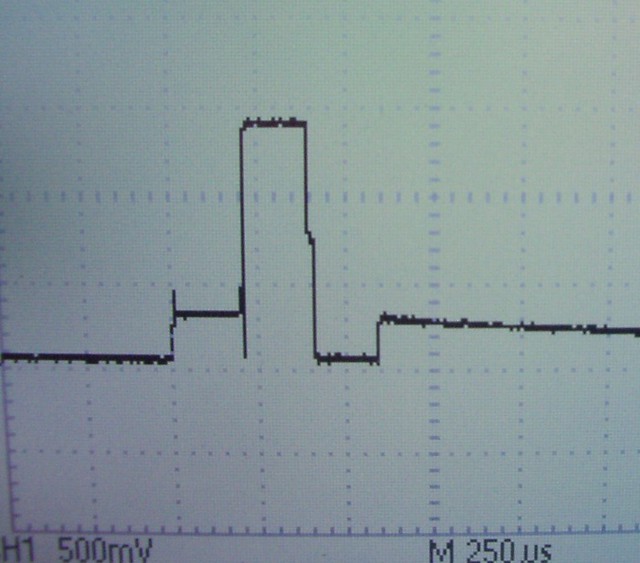
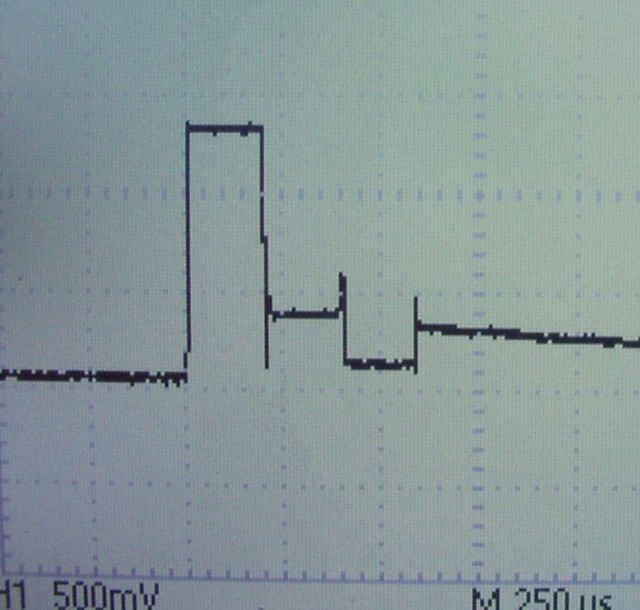
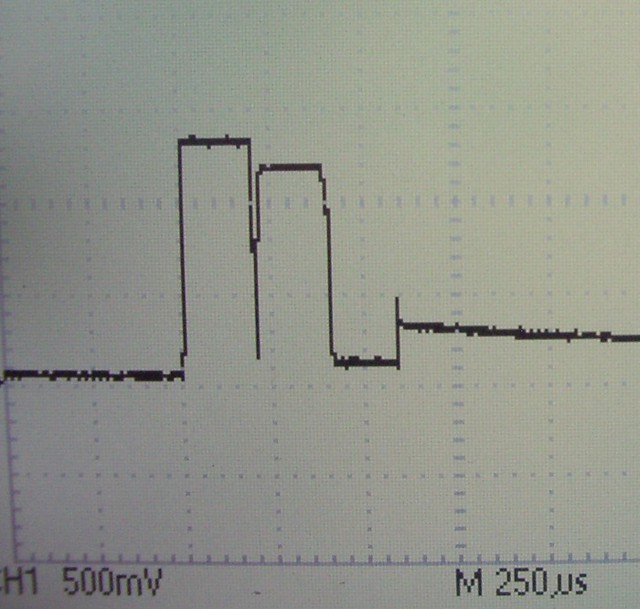
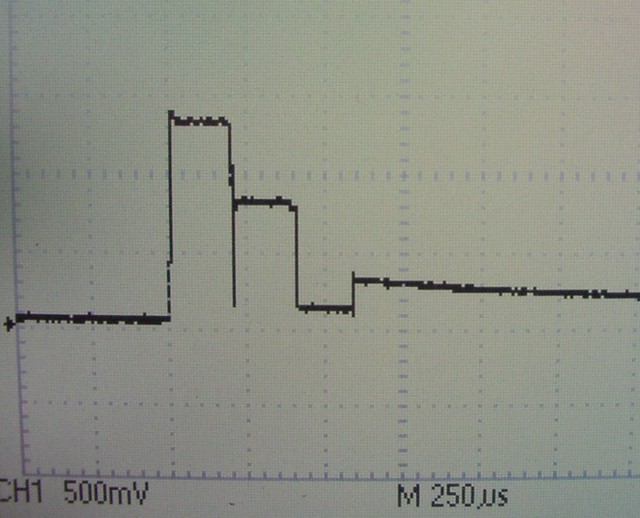
所以由示波器量 X+ , Y+ 都會出現3 個 "pulse".

下面兩張示量 Y+ 的波型,分別是 touch 在 panel 左邊和右邊的結果,可以看到 第一個 pulse 大小有改變。
xleft
.
xright

下面兩張是量 X+,分別 touch panel 上面和下面,可以看到第二個 pulse的大小有改變:
ytop
..
ydown

最後一個 pulse 就是利用 小 current 量電阻。可以知道這個是輕輕的 touch 還是..


另外,由於 touch 屬於 UI,所以使用 polling 的方式來偵測沒有效率。
所以 controller 通常會提供 interrupt 模式,來偵測有 touch。

以這一個 controller 為例,就是在 X+ 提供 一個小電流,Y+接地。
未接觸時是 open,所以 X+ 會是 3.3V。
當 touch 時,weak current source 的電壓就會降下來。
這樣 controller 就偵測到 interrupt。

之後才開始進入剛剛說明的 X-Y 量測模式。
目標在找出 ril 和 bluetooth d-bus exception 的原因。
還有能不能只啟動 touch screen 和 console。

my vm : restart from scratch

remote : follow on, 修改 init.rc 拿掉 ts_calibrator 後的service.

打開 pmic adc 的 debug log, replace pr_debug with printk. - 確認按下 panel 會有 interrupt message。

最舊版

就只有html 模式 連項目標號也沒有。
  • 11
  • chrome 配上新版如何

    還會有一堆 div 嗎?
    可以用 > < ?

    #include "header.s"
    這樣呢?
    #include <header.h>

    所以還是不行。

    頂多是那些 <div> 不見了。

    clean in Android makefile

    ndroid 有關 clean 的 Make rule 寫在: build/core/cleanbuild.mk clean 的 target 有:
    • dataclean
    • installclean

    installclean: installclean_files := \ ./$(HOST_OUT)/obj/NOTICE_FILES \ ./$(HOST_OUT)/sdk \ ./$(PRODUCT_OUT)/*.img \ ./$(PRODUCT_OUT)/*.txt \ ./$(PRODUCT_OUT)/*.xlb \ ./$(PRODUCT_OUT)/*.zip \ ./$(PRODUCT_OUT)/data \ ./$(PRODUCT_OUT)/obj/lib \ ./$(PRODUCT_OUT)/obj/APPS \ ./$(PRODUCT_OUT)/obj/NOTICE_FILES \ ./$(PRODUCT_OUT)/obj/PACKAGING \ ./$(PRODUCT_OUT)/recovery \ ./$(PRODUCT_OUT)/root \ ./$(PRODUCT_OUT)/symbols/system/lib \ ./$(PRODUCT_OUT)/system
    dataclean: dataclean_files := \ ./$(PRODUCT_OUT)/data/* \ ./$(PRODUCT_OUT)/data-qemu/* \ ./$(PRODUCT_OUT)/userdata-qemu.img installclean 的 showcommands log: 另外在 main.mk 也有 clean target
    • clean
    • clobber
    clean dirs_to_clean := \ $(PRODUCT_OUT) \ $(TARGET_COMMON_OUT_ROOT) \ $(HOST_OUT) \ $(HOST_COMMON_OUT_ROOT)
    clobber rm -rf $(OUT_DIR) 所以最可怕的是 clobber 吧..
    關於以上用到的目錄變數: OUT_DIR := out PRODUCT_OUT := out/target/
    Android 的說明文件 說 If you build one flavor and then want to build another, you should run "make installclean" between the two makes to guarantee that you don't pick up files installed by the previous flavor. "make clean" will also suffice, but it takes a lot longer. 還有列出上面的 clean target:
    • clean-$(LOCAL_MODULE) and clean-$(LOCAL_PACKAGE_NAME) - Let you selectively clean one target. For example, you can type make clean-libutils and it will delete libutils.so and all of the intermediate files, or you can type make clean-Home and it will clean just the Home app.
    • clean - make clean deletes all of the output and intermediate files for this configuration. This is the same as rm -rf out//
    • clobber - make clobber deletes all of the output and intermediate files for all configurations. This is the same as rm -rf out/.
    • dataclean - make dataclean deletes contents of the data directory inside the current combo directory. This is especially useful on the simulator and emulator, where the persistent data remains present between builds.

    2010年11月19日 星期五

    iMX51 : uboot env variable location

    這個 iMX51 的 SD bootloader 把 environment variable 放在.. 768K 的地方,大小是 128K
    ref : uboot參數 - 強人狗夫叔叔提供
    所以要backup uboot env variable: $dd if=/dev/sdc of=ubootarg.bin bs=128k skip=6 count=1
    要 restore: $dd if=ubootargs.bin of=/dev/sdc bs=128k seek=6

    Worklog - 2G SD partition Tables for Android

    1G 的 partition 安排
    • mbr+uboot+uImage+uramdisk : 10M
    • 1 Primary : VFAT for general data (1G-510M = 490M) - 所以pre alloc 500M
    • 2 Primary : EXT4 /system (200M)
    • 3 Extended (total 200M)
      • 5 Extended : EXT4 /data (100M)
      • 6 Extended : EXT4 /cache (100M)
    • 4 Primary : EXT4 for recovery (100M)

    Worklog - LCD panel OK

    其實 L 先生的參數原來就是對的,不能顯示的原因是 kernel 和 Android Service。
    • 使用8.1 uboot , kernel fail 的原因: mem 實際上沒有 256M ,扣掉 GPU 的區域,只剩下 170M
    • Audio Codec 更換,但是 Android AudioHardware 還是會使用,導致 fail : 改用 GENERIC_AUDIO (Software Andio Interface Stub) 讓他 pass
      ref : Software Audio Driver Interface Stub
    大概就是這兩個。 (其他的修改都沒有關係) 目前最大的問題應該是 SD Card read/write 不穩定。

    2010年11月18日 星期四

    Linux Lcd Panel Sync Parameter

    設定 framebuffer 的 timeing parameter 的 structure: include/linux/fb.h struct fb_videomode { const char *name; /* optional */ u32 refresh; /* optional */ u32 xres; u32 yres; u32 pixclock; u32 left_margin; u32 right_margin; u32 upper_margin; u32 lower_margin; u32 hsync_len; u32 vsync_len; u32 sync; u32 vmode; u32 flag; };好像沒有提到 "單位",是 dot clock , time 還是 scanline ? 這些parameter 的意義可以參考: Lcd Controller Timing Parameters 根據 L 先生的參數: + /* 800x480 @ 58 Hz , pixel clk @ 32MHz */ "PVI-2003A-WVGA", 58, // refresh 800, // x res 480, // y res 31250, // pixclock 86, // left margin 42, // right margin 33, // upper margin 10, // lower margin 128, // hync len 2, // vsync len FB_SYNC_CLK_LAT_FALL | FB_SYNC_EXT, FB_VMODE_NONINTERLACED, 0,}, 每個的單位都不一樣:
    • left, right margine 和 hsync len 的單位是 pixle clock
    • upper. lower 和 vsync len的單位是 horizontal scanline
    當完全設定正確的時候 frame rate (e.g 57Hz ?) 就會正確。 這個 data 宣告在 LCD 設定正確後,power up sequence 也要正確。 ref : Lcd Power Up Sequence - 但是每一個 panel 的 power up sequence 不一定一樣。

    2010年11月17日 星期三

    Software Audio Driver Interface Stub,,

    參考這個 : Android Build System 要是變更了 BoardConfig.mk,好像要.. make installclean 再作 make 否則好像沒效,BoardConfig.mk的修改不會進去.. .. 這樣更慘,有些 bin/ 下的 tool 不會重 build XD. 所以還是乖乖用 find 找出有用到的 module,一一touch 後再 mm ? Cleanup 好像是 m clean 如果要 clean 所有 build 出來的 binary 檔: m clobber ... 他說這個 command 就是把 out 這個 folder 刪掉 >_<
    Audio 是在 framework/base/libs Android 有提供一個 AudioStub,讓 Hardware 的 Audio 還沒好的時候,可以用這個Stub 提供 Audio 需要的 Interface。 要使用這個 Stub,需要在 BoardConfig.mk 裡 Enabel BOARD_USES_GENERIC_AUDIO := true 這樣 framework/base/libs/audioflinger 的 Android.mk 就會 define. ifeq ($(strip $(BOARD_USES_GENERIC_AUDIO)),true) LOCAL_CFLAGS += -DGENERIC_AUDIO 這樣在 AudioHardwareInterface.cpp .. AudioHardwareInterface* AudioHardwareInterface::create() { AudioHardwareInterface* hw = 0; char value[PROPERTY_VALUE_MAX]; #ifdef GENERIC_AUDIO hw = new AudioHardwareGeneric(); #else 還有 AudioPolicyService.cpp .. AudioPolicyService::AudioPolicyService() : BnAudioPolicyService() , mpPolicyManager(NULL) { char value[PROPERTY_VALUE_MAX]; // start tone playback thread mTonePlaybackThread = new AudioCommandThread(String8("")); // start audio commands thread mAudioCommandThread = new AudioCommandThread(String8("ApmCommandThread")); #if (defined GENERIC_AUDIO) || (defined AUDIO_POLICY_TEST) mpPolicyManager = new AudioPolicyManagerBase(this); LOGV("build for GENERIC_AUDIO - using generic audio policy"); #else 改完build 還是會有一堆問題...例如...用 showcommands 看 GENERIC_AUDIO 好像沒 define.. 最後好像是 touch 所有的 audioglinger/ 下的 file 再重 build 才看到。
    實際使用時,因為這次 AudioCodec hardware 還沒 ready,所以一旦access 到 codec 就會 down 機。 上面的 code 還是會 access 到 codec,所以要稍微修改一下,不嘗試 new AudioHardwareGeneric(),直接 new AudioHardwareStub( ): AudioHardwareInterface* AudioHardwareInterface::create() { /* * FIXME: This code needs to instantiate the correct audio device * interface. For now - we use compile-time switches. */ AudioHardwareInterface* hw = 0; char value[PROPERTY_VALUE_MAX]; #if 0 #ifdef GENERIC_AUDIO hw = new AudioHardwareGeneric(); #else // if running in emulation - use the emulator driver if (property_get("ro.kernel.qemu", value, 0)) { LOGD("Running in emulation - using generic audio driver"); hw = new AudioHardwareGeneric(); } else { LOGV("Creating Vendor Specific AudioHardware"); hw = createAudioHardware(); } #endif if (hw->initCheck() != NO_ERROR) { LOGW("Using stubbed audio hardware. No sound will be produced."); delete hw; hw = new AudioHardwareStub(); } #else hw = new AudioHardwareStub(); LOGW("Using stubbed audio hardware. No sound will be produced."); #endif // if 0
    好像是因為 GENERIC_AUDIO 沒有 A2DP 的 support,所以也要把 bluetooth 的 A2DP profile disable.

    2010年11月16日 星期二

    Android : enable init log print out

    android 的 init (system/core/init) 的 message (ERROR, INFO..) 是不是要 print 到 console,可以用 init.rc 的 loglevel 3 來控制,參考 system/core/init/init.h: #define ERROR(x...) log_write(3, "<3>init: " x) #define NOTICE(x...) log_write(5, "<5>init: " x) #define INFO(x...) log_write(6, "<6>init: " x) #define LOG_DEFAULT_LEVEL 8 /* messages <= this level are logged */ 把 init.rc 的 loglevel 設為 6,所有message都會丟出來(連 kernel 的 debug messasge 也會印出來)。
    直接去 out/target/product/.../root 改,修改完可以參考 makebootfs 重做 ramdisk.img

    2010年11月15日 星期一

    Tell Hardware Time is Local Time

    每次 server 都把 hardware clock 的時間當做 Universal Time,然後再轉 Local Time,所以都不對。 要告訴 Server, 現在 hardware clock 的時間就是 Local Timer,不是 Universal Time。 要修改: /etc/defaults/rcS 有一行: UTC=yes 改為 UTC=no

    repo in android source

    repo 是一個 python script。
    repo 本體只有一些基本的command,

    但是會靠 repo folder 下, .repo/repo 下的 py file 來擴充..
    可以看 .repo/repo/main.py

    這個 folder 還有說明檔,說明 manifest.xml 的語法
    .repo/repo/docs/manifest-format.txt

    ToDo Today

    • check gpio - 與 demoboard 不同處
    • 要modify code了,要作 version control 和 team work
    • centrialize git server -- 似乎有點難,用 各 member 提供 patch 的方式?
    • 各 member 自己作 local git repo control,最後提供一個 patch 到 integrator。
    • integrator apply 所有 member 的 patch,, commit 到 main git repo --- integrator 會作死
    • 各 team member 間 public repo 出來,integrator 一一 pull 回來,commit 到 main server
    • 各 team member 自己 push 到main git server,發出訊息請大家各自 pull 回來 ... 所有人要會做 push - pull,center git server 也要先 setup 好。
    麻煩的是 ... 不單純是 git,是 repo... follow 一下google的 repo workflow 說明好了。

    2010年11月11日 星期四

    git: 使用 ssh:// 作 remote repository 的 protocol

    要裝 gitosis 好像很麻煩,
    看到 這一篇
    (http://plog.longwin.com.tw/my_note-unix/2009/05/08/build-git-env-over-ssh-2009 ) 可以直接用 ssh:// 作 access 的 protocol。

    所以是,..對該 folder 有 access 權限的人都可以 remote push.. pull ?

    git : work with diff, patch

    在一般的開發過程。如果不想commite,但是又想留住目前的code。 可以直接將 git diff 的結果存起來。 $git diff > mystage.patch 然後 checkout 一次 --- 回到上次 commite 的狀態: $git checkout -f 做完 git 的操作 (branch..checkout.. ect),再 patch 回去。 $patch -p1 < ./mystage.patch

    2010年11月9日 星期二

    device print in kernel

    kernel, driver 有一堆 DBG( ...)。\
    實際上是: #define DRIVER_NAME "mydriver" #define DBG(f, x...) \ pr_debug(DRIVER_NAME " [%s()]: " f, __func__, ## x)
    呼叫 pr_debug。

    pr_debug 又定義在: include/linux/kernel.h
    #if defined(DEBUG)
    #define pr_debug(fmt, ...) \
    printk(KERN_DEBUG pr_fmt(fmt), ##__VA_ARGS__)
    #elif defined(CONFIG_DYNAMIC_DEBUG)
    /* dynamic_pr_debug() uses pr_fmt() internally so we don't need it here */
    #define pr_debug(fmt, ...) do { \
    dynamic_pr_debug(fmt, ##__VA_ARGS__); \
    } while (0)
    #else
    #define pr_debug(fmt, ...) \
    ({ if (0) printk(KERN_DEBUG pr_fmt(fmt), ##__VA_ARGS__); 0; })
    #endif
    也就是說,要有 define DEBUG 或是 CONFIG_DYNAMIC_DEBUG 才會有效果。
    還有 pr_debug 好像要 loglevel 設 8 才會直接 output 到 console.
    device driver 都用 dev_err, dev_dbg 作 print 輸出。
    定義在 include/linux/device.h
    #if defined(DEBUG) #define dev_dbg(dev, format, arg...) \ dev_printk(KERN_DEBUG , dev , format , ## arg) #elif defined(CONFIG_DYNAMIC_DEBUG) #define dev_dbg(dev, format, ...) do { \ dynamic_dev_dbg(dev, format, ##__VA_ARGS__); \ } while (0) #else ...
    其中 dev_dbg 定義是:
    #define dev_printk(level, dev, format, arg...) \ printk(level "%s %s: " format , dev_driver_string(dev) , \ dev_name(dev) , ## arg)
    所以只要 有 define DEBUG,dev_dbg 就是 printk 加一堆 device driver name..

    但是好像不是所有的 driver Makefile 都有 DEBUG option,沒有的可能要自己加..
    在對應driver 的 Makefile 最後,加上:
    EXTRA_CFLAGS += -DDEBUG
    但是 Makefile 好像沒有在 master Makefile 的 dependentenct check 裡,所以要自己 touch source code 再 make

    這樣所有 dev_XXX 的 message 都會log起來,可以用 dmesg 印出來,但ˋ是只有 level 小於 loglevel 的 message 才會realtime印出console。

    一般 (android) loglevel 是 3,設為 8 好像就可以把所有 message 都 realtime印出來。
    ref : Enable log print out
    kerenl 定義這些 run level 和 KERN_INFO, KERN_DEBUG 的地方是: linux/kernel.h
    #define KERN_EMERG "<0>" /* system is unusable */ #define KERN_ALERT "<1>" /* action must be taken immediately */ #define KERN_CRIT "<2>" /* critical conditions */ #define KERN_ERR "<3>" /* error conditions */ #define KERN_WARNING "<4>" /* warning conditions */ #define KERN_NOTICE "<5>" /* normal but significant condition */ #define KERN_INFO "<6>" /* informational */ #define KERN_DEBUG "<7>" /* debug-level messages */
    決定 要不要從console 輸出是在 kernel/printk.c
    /* printk's without a loglevel use this.. */ #define DEFAULT_MESSAGE_LOGLEVEL 4 /* KERN_WARNING */ /* We show everything that is MORE important than this.. */ #define MINIMUM_CONSOLE_LOGLEVEL 1 /* Minimum loglevel we let people use */ #define DEFAULT_CONSOLE_LOGLEVEL 7 /* anything MORE serious than KERN_DEBUG */ DECLARE_WAIT_QUEUE_HEAD(log_wait); int console_printk[4] = { DEFAULT_CONSOLE_LOGLEVEL, /* console_loglevel */ DEFAULT_MESSAGE_LOGLEVEL, /* default_message_loglevel */ MINIMUM_CONSOLE_LOGLEVEL, /* minimum_console_loglevel */ DEFAULT_CONSOLE_LOGLEVEL, /* default_console_loglevel */ }; 系統起來後,可以在
    proc/sys/kernel/printk 裡看到這四個值 (cat 出來就可以)


    好像有些 driver 用 DBG, 有些用 pr_debug,有些又用 dev_dbg..沒有統一。
    kernel developer 好像有定一個rule,並且加入了 dynamic_debug 的功能:
    http://lwn.net/Articles/286191/ 好像是說,follow rule使用 pr_debug, dev_dbg 印 message 的 module,只要 define support dynamic_message,在 load module 時就會被 list 在 /sys/kernel/debug 這樣就可以動態 enable/disable 這些 module print message

    2010年11月8日 星期一

    arch/arm/mach-xx 的 board.c 宣告
    MACHINE_START(BOARD_NAME,"bord name")
    .fixup = fixup_board,
    .map_io = board_map_io,
    .init_irq = board_init_irq,
    .init_machine = mxc_board_init,
    .timer = &mxc_timer,
    MACHINE_END
    
    這個 MACRO 定義在 arch/arm/include/asm/mach/arch.h
    ##define MACHINE_START(_type,_name)                      \
    static const struct machine_desc __mach_desc_##_type    \
    __used                                                 \
    __attribute__((__section__(".arch.info.init"))) = {    \
           .nr             = MACH_TYPE_##_type,            \
           .name           = _name,
    
    #define MACHINE_END                             \
    };
    

    arch/arm/kernel/setup.c -- void _init setup_arch(char *cmdline_p) init/main.c: -- asmlinkage void _init start_kernel(void)
    asmlinkage void __init start_kernel(void)
    {
            char * command_line;
            extern struct kernel_param __start___param[], __stop___param[];
    
            smp_setup_processor_id();
    
            lockdep_init();
            debug_objects_early_init();
    
            boot_init_stack_canary();
    
            cgroup_init_early();
    
            local_irq_disable();
            early_boot_irqs_off();
            early_init_irq_lock_class();
    
            lock_kernel();
            tick_init();
            boot_cpu_init();
            page_address_init();
            printk(KERN_NOTICE "%s", linux_banner);
            setup_arch(&command_line);
    

    在 init/main.c 的 do_early_param(char *param,char *val):
    {
            struct obs_kernel_param *p;
    
            for (p = __setup_start; p < __setup_end; p++) {
                    if ((p->early && strcmp(param, p->str) == 0) ||
                        (strcmp(param, "console") == 0 &&
                         strcmp(p->str, "earlycon") == 0)
                    ) {
                            if (p->setup_func(val) != 0)
                                    printk(KERN_WARNING
                                           "Malformed early option '%s'\n", param);
                    }
            }
            /* We accept everything at this stage. */
            return 0;
    }
    
    參考 __setup_start, __setup_end, 這宣告/tag 在 lds 中。 配合 include/asm-generic/vmlinux.lds.h :
    #define INIT_SETUP(initsetup_align)                                     \
                    . = ALIGN(initsetup_align);                             \
                    VMLINUX_SYMBOL(__setup_start) = .;                      \
                    *(.init.setup)                                          \
                    VMLINUX_SYMBOL(__setup_end) = .;
    
    
    還有在 arch/arm/kernel/vmlinux.lds 中
      __setup_start = .;
       *(.init.setup)
      __setup_end = .;
     
    所以

    2010年11月3日 星期三

    最後一定要將 ESDSCR 清為 0x00000000,否則DRAM不能動作。 sd klkl klkl 很奇怪 為什麼 會這樣 再來一下 ok

    測試一下新版編輯器

    可以處理大小符號了嗎?
    <
    <
    太奇怪
    中文換行有點問題

    boot fail.

    糟糕,沒辦法開機。所以
    • 雖然是 SD boot,但是boot rom 還是會先 initial DRAM ,所以先 check 一下 DRAM 的 clock是不是正確
    • Boot SD 的 pull-high 都有依照EVBoard 接嗎?
    用 realview 看看.....

    2010年11月2日 星期二

    notes - mDDR config/timing

    GPIO MUX Regisgter Definition is in In Appendix A

    8a0 : bit 9 = 1 DDR2 Input
    50c/510 : control signal hystersis, slew rate..
    83c/848 : drive strength
    4b8 : SDCLK setting (pull up/down, drive strength, slew rate)
    4bc/4c0/4c4/4c8 : SDQS(0.1.2.3) setting (hystersis, pull up/down, driver strength, slew rate)
    820 : D0-D31 pull up enable
    4a4 : RAS (drive strength, slew rate)
    4a8 : CAS (drive strength, slew rate)
    4ac : SDWE (pull up/down, drive strength, slew rate)
    4b0/4b4 : SDCKE(0.1) (pull up/down, drive strength, slew rate)
    82c : D24-D31 drive strength
    8a4 :D0-D7 drive strength
    8ac : D8-D15 drive strength
    8b8 : D16-D23 drive strength

    SDRAM/DDR Control in DataSheet Chap 30
    ref my ddr timeing notes

    ESDCTL0/1 :

    8
    • 31 SDE =1
    • 30-28 refresh cycle = 0 (disabled)
    3
    • 27 reserved = 0
    • 26-24 row address width = 011 (14 Row Address)
    A
    • 23 double the RFC setting = 1
    • 22 reserved = 0
    • 21-20 Colume Address Width = 10 (10 bit)
    2
    • 19-18 reserved = 00
    • 17-16 Data Width = 10 (32 bit)
    0
    • 15 self refresh timer = 0
    • 14 self refresh timer = 0
    • 13 power down timer = 0
    • 12 power down timer = 0
    000
    • 11-0 reserved
    ESDMISC

    0
    • 31 CS0_RDY = 0 (?) page 808
    • 30 CS1_RDY = 0
    • 29 ODT_IDLE_ON (On Die Terminator) = 0
    • 28 SDCLK EXT = 0
    0
    • 27 termination resistor (DQS3 DQ31-24) terminator select (No termination) = 0
    • 26 termination resistor (DQS3 DQ31-24) terminator select (No termination) = 0
    • 25 termination resistor (DQS2 DQ23-16) terminator select (No termination) = 0
    • 24 termination resistor (DQS2 dQ23-16) terminator select (No termination) = 0
    0
    • 23 termination resistor (DQS1
    • 22
    • 21 termination resistor (DQS0
    • 20
    A (for JEDEC compliant)
    • 19 auto precharge AP bit
    • 18 -
    • 17 -
    • 16 -
    0
    • 15 DIFF_DQS_EN, Differential DQS disabled = 0 (確認 mDDR 只有 CLK 是 differential)
    • 14 AUTO_DLL_PAUSE = 0 (this mDDR doesn't need this - list on the cover page)
    • 13 ODT_EN = 0 (確認 這個 mDDR 沒有 ODT)
    • 12 BI_ON (Bank Interleaving ) = ? (mDDR datasheet 有,但是不確定要不要用)
    0
    • 11 FRC_MSR (measurement ?) = 0
    • 10 MIF3 mechanism = 0
    • 9 MIF3 mechanism = 0
    • 8 Read Additional Latency (disabled) = 0
    0
    • 7 Read Additional Latency (disabled) = 0
    • 6 DDR2_8_Bank = 0 (這個 mDDR 是 4 bank)
    • 5 Latency Hiding Disable for read = ? (要確認 mDDR 需不需要)
    • 4 DDR2_EN = 0 (Not DDR2 device)
    0
    • 3 DDR_EN = 0 (both DDR2_EN & DDR_EN = 0 , will be in mDDR Mode)
    • 2 reserved = 0
    • 1 RST , software reset = 0
    • 0 reserved = 0
    ESDCFG0/1

    Working on 200MHz, 1 clk = 5nS

    • 31-28 tRFC (120nS =24 clk) = 1110
    • 27-24 tXSR (120nS = 24clk) = 0000
    • 23-21 tXP (no data, set to max) = 111
    • 20 tWTR (no data, set to max) = 1
    • 19-18 tRP (18nS = 4clk) = 10
    • 17-16 tMRD (2tCK =12nSx2 =24nS = 5 CLK, use 4) = 11
    • 15-12 tRAS (42nS = 9clk) = 1000
    • 11-10 tRRD (12ns = 3clk) = 10
    • 9-8 reserved = 00
    • 7 tWR (12nS = 3clk) = 1
    • 6-4 tRCD (18ns = 4clk) = 11
    • 3-0 tRC (60nS = 12clk) = 1010
    Mode Register Set (MRS)

    對應的是 SDRAM Special Command Register (p30-34)
    ref my SDRAM Mode Register Notes

    from mDDR DataSheet.

    Mode Register Set 的內容:
    • A6-A4 : CAS Latency
    • A3 - Brust Type
    • A2-A0 : Burst Length
    controller 的 Load Mode Register :
    • bit 30-16 : 對應 A14-A0
    • bit 5-3 : CMD - 要作的事 - 011 - Load Mode Register
    DataSheet 的 example 是:
    • 04008008 -- precharge
    • 00008010 -- refresh
    • 00338018 -- Load Mode Register -- CAS = 3, BL=2 (Burst Length=8), Burst Type = sequential
    • 0020801A -- Extend Mode Register - half strength, Full Refresh

    2010年10月29日 星期五

    reference-ril in Android

    Android 提供的 Ril (Radio Interface Layer) 說明在: PDK - Telephony 在init.rc: /root/init.rc:service ril-daemon /system/bin/rild -l /system/lib/libreference-ril.so -- -d /dev/ttyUSB3 -u /dev/ttyUSB0 rild 和 libreference-ril.so 的 sourcecode 在 hardware/ril 真正執行 AT Command 的好像是 reference-ril。 libreference-ril 的參數: d, u 是 MODEM 的 command port
    • d : tty Device (dial ?)
    • u : data channel
    像某家的 Modem 就是:
    • ttyUSB2 : AT Command Interface
    • ttyUSB3 : Modem Interface
    modem 就是 data channel ? AT Command 就是 tty ?
    libreference-ril 的 reference 是 android 提供給 vendor 的 for reference Ril 實作。

    DDR Clock

    iMX51 好像boot rom code 就包含 setup clk。 所以在 boot code 中都沒有看到設定 (只有讀出來)。 有關 DDR clk 的設定,在 FreeScale Forume 有提到: User Manual Section: 7.3.3.6 CCM Bus Clock Divider Register. 其中
    • bit 30 : Select for DDR main clock
    • bit29-27 : Divider for DDR podf
    這兩項 field 的說明有提到 變更這兩項後, ddr clk 的狀態會 update 到 CCM Divider Handshake In-Process Register 對應的 bit
    • bit 8 : ddr src select mux is budy
    • bit 7 : ddr_podf_busy
    這幾個 busy bit 是 0 代表轉換完成。

    2010年10月28日 星期四

    use generic usb serial driver to support new vid pid

    simcom 的 3G module 在 2.6.20 以後的版本,可以用 usbserial.ko。
    但是因為其中的 AGPS 功能,沒有實作 RX channel,所以要稍微修改 driver。

    又因為這一個 module 的 VID, PID 沒有在 usbserial.ko 的 support list 中。
    所以要手動 load usbserial.ko

    在 driver/usb/serial/generic.c 中,有宣告 這個 module 吃的參數:
    module_parameter(vendor,ushort,0); module_parameter(product,ushort,0);
    所以可以在 insmod 時,傳入vid, pid,讓 usbserial.ko support 新的 device...

    例如:
    #insmod usbserial.ko vendor=0x05f9 product=0x0fff

    Add Busybox in Android

    就 follow 一般的 cross build for ARM,設好 ARCH, CROSS_COMPILE 兩個環境變數。
    make menuconfig -- 設定 static 和不 install 在 /usr。
    就可以 build 了。
    build 好後。產生 busybox 這個ˊ執行檔,copy 到 /system/bin 下。
    在 android build system 下作 make snod 產生新的 system.bin.
    修改 init.rc 把,system.img mount 成 rw.

    Android 開機後..在 console 下 #busybox --install /system/bin 就可以了。


    應該要看 install 在 /system/bin 下,再產生 system.bin 的方法..

    2010年10月27日 星期三

    sound test -console tool to play wav : alsa_aplay

    android 有內建 console mode 的 play sound tool.
    在 external/alsa-util 下

    是從 alsa-util 的 aplay porting 過來的: alsa_aplay.

    但是因為 Android VM 一啟動就站住了 sound card。所以要用之前要先把 Android 的 audio service 停掉: # stop media 然後再使用 alsa_aplay:

    列出所有 command #alsa_aplay --help
    列出目前系統的 pcm 裝置: #alsa_aplay -L 如果 default 是正確的,就可以用: alas_aplay ./11k.wav 來播放 wav 檔。
    在 system/extras/sound 的 playwav.c 沒有辦法使用,因為 sound device 不對。

    android 的 sound 支援好像是用 /hardware/alsa_sound 產生的 audio library,讓所有需要的 ap 呼叫。


    ref: http://superuser.com/questions/53957/what-do-alsa-devices-like-hw0-0-mean-how-do-i-figure-out-which-to-use
    aplay 的參數:
    $alsa_aplay -D hw:2,0 -f S8 -c 2 /dev/uramdom
    
    其中:
    -D sound device, 
    2 是 card index
    0 是 device index
    
    -f format
    -c channels  , 有時候沒給的話會出現error
    

    在usb serial 加入 新的 module

    debian squeeze 要 build module, 要 install
    • kernel header : uame -a 看一下 kernel 的版本。然後 install 對應的 linux-headers (我的 sempron 是 linux-headers-2.6.32-5-686)
      其實就是 "aptitude install linux-header-$(uname -r)
    • 還需要 module-assistant
    裝完 kernel header 後,在 /lib/modules/2.6.32-5-686 會多一個 build 的 link,link 到 /usr/src/linux-headers-2.6.32-5-common build 的動作就跟 書上說的一樣: make -C /lib/module/2.6.32-5-686/build M=`pwd` modules module 的 makefile 就跟書上寫的一樣,寫 obj-m := option.o 我要 build 的 module name

    整個重寫: apt-get install linux-source-2.6.32 -- 這是要拿到 option.c 再 apt-get install linux-headers-2.6.32-5-686 奇怪,應該用第一個步驟也可以+ copy .config from /boot/ 然後 make scripts 後應該也可以。 但是為沒有整個ˊmake 過,所以沒有 modules.symvers。再 make ˊ時會warnning。 build好的 option.ko insmod 時會說 format error. 參考:這一篇 http://tetralet.luna.com.tw/index.php?op=ViewArticle&articleId=228&blogId=1

    insmod : init_module failed (Exec format error)

    手動insmod ,結果出現 error,說是 init_module failed (Exec format error).
    用 file 看 format 是正確的 arm..

    用 hello.ko 測試 build 環境是否 OK -- 一樣也是 Exec format error。

    後來重 build uImage,在這個 uImage 上 insmod 就 OK 了 !!

    猜是改了 kernel 的 .config,但是確沒有重 build kernel image。

    2010年10月26日 星期二

    LOCAL_BUILT_MODULE and LOCAL_INSTALLED_MODULE must not be defined by component makefiles

    出現在 base_rule.mk

    binary.mk dynamic_binary.mk prebuild.mk 都有 include base_rule.mk
    在上面的 mk 開頭都加上 $(info in binary.mk) 或 dynamic_binary.mk,,
    prebuild.mk..

    再 make 一次,發現是 binary.mk include base_rule.mk 後出現 error message.

    找 binary.mk
    有 dynamic_binary.mk executable.mk ...
    猜是 executable.mk


    印出來看,是哪一個 variable 被 define..
    out/target/product/myBBG/system/bin/unifi_helper build/core/base_rules.mk:112: *** hardware/libhardware_legacy/unifi-linux/unifi_helper: LOCAL_BUILT_MODULE and LOCAL_INSTALLED_MODULE must not be defined by component makefiles. Stop. 另一個是: out/target/product/imx51_BBG/system/bin/unifi_manager build/core/base_rules.mk:112: *** hardware/libhardware_legacy/unifi-linux/os_linux: LOCAL_BUILT_MODULE and LOCAL_INSTALLED_MODULE must not be defined by component makefiles. Stop.


    好像是擺放位置的問題:
    hardware\libhardware_legacy 目的在 build 出 libhardware_legacy.so
    所以該目錄下的 各 folder 都不能再define LOCAL_MODULE.

    所以把 unifi_wifi 擺在 hardware/libhardware_legacy 下是不行的

    果然,搬移到 external 後 就 OK 了。

    2010年10月25日 星期一

    put vendor's wifi driver in android

    將 prebuild 的 optin 設好,結果開啟 wifi 後 dmesg 出現:
    no symbol version for module_layout
    google 一下,說是 kernel config 有把 CONFIG_MODULEVERSION 打開,但是 build module 時沒有打開。

    因為 module 是 vendor 提供的,所以只好修改 kernel,把 config 關掉.

    ... 結果一樣不行 :(


    以 212 來測試,把 包含 Android.mk 的最高一層 folder - 好像是 unifi-linux。
    參考 driver/config.android-arm.mk 的 內容 (folder depth),好像 copy 到 hardware/libhardware_legacy 下。

    看一下 driver/config.android-arm.mk ,那個 kernel source path name 要改一下。

    但是要先到 driver 下 ./build android-arm 會有error,但是可以成功 build 出*.ko
    但是因為 tools 也在 all 的 dependency 中,所以會 build fail.
    修改 Makfile,把 tools 刪掉就可以。

    然後到 unifi_wifi 那一層,下 mm 指令,就可以把 userland 的 program 都 build 完。

    繼續作 make snod 會發生 這個 新增 module, 和 prebuild 裡那個舊的衝突的問題..

    put strace in android

    因為這個人 http://benno.id.au/blog/2007/11/18/android-runtime-strace很好心的放了port 好,還是 static link 的 strace。 所以download 下來就可以 run 了 (其實我把他 放進 system/bin 中)。 build strace for android 的方法 follow 這一篇 strace 是用 autoconf ,所以 configure script 看不懂。 cross compile for android 大概是: build 一個 arm-linux , static link 的 strace。 所以
    • 設好 cross toolchain 的 path
    • 設好 cross toolchain 的 name : export CC=/opt/....
    • configure -host=arm-linux
    • configure 完會產生 Makefile,把 CFLAGS 加上 -static
    然後就可以 make 了

    myhello - native shell runnable program in android-linux

    會這樣寫是因為這是在 shell run 的程式,沒有用 Dalvik. 是要看看 android linux 的 bionic , share library 用偷懶的方法,拿 system/extra/sound 來參考 (copy)
    • 在 system/extra 下 create "myhello" folder
    • copy sound 的 Android.mk 過來
    • 修改 Android.mk
    • mm
    build log: make: Entering directory `/home/checko/myandroid8.1' target thumb C: myhello <= system/extras/myhello/myhello.c target Executable: myhello (out/target/product/myBBG/obj/EXECUTABLES/myhello_intermediates/LINKED/myhello) target Non-prelinked: myhello (out/target/product/myBBG/symbols/system/bin/myhello) target Strip: myhello (out/target/product/myBBG/obj/EXECUTABLES/myhello_intermediates/myhello) Install: out/target/product/myBBG/system/bin/myhello Copy: out/target/product/myBBG/system/etc/apns-conf.xml make: Leaving directory `/home/checko/myandroid8.1' 在 croot (android project root),用 make showcommands myhello 的 log: build/core/copy_headers.mk:15: warning: overriding commands for target `out/target/product/myBBG/obj/include/libpv/getactualaacconfig.h' build/core/copy_headers.mk:15: warning: ignoring old commands for target `out/target/product/myBBG/obj/include/libpv/getactualaacconfig.h' /bin/bash: line 0: cd: sdk/layoutopt/app/src/resources: No such file or directory No private recovery resources for TARGET_DEVICE myBBG target thumb C: myhello <= system/extras/myhello/myhello.c prebuilt/linux-x86/toolchain/arm-eabi-4.4.0/bin/arm-eabi-gcc -I system/core/include -I hardware/libhardware/include -I hardware/libhardware_legacy/include -I hardware/ril/include -I dalvik/libnativehelper/include -I frameworks/base/include -I frameworks/base/opengl/include -I external/skia/include -I out/target/product/myBBG/obj/include -I bionic/libc/arch-arm/include -I bionic/libc/include -I bionic/libstdc++/include -I bionic/libc/kernel/common -I bionic/libc/kernel/arch-arm -I bionic/libm/include -I bionic/libm/include/arch/arm -I bionic/libthread_db/include -I system/extras/myhello -I out/target/product/myBBG/obj/EXECUTABLES/myhello_intermediates -I out/target/product/myBBG/obj/STATIC_LIBRARIES/libwebcore_intermediates -c -fno-exceptions -Wno-multichar -msoft-float -fpic -ffunction-sections -funwind-tables -fstack-protector -fno-short-enums -march=armv5te -mtune=xscale -D__ARM_ARCH_5__ -D__ARM_ARCH_5T__ -D__ARM_ARCH_5E__ -D__ARM_ARCH_5TE__ -include system/core/include/arch/linux-arm/AndroidConfig.h -I system/core/include/arch/linux-arm/ -mthumb-interwork -DANDROID -fmessage-length=0 -W -Wall -Wno-unused -Winit-self -Wpointer-arith -Werror=return-type -Werror=non-virtual-dtor -Werror=address -Werror=sequence-point -DSK_RELEASE -DNDEBUG -g -Wstrict-aliasing=2 -finline-functions -fno-inline-functions-called-once -fgcse-after-reload -frerun-cse-after-loop -frename-registers -DNDEBUG -UDEBUG -mthumb -Os -fomit-frame-pointer -fno-strict-aliasing -finline-limit=64 -MD -o out/target/product/myBBG/obj/EXECUTABLES/myhello_intermediates/myhello.o system/extras/myhello/myhello.c Install: out/host/linux-x86/bin/apriori out/host/linux-x86/bin/acp -fpt out/host/linux-x86/obj/EXECUTABLES/apriori_intermediates/apriori out/host/linux-x86/bin/apriori Install: out/host/linux-x86/bin/soslim out/host/linux-x86/bin/acp -fpt out/host/linux-x86/obj/EXECUTABLES/soslim_intermediates/soslim out/host/linux-x86/bin/soslim target Executable: myhello (out/target/product/myBBG/obj/EXECUTABLES/myhello_intermediates/LINKED/myhello) prebuilt/linux-x86/toolchain/arm-eabi-4.4.0/bin/arm-eabi-g++ -nostdlib -Bdynamic -Wl,-T,build/core/armelf.x -Wl,-dynamic-linker,/system/bin/linker -Wl,--gc-sections -Wl,-z,nocopyreloc -o out/target/product/myBBG/obj/EXECUTABLES/myhello_intermediates/LINKED/myhello -Lout/target/product/myBBG/obj/lib -Wl,-rpath-link=out/target/product/myBBG/obj/lib -lc -lstdc++ -lm out/target/product/myBBG/obj/lib/crtbegin_dynamic.o out/target/product/myBBG/obj/EXECUTABLES/myhello_intermediates/myhello.o -Wl,--no-undefined /home/checko/myandroid8.1/prebuilt/linux-x86/toolchain/arm-eabi-4.4.0/bin/../lib/gcc/arm-eabi/4.4.0/interwork/libgcc.a out/target/product/myBBG/obj/lib/crtend_android.o target Non-prelinked: myhello (out/target/product/myBBG/symbols/system/bin/myhello) out/host/linux-x86/bin/acp -fpt out/target/product/myBBG/obj/EXECUTABLES/myhello_intermediates/LINKED/myhello out/target/product/myBBG/symbols/system/bin/myhello target Strip: myhello (out/target/product/myBBG/obj/EXECUTABLES/myhello_intermediates/myhello) out/host/linux-x86/bin/soslim --strip --shady --quiet out/target/product/myBBG/symbols/system/bin/myhello --outfile out/target/product/myBBG/obj/EXECUTABLES/myhello_intermediates/myhello Install: out/target/product/myBBG/system/lib/libdl.so out/host/linux-x86/bin/acp -fpt out/target/product/myBBG/obj/lib/libdl.so out/target/product/myBBG/system/lib/libdl.so Install: out/target/product/myBBG/system/lib/libc.so out/host/linux-x86/bin/acp -fpt out/target/product/myBBG/obj/lib/libc.so out/target/product/myBBG/system/lib/libc.so Install: out/target/product/myBBG/system/lib/libstdc++.so out/host/linux-x86/bin/acp -fpt out/target/product/myBBG/obj/lib/libstdc++.so out/target/product/myBBG/system/lib/libstdc++.so Install: out/target/product/myBBG/system/lib/libm.so out/host/linux-x86/bin/acp -fpt out/target/product/myBBG/obj/lib/libm.so out/target/product/myBBG/system/lib/libm.so Install: out/target/product/myBBG/system/bin/myhello out/host/linux-x86/bin/acp -fpt out/target/product/myBBG/obj/EXECUTABLES/myhello_intermediates/myhello out/target/product/myBBG/system/bin/myhello 這樣build 出來的 myhello 會被 install 在 system/bin 中,boot 後直接 invoke 就可以執行。 啟動 strace myhello 的內容: strace myhello execve("/system/bin/myhello", ["myhello"], [/* 19 vars */]) = 0 syscall_983045(0xb0017900, 0xbed6dbb4, 0, 0x847c, 0xb000f448, 0xbed6dbb0, 0x8, 0xf0005, 0, 0, 0, 0, 0, 0xbed6db58, 0xb000194b, 0xb000228c, 0x80000010, 0xb0017900, 0, 0, 0xc764, 0, 0, 0, 0, 0, 0, 0, 0, 0, 0, 0) = 0 getpid() = 2109 sigaction(SIGILL, {0xb0001d45, [], SA_RESTART}, {SIG_DFL}, 0) = 0 sigaction(SIGABRT, {0xb0001d45, [], SA_RESTART}, {SIG_DFL}, 0) = 0 sigaction(SIGBUS, {0xb0001d45, [], SA_RESTART}, {SIG_DFL}, 0) = 0 sigaction(SIGFPE, {0xb0001d45, [], SA_RESTART}, {SIG_DFL}, 0) = 0 sigaction(SIGSEGV, {0xb0001d45, [], SA_RESTART}, {SIG_DFL}, 0) = 0 sigaction(SIGSTKFLT, {0xb0001d45, [], SA_RESTART}, {SIG_DFL}, 0) = 0 sigaction(SIGPIPE, {0xb0001d45, [], SA_RESTART}, {SIG_DFL}, 0) = 0 getuid32() = 0 geteuid32() = 0 getgid32() = 0 getegid32() = 0 stat64("/system/lib/libc.so", {st_mode=S_IFREG|0644, st_size=239972, ...}) = 0 open("/system/lib/libc.so", O_RDONLY|O_LARGEFILE) = 3 lseek(3, 0, SEEK_SET) = 0 read(3, "\177ELF\1\1\1\0\0\0\0\0\0\0\0\0\3\0(\0\1\0\0\0 \250\0\000"..., 4096) = 4096 lseek(3, -8, SEEK_END) = 239964 read(3, "\0\0\340\257PRE ", 8) = 8 mmap2(0xafe00000, 286720, PROT_READ|PROT_EXEC, MAP_PRIVATE|MAP_ANONYMOUS, -1, 0) = 0xafe00000 mmap2(0xafe00000, 228532, PROT_READ|PROT_EXEC, MAP_PRIVATE|MAP_FIXED, 3, 0) = 0xafe00000 mprotect(0xafe00000, 229376, PROT_READ|PROT_WRITE|PROT_EXEC) = 0 mmap2(0xafe38000, 8596, PROT_READ|PROT_WRITE, MAP_PRIVATE|MAP_FIXED, 3, 0x38) = 0xafe38000 mmap2(0xafe3b000, 42160, PROT_READ|PROT_WRITE, MAP_PRIVATE|MAP_FIXED|MAP_ANONYMOUS, -1, 0) = 0xafe3b000 close(3) = 0 mprotect(0xafe00000, 229376, PROT_READ|PROT_EXEC) = 0 getuid32() = 0 geteuid32() = 0 getgid32() = 0 getegid32() = 0 gettid() = 2109 syscall_983045(0xafe42ad4, 0xafe42a98, 0, 0x40, 0xafe38e08, 0xbed6dbb0, 0xbed6da58, 0xf0005, 0, 0, 0, 0, 0, 0xbed6da48, 0xafe1f721, 0xafe0d89c, 0x60000010, 0xafe42ad4, 0, 0, 0xc764, 0, 0, 0, 0, 0, 0, 0, 0, 0, 0, 0) = 0 mmap2(NULL, 32768, PROT_READ, MAP_SHARED, 9, 0) = 0x40000000 open("/dev/urandom", O_RDONLY|O_LARGEFILE) = 3 read(3, "\223\31\234=", 4) = 4 close(3) = 0 stat64("/system/lib/libstdc++.so", {st_mode=S_IFREG|0644, st_size=5268, ...}) = 0 open("/system/lib/libstdc++.so", O_RDONLY|O_LARGEFILE) = 3 lseek(3, 0, SEEK_SET) = 0 read(3, "\177ELF\1\1\1\0\0\0\0\0\0\0\0\0\3\0(\0\1\0\0\0X\10\0\000"..., 4096) = 4096 lseek(3, -8, SEEK_END) = 5260 read(3, "\0\0\320\257PRE ", 8) = 8 mmap2(0xafd00000, 8192, PROT_READ|PROT_EXEC, MAP_PRIVATE|MAP_ANONYMOUS, -1, 0) = 0xafd00000 mmap2(0xafd00000, 2848, PROT_READ|PROT_EXEC, MAP_PRIVATE|MAP_FIXED, 3, 0) = 0xafd00000 mprotect(0xafd00000, 4096, PROT_READ|PROT_WRITE|PROT_EXEC) = 0 mmap2(0xafd01000, 232, PROT_READ|PROT_WRITE, MAP_PRIVATE|MAP_FIXED, 3, 0x1) = 0xafd01000 close(3) = 0 mprotect(0xafd00000, 4096, PROT_READ|PROT_EXEC) = 0 getuid32() = 0 geteuid32() = 0 getgid32() = 0 getegid32() = 0 stat64("/system/lib/libm.so", {st_mode=S_IFREG|0644, st_size=132116, ...}) = 0 open("/system/lib/libm.so", O_RDONLY|O_LARGEFILE) = 3 lseek(3, 0, SEEK_SET) = 0 read(3, "\177ELF\1\1\1\0\0\0\0\0\0\0\0\0\3\0(\0\1\0\0\0@ \0\000"..., 4096) = 4096 lseek(3, -8, SEEK_END) = 132108 read(3, "\0\0\300\257PRE ", 8) = 8 mmap2(0xafc00000, 135168, PROT_READ|PROT_EXEC, MAP_PRIVATE|MAP_ANONYMOUS, -1, 0) = 0xafc00000 mmap2(0xafc00000, 129828, PROT_READ|PROT_EXEC, MAP_PRIVATE|MAP_FIXED, 3, 0) = 0xafc00000 mprotect(0xafc00000, 131072, PROT_READ|PROT_WRITE|PROT_EXEC) = 0 mmap2(0xafc20000, 280, PROT_READ|PROT_WRITE, MAP_PRIVATE|MAP_FIXED, 3, 0x20) = 0xafc20000 close(3) = 0 mprotect(0xafc00000, 131072, PROT_READ|PROT_EXEC) = 0 getuid32() = 0 geteuid32() = 0 getgid32() = 0 getegid32() = 0 mprotect(0x8000, 4096, PROT_READ|PROT_EXEC) = 0 getuid32() = 0 geteuid32() = 0 getgid32() = 0 getegid32() = 0 mmap2(NULL, 4096, PROT_READ|PROT_WRITE, MAP_PRIVATE|MAP_ANONYMOUS, -1, 0) = 0x40008000 mprotect(0x40008000, 4096, PROT_READ) = 0 fstat64(1, {st_mode=S_IFCHR|0600, st_rdev=makedev(207, 16), ...}) = 0 brk(0) = 0xa000 brk(0xa000) = 0xa000 brk(0xc000) = 0xc000 mprotect(0x40008000, 4096, PROT_READ|PROT_WRITE) = 0 mprotect(0x40008000, 4096, PROT_READ) = 0 ioctl(1, SNDCTL_TMR_TIMEBASE or TCGETS, {B115200 opost isig icanon echo ...}) = 0 write(1, "Hello Bionic\n", 13Hello Bionic ) = 13 mprotect(0x40008000, 4096, PROT_READ|PROT_WRITE) = 0 mprotect(0x40008000, 4096, PROT_READ) = 0 munmap(0x40008000, 4096) = 0 exit_group(0) = ? Process 2109 detached 所以確認 share library path 是 OK 的 :(

    又是 ToDoToday

    雖然 每次的 ToDoToday 都沒作(完),還是要寫一下。 (linux 平台可以作/學的事情太多..)
    • build a Hello program with Android.mk -- to test the share library problem
    • try ver 8.1 unifi_wifi support (read the ref doc to unterstand android wifi arch)
    • read iMX51 SD3 register
    • read mDDR datasheet -- prepare for u-boot
    • 64bit ubuntu install test
    • win7 64bit 的燒錄軟體

    2010年10月22日 星期五

    Mantain log : Sempron26Debian - upgrade to squeeze

    因為 lenny 不認識 ext4,被迫要upgrade 到 squeeze。
    所以..

    修改 source.list
    /etc/init.d/gdm stop
    
    還有停止一堆 service (後來發現這不必作)
    apt-get dist-upgrade
    
    然後就一堆 complain
    ....
    第二天
    apt-get -f upgrade
    
    apt-get install locale
    
    gdm 進不去,說 X 打不開。 -- remove 重新安裝 OK.
    deforma-app remove gs
    
    upgrade-from-grub-legacy
    
    aptitude dist-upgrade 又一堆..

    終於upgrade 到新 kernel 了.. X 也開得進去.

    出現 error in Version string '3.0.12-54655_Debian_lenny': invalid character in revision number follow 這一篇 : dpkg --clear-avail

    2010年10月21日 星期四

    android, prelink tool

    prelink 的 tool 是 apriori (build/tool/apriori) command 是:(build/core/definitions.mk) define transform-to-prelinked @mkdir -p $(dir $@) @echo "target Prelink: $(PRIVATE_MODULE) ($@)" $(hide) $(APRIORI) \ --prelinkmap $(TARGET_PRELINKER_MAP) \ --locals-only \ --quiet \ $< \ --output $@ endef 會依照 Android.mk 中的 LOCAL_PRELINK_MODULE 定義來決定要不要作 prelink。 但是grep 一下,default 好像是 false... 好像沒有找到是 true 的 program..

    enable proprietary wifi_csr module in standard bsp

    原來 android source code 的 vendor 從 2.2 後改成 device 了。 所以新增自己的 board 要加在 device folder 裡。 原來 prebuild/proprietory 的部分依照各 device/vendor 不同,放在各自的 device\ 內。 v9.0 提供 csr wifi 的 no-disclose driver。 放在 proprietary/wifi_csr 但是因為
    • 是 user
    • makefile 沒有包含在 board mk
    所以build 出來的 image 沒有含這些 files 修改:
    • 把 fsl-wifi.mk 的 LOCAL_MODULE_TAGS 由 user 改 eng
    • imx51_bbg/AndroidBoard.mk 中加入 include device/fsl/proprietary/wifi_csr/fsl-wifi.mk
    然後重新 make 就可以。 有關 android 的 wifi support,這一篇 port wifi driver to android 有說明

    find command in envsetup.sh

    Android 的 envsetup.sh 中有 search command , cgrep, jgrep : function jgrep() { find . -type f -name "*\.java" -print0 | xargs -0 grep --color -n "$@" } function cgrep() { find . -type f -name "*\.c*" -print0 | xargs -0 grep --color -n "$@" } 可以學起來,search Makefile.. mk 等等其他檔案用。 還有一個是針對 目錄的:resgrep 先找出所有 名為 res 的 folder,再到所有 res folder 裡的.xml 檔裡找.. function resgrep() { for dir in `find . -name res -type d`; do find $dir -type f -name '*\.xml' -print0 | xargs -0 grep --color -n "$@"; done; } 稍微筆記一下: find
    • -type 指定目錄(d) 或是檔案 (f)
    • -name 指定match pattern (string)
    -print0, xargs -0
    • find 的輸出用 NULL (0x00) 作結尾,不用 newline
    • xargs 把 0x00 作分別字元,不用 space
    find 如果不要包含 "." 開頭的檔案/目錄。可以用 find . -not -name '.*' find 如果要包含很多檔名 pattern,可以用 -o -name 來加: find . -name '*\.java' -o -name '*\.c*' 但是一個 -o 有自己的 option,所以配合起來變成: find . -name '*\.c' -print0 -o -name '*\.h' -print0 | xargs -0 grep pattern

    ToDo Today - 一堆..

    • Ask about capability of encoding/decoding in the same time
    • Ask the PAN Serice Center the working weekend of this month
    • standard hello program with share library
    • put strace in system

    2010年10月20日 星期三

    porting -- pdk document

    android kernel source 可以 build 出 pdk,會順便 build 出 document。 在 developement\pdk\readme 有說明 $mkdir dist $time make -j4 pdk pdk_all DIST_DIR=dist 看 build log 可以知道 build 出來的 doc 位置。 但是這個 document link 好像是絕對位置,不是相對位址,所以沒有辦法放到 disk 中 單純的看。 google android site 有提供一個 online 版本(?) Porting http://source.android.com/porting/index.html 好像就是 pdk 的內容。 (或是 這一個 http://pdk.android.com/online-pdk/guide/index.html ) .. 有些 link 點不出來,可以自己看 url ,自己打 link build_system 這一篇要先看,可以減少很多 rebuild 的時間。

    build option on building playwav

    剛好要try alsa,所以就用 system/extra/sound/playwav 來看 target 是 sound (不是 playwav)。 touch system/extra/sound/playwav.c 看一下 build command.. prebuilt/linux-x86/toolchain/arm-eabi-4.4.0/bin/arm-eabi-gcc -I system/core/include -I hardware/libhardware/include -I hardware/libhardware_legacy/include -I hardware/ril/include -I dalvik/libnativehelper/include -I frameworks/base/include -I frameworks/base/opengl/include -I external/skia/include -I out/target/product/imx51_BBG/obj/include -I bionic/libc/arch-arm/include -I bionic/libc/include -I bionic/libstdc++/include -I bionic/libc/kernel/common -I bionic/libc/kernel/arch-arm -I bionic/libm/include -I bionic/libm/include/arch/arm -I bionic/libthread_db/include -I system/extras/sound -I out/target/product/imx51_BBG/obj/EXECUTABLES/sound_intermediates -I out/target/product/imx51_BBG/obj/STATIC_LIBRARIES/libwebcore_intermediates -c -fno-exceptions -Wno-multichar -msoft-float -fpic -ffunction-sections -funwind-tables -fstack-protector -fno-short-enums -march=armv5te -mtune=xscale -D__ARM_ARCH_5__ -D__ARM_ARCH_5T__ -D__ARM_ARCH_5E__ -D__ARM_ARCH_5TE__ -include system/core/include/arch/linux-arm/AndroidConfig.h -I system/core/include/arch/linux-arm/ -mthumb-interwork -DANDROID -fmessage-length=0 -W -Wall -Wno-unused -Winit-self -Wpointer-arith -Werror=return-type -Werror=non-virtual-dtor -Werror=address -Werror=sequence-point -DSK_RELEASE -DNDEBUG -g -Wstrict-aliasing=2 -finline-functions -fno-inline-functions-called-once -fgcse-after-reload -frerun-cse-after-loop -frename-registers -DNDEBUG -UDEBUG -mthumb -Os -fomit-frame-pointer -fno-strict-aliasing -finline-limit=64 -MD -o out/target/product/imx51_BBG/obj/EXECUTABLES/sound_intermediates/playwav.o system/extras/sound/playwav.c 果然很麻煩... sound 的 makefile: LOCAL_PATH := $(call my-dir) // 就是 pwd include $(CLEAR_VARS) // 清掉所有變數 LOCAL_MODULE := sound // 這個 program 要用的名字 LOCAL_SRC_FILES := playwav.c LOCAL_MODULE_TAGS := optional // 屬於哪一類的 tag .. 在 make 時會指定 eng, debug, user.. include $(BUILD_EXECUTABLE) 其中LOCAL_MODULE_TAGS 是用來決定build 哪些 target 需要的變數。 像 optional 就永遠不會 build 進 system. 改為 eng 後,在ˋ build eng 時,就會 build 進去。

    ToDo Today - 8.1 做好後可以作的事

    • try strace -- 看一下 default share library search path .
    • - makefile /command to build single executable file. (use dynamic linking)
    about new nb, the vm
    • archlinux
    • gentoo
    • bsd
    • osx86

    2010年10月18日 星期一

    筆記 -- LDD3 chapter 14

    kernel 2.6 後的 driver model 增加了以下的能力:
    • Power Management and System Shutdown -- 確保 device driver 在系統 power off 和 shutdown 之前都能獲得通知。
    • Communication with User Space -- sysfs
    • Hotpluggable Devices
    • Devices Classes
    • Object Lifecycle
    Bus, Device, Class Kobject, Ksets Ksets 是 Kobject 的 container sysfs mount 在 /sys 負責 kernel 的 subsystem,每個 subsystem 都有自己的 Ksets. sysfs 就是在處理 Kobject. udev 把所有資訊藉由 sysfs 公布在 user space。 hotplug 就是由 Kobject 的加入/移除 所引發的。

    2010年10月15日 星期五

    How to checkout the code from ViewVC link

    要 checkout http://code.google.com/chrome/extensions/samples.html 的 sample code。 ViewVC 的 link 是: http://src.chromium.org/viewvc/chrome/trunk/src/chrome/common/extensions/docs/examples/api/browserAction/set_icon_path/ 對應的 svn link 是? 在 get the code 有說: svn co http://src.chromium.org/svn/trunk/src/chrome/common/extensions/docs/examples/tutorials/getstarted/
    Note the difference in the url, namely /viewvc/chrome was replaced with /svn.

    2 other ways to do cp

    記一下好了,有點好笑 :) 因為 android 沒有包 cp 命令,所以可以改用以下方式: cat sourcefile > destinationfile 或是. dd if=sourcefile of=destinationfile 但是.. android 沒有 cp,但是有 dd ? 從 這裡 看到的

    ToDo Today

    • Build/Run strace in Android
    • find out why *.so cannot load in simple Hello program
    • Reading "Writting an ALSA Driver"
    • Run Android x86 in QEMU/Virtualbox -- for reference. and testing.
    • mDDR spec and DCD.

    bookmark Writting an ALSA Driver

    可能要看一下這個: Writting An ALSA Driver

    2010年10月14日 星期四

    只要重新產生 system.img

    system.img 是 從 out/target/product/imx51_bbg/system 做出來的。 如果改了 這個 folder 的內容,想要重新產生 system.img。不要管 system folde 裡面的 file 的 dependency,可以用 snod 這個 target: make snod 在 build/core/Makefile 可以看到 snod 這個 target: .PHONY: systemimage-nodeps snod systemimage-nodeps snod: $(filter-out systemimage-nodeps snod,$(MAKECMDGOALS)) \ | $(INTERNAL_MKUSERFS) @echo "make $@: ignoring dependencies" $(call build-systemimage-target,$(INSTALLED_SYSTEMIMAGE)) $(hide) $(call assert-max-image-size,$(INSTALLED_SYSTEMIMAGE),$(BOARD_SYSTEMIMAGE_PARTITION_SIZE),yaffs) 有說明是: make system.img ignoring depencies. 至於 做出 system.img 的command,可以用 showcommands 這個 target.. make showcommands snod 這樣 就會 show 出所有 build snod 這個target 的 command: make snod: ignoring dependencies Target system fs image: out/target/product/imx51_bbg/system.img num_blocks=`du -sk out/target/product/imx51_bbg/system | tail -n1 | awk '{print $1;}'`; if [ $num_blocks -lt 20480 ]; then extra_blocks=3072; else extra_blocks=20480; fi ; if [ "" != "" ]; then num_blocks=; num_inodes=4096; else num_blocks=`expr $num_blocks + $extra_blocks` ; num_inodes=`find out/target/product/imx51_bbg/system | wc -l` ; num_inodes=`expr $num_inodes + 500`; fi; out/host/linux-x86/bin/genext2fs -a -d out/target/product/imx51_bbg/system -b $num_blocks -N $num_inodes -m 0 out/target/product/imx51_bbg/system.img; tune2fs -L system out/target/product/imx51_bbg/system.img tune2fs 1.41.11 (14-Mar-2010) tune2fs -j out/target/product/imx51_bbg/system.img tune2fs 1.41.11 (14-Mar-2010) Creating journal inode: done This filesystem will be automatically checked every 20 mounts or 0 days, whichever comes first. Use tune2fs -c or -i to override. tune2fs -C 1 out/target/product/imx51_bbg/system.img tune2fs 1.41.11 (14-Mar-2010) Setting current mount count to 1 e2fsck -fy out/target/product/imx51_bbg/system.img ; [ $? -lt 4 ] e2fsck 1.41.11 (14-Mar-2010) Filesystem did not have a UUID; generating one. Filesystem has feature flag(s) set, but is a revision 0 filesystem. Fix? yes Pass 1: Checking inodes, blocks, and sizes Pass 2: Checking directory structure Pass 3: Checking directory connectivity /lost+found not found. Create? yes Pass 4: Checking reference counts Pass 5: Checking group summary information system: ***** FILE SYSTEM WAS MODIFIED ***** system: 596/1144 files (1.8% non-contiguous), 86956/103536 blocks true 大概是用 genext2fs 從 system folder 做出一個ext2 的 system.img。 然後再用 tune2fs -j 把 system.img 轉為 ext3。
    這個 build-userimage-ext2-target 定義在 external/genext2fs/Config.mk # $(1): src directory # $(2): output file # $(3): label (if any) # $(4): if true, add journal define build-userimage-ext2-target @mkdir -p $(dir $(2)) $(hide) num_blocks=`du -sk $(1) | tail -n1 | awk '{print $$1;}'`;\ if [ $$num_blocks -lt 20480 ]; then extra_blocks=3072; \ else extra_blocks=20480; fi ; \ num_blocks=`expr $$num_blocks + $$extra_blocks` ; \ num_inodes=`find $(1) | wc -l` ; num_inodes=`expr $$num_inodes + 500`; \ $(MKEXT2IMG) -a -d $(1) -b $$num_blocks -N $$num_inodes -m 0 $(2) $(if $(strip $(3)),\ $(hide) $(TUNE2FS) -L $(strip $(3)) $(2)) $(if $(strip $(4)),\ $(hide) $(TUNE2FS) -j $(2)) $(TUNE2FS) -C 1 $(2) $(E2FSCK) -fy $(2) ; [ $$? -lt 4 ] endef 是在 core/Makefile include 近來的: ifeq ($(TARGET_USERIMAGES_USE_EXT2),true) include external/genext2fs/Config.mk INTERNAL_MKUSERFS := $(MKEXT2IMG) ..

    標籤

    網誌存檔