ubuntu 在 R40e 上 還有 Debian 在 Sempron 2600 上

2010年11月30日 星期二

local mirrir repo server

git-daemon OK,但是要 對整個 android source 作 VC,要用 repo

參考,大概都是利用修改 manifest.xml,建立一個 branch..
但是原來 bsp vendor 就 branch 一次了....
所以,預計這樣:
 master ----> apply patch ----> vender branch ----> modify manifest ----> local branch

Server 還有 48G,應該足夠。

參考 這一篇 (http://gregmeiste.com/2009/02/mirror-android-repositories-on-a-local-server/)要建 local mirror ,在 repo init 時要加 option --mirror
加上 --mirror ,接著作 repo sync 後,會做類似 git clone --bare 的動作, 只會 checkout git 的記錄資料,不會 checkout source code 出來。

這樣的 repository folder,剛好可以放在 git-daemon 的 base-path,當做一般專案。讓 git-daemon 管理。

所以建議直接到 git-daemon 的 local-path 作 repo init, repo sync,同時,follow 前面的 ref link,執行時 用 gitdaemon user 的 uid 來作。避免 access 權限問題。


使用 --mirror 作 clone 的 repo ,不能直接修改內容,要 另外 checkout 出來改,然後再 commit /push.


Follow BSP 的方式,android source 分成三個 project:
  • android repo
  • kernel
  • uboot
麻煩的地方: device 下有 vendor 自己 create 的 folder,用的是 local 的 git project. -- 要怎樣加到 server ?

android repo 比較麻煩,要先 repo init --mirror 下來。
因為 vender 改過 default.xml,所以要 checkout default.xml 出來,branch ,修改後再 commit , push 回 server。

之後各 developer 要 checkout 的時候:
  • android repo 要加上 -b local
  • kernel 和 uboot 就不用 branch 到 local 了。直接 checkout 就可以。

2010年11月29日 星期一

public git server by git-daemon

雖然 git-daemon 有 security 問題,但是在 LAN 內還算 OK .
follow 這一篇 , install git-daemon-run $sudo aptitude install git-daemon-run 這會用 sv 啟動 git-daemon,

git-daemon 的啟動 script 在 /etc/sv/git-gaemo/run
要修改一下 run 這個 script,讓他可以允許 remote push,, follow 這一篇: #!/bin/sh exec 2>&1 echo 'git-daemon starting.' exec chpst -ugitdaemon \ /usr/lib/git-core/git-daemon --export-all --verbose --enable=receive-pack --base-path=/var/cache /var/cache/git
至於要 public 的 repository,要 follow git book 的說明,先 bare clone 出來。
如果不作 bare clone的話,會不允許 remote 對 master 作 push 的動作。

option --export-all 就不用在 .git 下加一個 export_ok 的檔案。

--base-path=/var/cache 代表 git:// 的 root path.

/var/cache/git 代表放置 git repo 專案的位置。
因為 -base-path=/var/cache, 和 位置 /var/cache/git 不一樣 (少了 git),所以 remote access git:// 時,要自己加上 /git/
如果設得一樣就不用了。

假設要 public 的 repository 是 ~/testgit"
$git clone --bare ~/testgit testgit.git 然後把 clone 出來的 testgit.git 這個目錄 copy 到 剛剛啟動 git-daemon 時指定的 path : /var/cache/git 下。

另外,把testgit.git 裡,所有 file, directory 的 owner 都設為 git,這樣 git-daemon 才有write的權限。

重新啟動 git-daemon $sudo sv restart git-daemon
這樣,LAN 裡面的 機器就可以用
$ git clone git://serverip/git/testgit 取出 剛剛的 repo,用
$git push 把 code update 到 server.

實際上,安裝玩後一直有 remote push fail 的問題,到 server 打開 /var/log/git-daemon/current 來看,可以看到是 git repo folder 全縣問題。

結果是看了 run script
exec chpst -ugitdaemon 查一下 chpst 的意思, chpst -uuid 是以 uid 來 run 後面的 program。
所以要把所有 repo 的 owner 改為 gitdaemon 才行。

.... gitdaemon 只有 create user 沒有 group.


開啟 web 介面 (gitweb) #aptitude install apache2 gitweb 裝完以後,先 config gitweb: /etc/gitweb.conf
告訴 gitweb, git-daemon 的 repository 位置: $projectroot = "/home/git/git-daemon/myandroid10.2"
* 實際上,git-daemon 下有很多 folder,每個 folder 各自聚集很多 git project, 如果指定: $projectroot = "/home/git/git-daemon"
gitweb 會找所有 /home/git/git-daemon/下的git project,然後把他們攤平,列出來。
會很亂,所以只把最多人用的 project folder myandroid10.2 列出來就好,就把 root 指到 myandroid10.2 下.
其他的 folder project 就不會顯示出來了。

然後在 apache 加入 virtualhost

因為這個 server 已經 run redmine 了,加上 dns 不歸我們管,所以只有用 port number 來區分。
gitweb 使用 8080

#vi /etc/apache2/site-available/gitweb.conf: <VirtualHost *:8080> DocumentRoot /usr/share/gitweb/ SetEnv GITWEB_CONFIG /etc/gitweb.conf Options ExecCGI AddHandler cgi-script cgi DirectoryIndex gitweb.cgi RewriteEngine on RewriteRule ^/$ /usr/lib/cgi-bin/gitweb.cgi RewriteRule ^/(.*\.git/(?!/?(HEAD|info|objects|refs)).*)?$ /cgi-bin/gitweb.cgi%{REQUEST_URI} [L,PT] </VirtualHost>
然後建 link 到 site-enable 去 #ln -s /etc/apache2/site-available/gitweb.conf /etc/apache2/site-enable/001-gitweb.conf
然後把 port 8080 打開: /etc/apache2/port.conf 加上 port 8080
因為有enable RewriteEngine,所以要 load Rewrite module
建 link #ln -s /etc/apache2/mods-available/rewrite.load /etc/apache2/mods-enable/rewrite.load
之後重新啟動 apache2 #/etc/init.d/apache2 restart OK

ref
  1. http://blog.longwin.com.tw/2009/05/debian-linux-build-gitweb-2009/

備份一下 server 的 git-daemon run script: #!/bin/sh exec 2>&1 echo 'git-daemon starting.' exec chpst -ugit \ "$(git --exec-path)"/git-daemon --export-all --verbose --enable=receive-pack --base-path=/home/git/git-daemon /home/git/git-daemon server 為了方便,所以真的 create 一個 user git. 然後把 git-daemon base 放到 git 的 home 下...
  • bootloader 8.1 與 9.1 的不同--9.1 開機容易 fail 是 pmic output voltage 與 8.1 不同的關係?
  • 第一個 PanelOK 測試 image 播放 HD movie 易當機的原因 -- AudioHardwareInterface Stub 修改,沒有 clean build (whole system ?) : 看看能不能找出 dependency project 和 Make 能否auto rebuild
  • implement HOME, MENU KEY. < -- 這個有列 PIC

KEYPAD 使用 pmic 上的 ADC.用分壓找出被按下的按鍵。 BSP 的 PMIC ADC 使用:
  • 1 ~ 4 : touch
  • 5 : ADIN_5 --- 接到 PMIC 的 GPO1
  • 6 : Temperature - 接到 MCU 的 STR pin 上
  • 7 : ACCESSORY_CARD_ID - 接到 expansion boarfd slot 上

2010年11月26日 星期五

先找到 HOME, MENU KEY 等實體位置。 找到 POWER KEY -- 確認 suspend/wakeup 的動作。 ? 在 u-boot 有控制電壓的 command ?

2010年11月25日 星期四

要改 /root/init.rc 不要直接改 out/target..../root 的 init.rc

要去改 devices/... 下的 init.rc

這樣 git 可以 trace diff,而且用 make 就可以自動重新產生 ramdisk.img
不必自己用 mkbootfs ......

2010年11月23日 星期二

Detecting the Tocuh Screen

電阻式 touch screen 是由兩片導電透明塑膠重疊而成。
中間會用另一種半導電層隔開。

上面的一片,在上下兩側年上 Y+, Y- 電極。
下面的一片,在左右兩側黏上 X+, X- 電極。

由於有中間的半導電層隔開,所以上下兩層是絕緣的。

但是一旦touch 到,適當設計的半導電層,就會在touch 的位置導通。讓上下層導通。

一般的 touch controller,會配合驅動電路,供給電壓。
和 ADC 電路,量測電壓。

以下面這個 controller 來看,他是在 X+, X- 給 3.3V。
然後由 ADC 量 Y+ 的電壓,來找出 touch X 的位置。

然後再由 Y+,Y- 給 3.3V。
ADC 量 X+ 的電壓,找出 touch Y 的位置。

最後再由 X+ 給一個小電流,Y+接地,量 X+ 電壓,這樣就知道 touch 的電阻。
(用手指或是pen touch 會造成 電阻的不同)

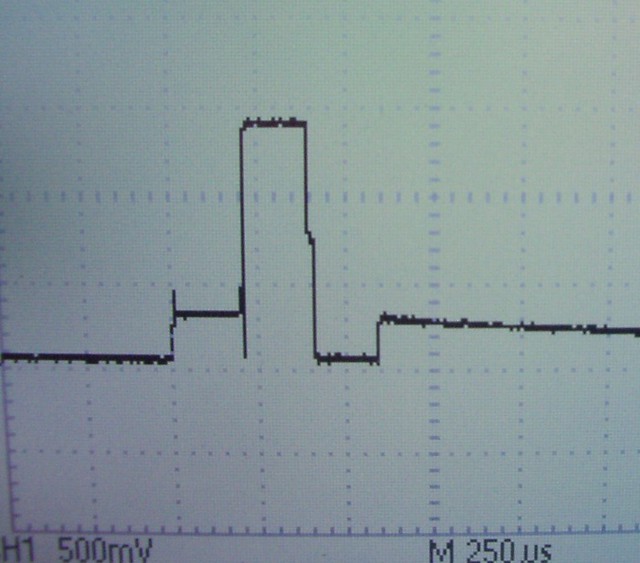
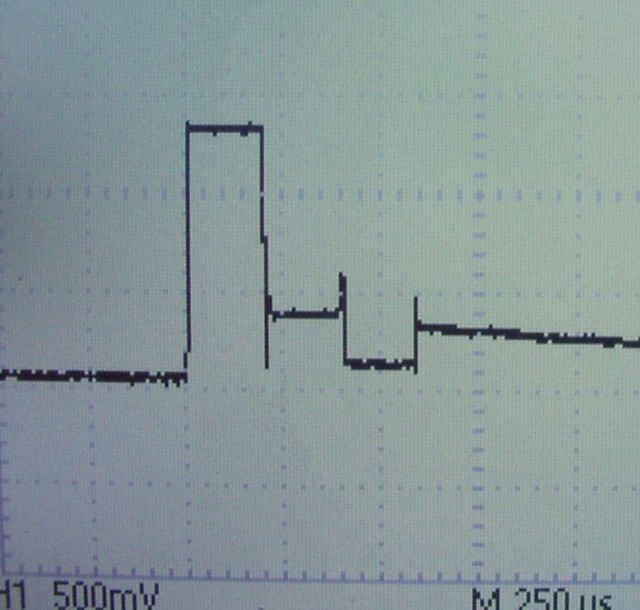
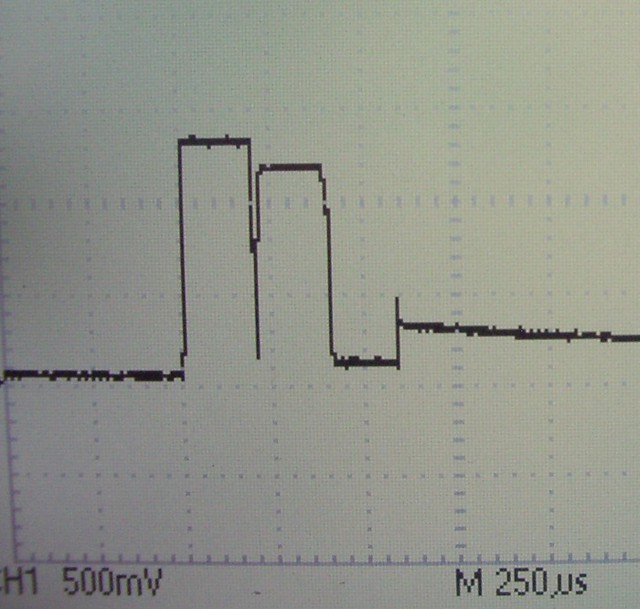
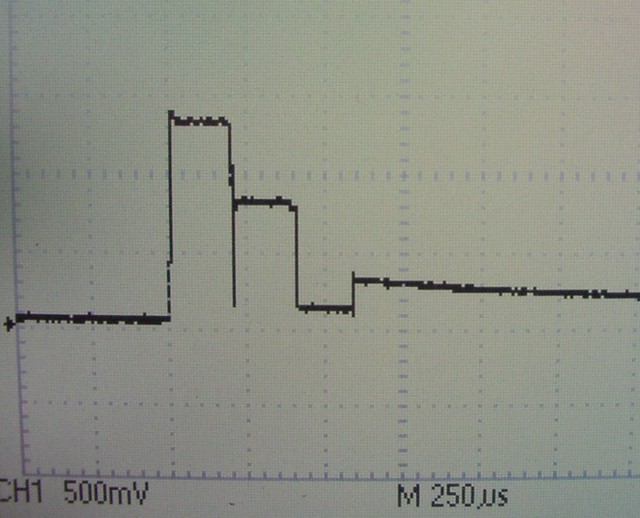
所以由示波器量 X+ , Y+ 都會出現3 個 "pulse".

下面兩張示量 Y+ 的波型,分別是 touch 在 panel 左邊和右邊的結果,可以看到 第一個 pulse 大小有改變。
xleft
.
xright

下面兩張是量 X+,分別 touch panel 上面和下面,可以看到第二個 pulse的大小有改變:
ytop
..
ydown

最後一個 pulse 就是利用 小 current 量電阻。可以知道這個是輕輕的 touch 還是..


另外,由於 touch 屬於 UI,所以使用 polling 的方式來偵測沒有效率。
所以 controller 通常會提供 interrupt 模式,來偵測有 touch。

以這一個 controller 為例,就是在 X+ 提供 一個小電流,Y+接地。
未接觸時是 open,所以 X+ 會是 3.3V。
當 touch 時,weak current source 的電壓就會降下來。
這樣 controller 就偵測到 interrupt。

之後才開始進入剛剛說明的 X-Y 量測模式。
目標在找出 ril 和 bluetooth d-bus exception 的原因。
還有能不能只啟動 touch screen 和 console。

my vm : restart from scratch

remote : follow on, 修改 init.rc 拿掉 ts_calibrator 後的service.

打開 pmic adc 的 debug log, replace pr_debug with printk. - 確認按下 panel 會有 interrupt message。

最舊版

就只有html 模式 連項目標號也沒有。
  • 11
  • chrome 配上新版如何

    還會有一堆 div 嗎?
    可以用 > < ?

    #include "header.s"
    這樣呢?
    #include <header.h>

    所以還是不行。

    頂多是那些 <div> 不見了。

    clean in Android makefile

    ndroid 有關 clean 的 Make rule 寫在: build/core/cleanbuild.mk clean 的 target 有:
    • dataclean
    • installclean

    installclean: installclean_files := \ ./$(HOST_OUT)/obj/NOTICE_FILES \ ./$(HOST_OUT)/sdk \ ./$(PRODUCT_OUT)/*.img \ ./$(PRODUCT_OUT)/*.txt \ ./$(PRODUCT_OUT)/*.xlb \ ./$(PRODUCT_OUT)/*.zip \ ./$(PRODUCT_OUT)/data \ ./$(PRODUCT_OUT)/obj/lib \ ./$(PRODUCT_OUT)/obj/APPS \ ./$(PRODUCT_OUT)/obj/NOTICE_FILES \ ./$(PRODUCT_OUT)/obj/PACKAGING \ ./$(PRODUCT_OUT)/recovery \ ./$(PRODUCT_OUT)/root \ ./$(PRODUCT_OUT)/symbols/system/lib \ ./$(PRODUCT_OUT)/system
    dataclean: dataclean_files := \ ./$(PRODUCT_OUT)/data/* \ ./$(PRODUCT_OUT)/data-qemu/* \ ./$(PRODUCT_OUT)/userdata-qemu.img installclean 的 showcommands log: 另外在 main.mk 也有 clean target
    • clean
    • clobber
    clean dirs_to_clean := \ $(PRODUCT_OUT) \ $(TARGET_COMMON_OUT_ROOT) \ $(HOST_OUT) \ $(HOST_COMMON_OUT_ROOT)
    clobber rm -rf $(OUT_DIR) 所以最可怕的是 clobber 吧..
    關於以上用到的目錄變數: OUT_DIR := out PRODUCT_OUT := out/target/
    Android 的說明文件 說 If you build one flavor and then want to build another, you should run "make installclean" between the two makes to guarantee that you don't pick up files installed by the previous flavor. "make clean" will also suffice, but it takes a lot longer. 還有列出上面的 clean target:
    • clean-$(LOCAL_MODULE) and clean-$(LOCAL_PACKAGE_NAME) - Let you selectively clean one target. For example, you can type make clean-libutils and it will delete libutils.so and all of the intermediate files, or you can type make clean-Home and it will clean just the Home app.
    • clean - make clean deletes all of the output and intermediate files for this configuration. This is the same as rm -rf out//
    • clobber - make clobber deletes all of the output and intermediate files for all configurations. This is the same as rm -rf out/.
    • dataclean - make dataclean deletes contents of the data directory inside the current combo directory. This is especially useful on the simulator and emulator, where the persistent data remains present between builds.

    2010年11月19日 星期五

    iMX51 : uboot env variable location

    這個 iMX51 的 SD bootloader 把 environment variable 放在.. 768K 的地方,大小是 128K
    ref : uboot參數 - 強人狗夫叔叔提供
    所以要backup uboot env variable: $dd if=/dev/sdc of=ubootarg.bin bs=128k skip=6 count=1
    要 restore: $dd if=ubootargs.bin of=/dev/sdc bs=128k seek=6

    Worklog - 2G SD partition Tables for Android

    1G 的 partition 安排
    • mbr+uboot+uImage+uramdisk : 10M
    • 1 Primary : VFAT for general data (1G-510M = 490M) - 所以pre alloc 500M
    • 2 Primary : EXT4 /system (200M)
    • 3 Extended (total 200M)
      • 5 Extended : EXT4 /data (100M)
      • 6 Extended : EXT4 /cache (100M)
    • 4 Primary : EXT4 for recovery (100M)

    Worklog - LCD panel OK

    其實 L 先生的參數原來就是對的,不能顯示的原因是 kernel 和 Android Service。
    • 使用8.1 uboot , kernel fail 的原因: mem 實際上沒有 256M ,扣掉 GPU 的區域,只剩下 170M
    • Audio Codec 更換,但是 Android AudioHardware 還是會使用,導致 fail : 改用 GENERIC_AUDIO (Software Andio Interface Stub) 讓他 pass
      ref : Software Audio Driver Interface Stub
    大概就是這兩個。 (其他的修改都沒有關係) 目前最大的問題應該是 SD Card read/write 不穩定。

    2010年11月18日 星期四

    Linux Lcd Panel Sync Parameter

    設定 framebuffer 的 timeing parameter 的 structure: include/linux/fb.h struct fb_videomode { const char *name; /* optional */ u32 refresh; /* optional */ u32 xres; u32 yres; u32 pixclock; u32 left_margin; u32 right_margin; u32 upper_margin; u32 lower_margin; u32 hsync_len; u32 vsync_len; u32 sync; u32 vmode; u32 flag; };好像沒有提到 "單位",是 dot clock , time 還是 scanline ? 這些parameter 的意義可以參考: Lcd Controller Timing Parameters 根據 L 先生的參數: + /* 800x480 @ 58 Hz , pixel clk @ 32MHz */ "PVI-2003A-WVGA", 58, // refresh 800, // x res 480, // y res 31250, // pixclock 86, // left margin 42, // right margin 33, // upper margin 10, // lower margin 128, // hync len 2, // vsync len FB_SYNC_CLK_LAT_FALL | FB_SYNC_EXT, FB_VMODE_NONINTERLACED, 0,}, 每個的單位都不一樣:
    • left, right margine 和 hsync len 的單位是 pixle clock
    • upper. lower 和 vsync len的單位是 horizontal scanline
    當完全設定正確的時候 frame rate (e.g 57Hz ?) 就會正確。 這個 data 宣告在 LCD 設定正確後,power up sequence 也要正確。 ref : Lcd Power Up Sequence - 但是每一個 panel 的 power up sequence 不一定一樣。

    2010年11月17日 星期三

    Software Audio Driver Interface Stub,,

    參考這個 : Android Build System 要是變更了 BoardConfig.mk,好像要.. make installclean 再作 make 否則好像沒效,BoardConfig.mk的修改不會進去.. .. 這樣更慘,有些 bin/ 下的 tool 不會重 build XD. 所以還是乖乖用 find 找出有用到的 module,一一touch 後再 mm ? Cleanup 好像是 m clean 如果要 clean 所有 build 出來的 binary 檔: m clobber ... 他說這個 command 就是把 out 這個 folder 刪掉 >_<
    Audio 是在 framework/base/libs Android 有提供一個 AudioStub,讓 Hardware 的 Audio 還沒好的時候,可以用這個Stub 提供 Audio 需要的 Interface。 要使用這個 Stub,需要在 BoardConfig.mk 裡 Enabel BOARD_USES_GENERIC_AUDIO := true 這樣 framework/base/libs/audioflinger 的 Android.mk 就會 define. ifeq ($(strip $(BOARD_USES_GENERIC_AUDIO)),true) LOCAL_CFLAGS += -DGENERIC_AUDIO 這樣在 AudioHardwareInterface.cpp .. AudioHardwareInterface* AudioHardwareInterface::create() { AudioHardwareInterface* hw = 0; char value[PROPERTY_VALUE_MAX]; #ifdef GENERIC_AUDIO hw = new AudioHardwareGeneric(); #else 還有 AudioPolicyService.cpp .. AudioPolicyService::AudioPolicyService() : BnAudioPolicyService() , mpPolicyManager(NULL) { char value[PROPERTY_VALUE_MAX]; // start tone playback thread mTonePlaybackThread = new AudioCommandThread(String8("")); // start audio commands thread mAudioCommandThread = new AudioCommandThread(String8("ApmCommandThread")); #if (defined GENERIC_AUDIO) || (defined AUDIO_POLICY_TEST) mpPolicyManager = new AudioPolicyManagerBase(this); LOGV("build for GENERIC_AUDIO - using generic audio policy"); #else 改完build 還是會有一堆問題...例如...用 showcommands 看 GENERIC_AUDIO 好像沒 define.. 最後好像是 touch 所有的 audioglinger/ 下的 file 再重 build 才看到。
    實際使用時,因為這次 AudioCodec hardware 還沒 ready,所以一旦access 到 codec 就會 down 機。 上面的 code 還是會 access 到 codec,所以要稍微修改一下,不嘗試 new AudioHardwareGeneric(),直接 new AudioHardwareStub( ): AudioHardwareInterface* AudioHardwareInterface::create() { /* * FIXME: This code needs to instantiate the correct audio device * interface. For now - we use compile-time switches. */ AudioHardwareInterface* hw = 0; char value[PROPERTY_VALUE_MAX]; #if 0 #ifdef GENERIC_AUDIO hw = new AudioHardwareGeneric(); #else // if running in emulation - use the emulator driver if (property_get("ro.kernel.qemu", value, 0)) { LOGD("Running in emulation - using generic audio driver"); hw = new AudioHardwareGeneric(); } else { LOGV("Creating Vendor Specific AudioHardware"); hw = createAudioHardware(); } #endif if (hw->initCheck() != NO_ERROR) { LOGW("Using stubbed audio hardware. No sound will be produced."); delete hw; hw = new AudioHardwareStub(); } #else hw = new AudioHardwareStub(); LOGW("Using stubbed audio hardware. No sound will be produced."); #endif // if 0
    好像是因為 GENERIC_AUDIO 沒有 A2DP 的 support,所以也要把 bluetooth 的 A2DP profile disable.

    2010年11月16日 星期二

    Android : enable init log print out

    android 的 init (system/core/init) 的 message (ERROR, INFO..) 是不是要 print 到 console,可以用 init.rc 的 loglevel 3 來控制,參考 system/core/init/init.h: #define ERROR(x...) log_write(3, "<3>init: " x) #define NOTICE(x...) log_write(5, "<5>init: " x) #define INFO(x...) log_write(6, "<6>init: " x) #define LOG_DEFAULT_LEVEL 8 /* messages <= this level are logged */ 把 init.rc 的 loglevel 設為 6,所有message都會丟出來(連 kernel 的 debug messasge 也會印出來)。
    直接去 out/target/product/.../root 改,修改完可以參考 makebootfs 重做 ramdisk.img

    2010年11月15日 星期一

    Tell Hardware Time is Local Time

    每次 server 都把 hardware clock 的時間當做 Universal Time,然後再轉 Local Time,所以都不對。 要告訴 Server, 現在 hardware clock 的時間就是 Local Timer,不是 Universal Time。 要修改: /etc/defaults/rcS 有一行: UTC=yes 改為 UTC=no

    repo in android source

    repo 是一個 python script。
    repo 本體只有一些基本的command,

    但是會靠 repo folder 下, .repo/repo 下的 py file 來擴充..
    可以看 .repo/repo/main.py

    這個 folder 還有說明檔,說明 manifest.xml 的語法
    .repo/repo/docs/manifest-format.txt

    ToDo Today

    • check gpio - 與 demoboard 不同處
    • 要modify code了,要作 version control 和 team work
    • centrialize git server -- 似乎有點難,用 各 member 提供 patch 的方式?
    • 各 member 自己作 local git repo control,最後提供一個 patch 到 integrator。
    • integrator apply 所有 member 的 patch,, commit 到 main git repo --- integrator 會作死
    • 各 team member 間 public repo 出來,integrator 一一 pull 回來,commit 到 main server
    • 各 team member 自己 push 到main git server,發出訊息請大家各自 pull 回來 ... 所有人要會做 push - pull,center git server 也要先 setup 好。
    麻煩的是 ... 不單純是 git,是 repo... follow 一下google的 repo workflow 說明好了。

    2010年11月11日 星期四

    git: 使用 ssh:// 作 remote repository 的 protocol

    要裝 gitosis 好像很麻煩,
    看到 這一篇
    (http://plog.longwin.com.tw/my_note-unix/2009/05/08/build-git-env-over-ssh-2009 ) 可以直接用 ssh:// 作 access 的 protocol。

    所以是,..對該 folder 有 access 權限的人都可以 remote push.. pull ?

    git : work with diff, patch

    在一般的開發過程。如果不想commite,但是又想留住目前的code。 可以直接將 git diff 的結果存起來。 $git diff > mystage.patch 然後 checkout 一次 --- 回到上次 commite 的狀態: $git checkout -f 做完 git 的操作 (branch..checkout.. ect),再 patch 回去。 $patch -p1 < ./mystage.patch

    2010年11月9日 星期二

    device print in kernel

    kernel, driver 有一堆 DBG( ...)。\
    實際上是: #define DRIVER_NAME "mydriver" #define DBG(f, x...) \ pr_debug(DRIVER_NAME " [%s()]: " f, __func__, ## x)
    呼叫 pr_debug。

    pr_debug 又定義在: include/linux/kernel.h
    #if defined(DEBUG)
    #define pr_debug(fmt, ...) \
    printk(KERN_DEBUG pr_fmt(fmt), ##__VA_ARGS__)
    #elif defined(CONFIG_DYNAMIC_DEBUG)
    /* dynamic_pr_debug() uses pr_fmt() internally so we don't need it here */
    #define pr_debug(fmt, ...) do { \
    dynamic_pr_debug(fmt, ##__VA_ARGS__); \
    } while (0)
    #else
    #define pr_debug(fmt, ...) \
    ({ if (0) printk(KERN_DEBUG pr_fmt(fmt), ##__VA_ARGS__); 0; })
    #endif
    也就是說,要有 define DEBUG 或是 CONFIG_DYNAMIC_DEBUG 才會有效果。
    還有 pr_debug 好像要 loglevel 設 8 才會直接 output 到 console.
    device driver 都用 dev_err, dev_dbg 作 print 輸出。
    定義在 include/linux/device.h
    #if defined(DEBUG) #define dev_dbg(dev, format, arg...) \ dev_printk(KERN_DEBUG , dev , format , ## arg) #elif defined(CONFIG_DYNAMIC_DEBUG) #define dev_dbg(dev, format, ...) do { \ dynamic_dev_dbg(dev, format, ##__VA_ARGS__); \ } while (0) #else ...
    其中 dev_dbg 定義是:
    #define dev_printk(level, dev, format, arg...) \ printk(level "%s %s: " format , dev_driver_string(dev) , \ dev_name(dev) , ## arg)
    所以只要 有 define DEBUG,dev_dbg 就是 printk 加一堆 device driver name..

    但是好像不是所有的 driver Makefile 都有 DEBUG option,沒有的可能要自己加..
    在對應driver 的 Makefile 最後,加上:
    EXTRA_CFLAGS += -DDEBUG
    但是 Makefile 好像沒有在 master Makefile 的 dependentenct check 裡,所以要自己 touch source code 再 make

    這樣所有 dev_XXX 的 message 都會log起來,可以用 dmesg 印出來,但ˋ是只有 level 小於 loglevel 的 message 才會realtime印出console。

    一般 (android) loglevel 是 3,設為 8 好像就可以把所有 message 都 realtime印出來。
    ref : Enable log print out
    kerenl 定義這些 run level 和 KERN_INFO, KERN_DEBUG 的地方是: linux/kernel.h
    #define KERN_EMERG "<0>" /* system is unusable */ #define KERN_ALERT "<1>" /* action must be taken immediately */ #define KERN_CRIT "<2>" /* critical conditions */ #define KERN_ERR "<3>" /* error conditions */ #define KERN_WARNING "<4>" /* warning conditions */ #define KERN_NOTICE "<5>" /* normal but significant condition */ #define KERN_INFO "<6>" /* informational */ #define KERN_DEBUG "<7>" /* debug-level messages */
    決定 要不要從console 輸出是在 kernel/printk.c
    /* printk's without a loglevel use this.. */ #define DEFAULT_MESSAGE_LOGLEVEL 4 /* KERN_WARNING */ /* We show everything that is MORE important than this.. */ #define MINIMUM_CONSOLE_LOGLEVEL 1 /* Minimum loglevel we let people use */ #define DEFAULT_CONSOLE_LOGLEVEL 7 /* anything MORE serious than KERN_DEBUG */ DECLARE_WAIT_QUEUE_HEAD(log_wait); int console_printk[4] = { DEFAULT_CONSOLE_LOGLEVEL, /* console_loglevel */ DEFAULT_MESSAGE_LOGLEVEL, /* default_message_loglevel */ MINIMUM_CONSOLE_LOGLEVEL, /* minimum_console_loglevel */ DEFAULT_CONSOLE_LOGLEVEL, /* default_console_loglevel */ }; 系統起來後,可以在
    proc/sys/kernel/printk 裡看到這四個值 (cat 出來就可以)


    好像有些 driver 用 DBG, 有些用 pr_debug,有些又用 dev_dbg..沒有統一。
    kernel developer 好像有定一個rule,並且加入了 dynamic_debug 的功能:
    http://lwn.net/Articles/286191/ 好像是說,follow rule使用 pr_debug, dev_dbg 印 message 的 module,只要 define support dynamic_message,在 load module 時就會被 list 在 /sys/kernel/debug 這樣就可以動態 enable/disable 這些 module print message

    2010年11月8日 星期一

    arch/arm/mach-xx 的 board.c 宣告
    MACHINE_START(BOARD_NAME,"bord name")
    .fixup = fixup_board,
    .map_io = board_map_io,
    .init_irq = board_init_irq,
    .init_machine = mxc_board_init,
    .timer = &mxc_timer,
    MACHINE_END
    
    這個 MACRO 定義在 arch/arm/include/asm/mach/arch.h
    ##define MACHINE_START(_type,_name)                      \
    static const struct machine_desc __mach_desc_##_type    \
    __used                                                 \
    __attribute__((__section__(".arch.info.init"))) = {    \
           .nr             = MACH_TYPE_##_type,            \
           .name           = _name,
    
    #define MACHINE_END                             \
    };
    

    arch/arm/kernel/setup.c -- void _init setup_arch(char *cmdline_p) init/main.c: -- asmlinkage void _init start_kernel(void)
    asmlinkage void __init start_kernel(void)
    {
            char * command_line;
            extern struct kernel_param __start___param[], __stop___param[];
    
            smp_setup_processor_id();
    
            lockdep_init();
            debug_objects_early_init();
    
            boot_init_stack_canary();
    
            cgroup_init_early();
    
            local_irq_disable();
            early_boot_irqs_off();
            early_init_irq_lock_class();
    
            lock_kernel();
            tick_init();
            boot_cpu_init();
            page_address_init();
            printk(KERN_NOTICE "%s", linux_banner);
            setup_arch(&command_line);
    

    在 init/main.c 的 do_early_param(char *param,char *val):
    {
            struct obs_kernel_param *p;
    
            for (p = __setup_start; p < __setup_end; p++) {
                    if ((p->early && strcmp(param, p->str) == 0) ||
                        (strcmp(param, "console") == 0 &&
                         strcmp(p->str, "earlycon") == 0)
                    ) {
                            if (p->setup_func(val) != 0)
                                    printk(KERN_WARNING
                                           "Malformed early option '%s'\n", param);
                    }
            }
            /* We accept everything at this stage. */
            return 0;
    }
    
    參考 __setup_start, __setup_end, 這宣告/tag 在 lds 中。 配合 include/asm-generic/vmlinux.lds.h :
    #define INIT_SETUP(initsetup_align)                                     \
                    . = ALIGN(initsetup_align);                             \
                    VMLINUX_SYMBOL(__setup_start) = .;                      \
                    *(.init.setup)                                          \
                    VMLINUX_SYMBOL(__setup_end) = .;
    
    
    還有在 arch/arm/kernel/vmlinux.lds 中
      __setup_start = .;
       *(.init.setup)
      __setup_end = .;
     
    所以

    2010年11月3日 星期三

    最後一定要將 ESDSCR 清為 0x00000000,否則DRAM不能動作。 sd klkl klkl 很奇怪 為什麼 會這樣 再來一下 ok

    測試一下新版編輯器

    可以處理大小符號了嗎?
    <
    <
    太奇怪
    中文換行有點問題

    boot fail.

    糟糕,沒辦法開機。所以
    • 雖然是 SD boot,但是boot rom 還是會先 initial DRAM ,所以先 check 一下 DRAM 的 clock是不是正確
    • Boot SD 的 pull-high 都有依照EVBoard 接嗎?
    用 realview 看看.....

    2010年11月2日 星期二

    notes - mDDR config/timing

    GPIO MUX Regisgter Definition is in In Appendix A

    8a0 : bit 9 = 1 DDR2 Input
    50c/510 : control signal hystersis, slew rate..
    83c/848 : drive strength
    4b8 : SDCLK setting (pull up/down, drive strength, slew rate)
    4bc/4c0/4c4/4c8 : SDQS(0.1.2.3) setting (hystersis, pull up/down, driver strength, slew rate)
    820 : D0-D31 pull up enable
    4a4 : RAS (drive strength, slew rate)
    4a8 : CAS (drive strength, slew rate)
    4ac : SDWE (pull up/down, drive strength, slew rate)
    4b0/4b4 : SDCKE(0.1) (pull up/down, drive strength, slew rate)
    82c : D24-D31 drive strength
    8a4 :D0-D7 drive strength
    8ac : D8-D15 drive strength
    8b8 : D16-D23 drive strength

    SDRAM/DDR Control in DataSheet Chap 30
    ref my ddr timeing notes

    ESDCTL0/1 :

    8
    • 31 SDE =1
    • 30-28 refresh cycle = 0 (disabled)
    3
    • 27 reserved = 0
    • 26-24 row address width = 011 (14 Row Address)
    A
    • 23 double the RFC setting = 1
    • 22 reserved = 0
    • 21-20 Colume Address Width = 10 (10 bit)
    2
    • 19-18 reserved = 00
    • 17-16 Data Width = 10 (32 bit)
    0
    • 15 self refresh timer = 0
    • 14 self refresh timer = 0
    • 13 power down timer = 0
    • 12 power down timer = 0
    000
    • 11-0 reserved
    ESDMISC

    0
    • 31 CS0_RDY = 0 (?) page 808
    • 30 CS1_RDY = 0
    • 29 ODT_IDLE_ON (On Die Terminator) = 0
    • 28 SDCLK EXT = 0
    0
    • 27 termination resistor (DQS3 DQ31-24) terminator select (No termination) = 0
    • 26 termination resistor (DQS3 DQ31-24) terminator select (No termination) = 0
    • 25 termination resistor (DQS2 DQ23-16) terminator select (No termination) = 0
    • 24 termination resistor (DQS2 dQ23-16) terminator select (No termination) = 0
    0
    • 23 termination resistor (DQS1
    • 22
    • 21 termination resistor (DQS0
    • 20
    A (for JEDEC compliant)
    • 19 auto precharge AP bit
    • 18 -
    • 17 -
    • 16 -
    0
    • 15 DIFF_DQS_EN, Differential DQS disabled = 0 (確認 mDDR 只有 CLK 是 differential)
    • 14 AUTO_DLL_PAUSE = 0 (this mDDR doesn't need this - list on the cover page)
    • 13 ODT_EN = 0 (確認 這個 mDDR 沒有 ODT)
    • 12 BI_ON (Bank Interleaving ) = ? (mDDR datasheet 有,但是不確定要不要用)
    0
    • 11 FRC_MSR (measurement ?) = 0
    • 10 MIF3 mechanism = 0
    • 9 MIF3 mechanism = 0
    • 8 Read Additional Latency (disabled) = 0
    0
    • 7 Read Additional Latency (disabled) = 0
    • 6 DDR2_8_Bank = 0 (這個 mDDR 是 4 bank)
    • 5 Latency Hiding Disable for read = ? (要確認 mDDR 需不需要)
    • 4 DDR2_EN = 0 (Not DDR2 device)
    0
    • 3 DDR_EN = 0 (both DDR2_EN & DDR_EN = 0 , will be in mDDR Mode)
    • 2 reserved = 0
    • 1 RST , software reset = 0
    • 0 reserved = 0
    ESDCFG0/1

    Working on 200MHz, 1 clk = 5nS

    • 31-28 tRFC (120nS =24 clk) = 1110
    • 27-24 tXSR (120nS = 24clk) = 0000
    • 23-21 tXP (no data, set to max) = 111
    • 20 tWTR (no data, set to max) = 1
    • 19-18 tRP (18nS = 4clk) = 10
    • 17-16 tMRD (2tCK =12nSx2 =24nS = 5 CLK, use 4) = 11
    • 15-12 tRAS (42nS = 9clk) = 1000
    • 11-10 tRRD (12ns = 3clk) = 10
    • 9-8 reserved = 00
    • 7 tWR (12nS = 3clk) = 1
    • 6-4 tRCD (18ns = 4clk) = 11
    • 3-0 tRC (60nS = 12clk) = 1010
    Mode Register Set (MRS)

    對應的是 SDRAM Special Command Register (p30-34)
    ref my SDRAM Mode Register Notes

    from mDDR DataSheet.

    Mode Register Set 的內容:
    • A6-A4 : CAS Latency
    • A3 - Brust Type
    • A2-A0 : Burst Length
    controller 的 Load Mode Register :
    • bit 30-16 : 對應 A14-A0
    • bit 5-3 : CMD - 要作的事 - 011 - Load Mode Register
    DataSheet 的 example 是:
    • 04008008 -- precharge
    • 00008010 -- refresh
    • 00338018 -- Load Mode Register -- CAS = 3, BL=2 (Burst Length=8), Burst Type = sequential
    • 0020801A -- Extend Mode Register - half strength, Full Refresh

    標籤

    網誌存檔